

Fujifilm X10: Ten years on, can it still compete with modern compact cameras?
The Fujifilm X10 is a 10-year-old high-end compact camera that still has everything a garden photographer needs to capture beautiful garden images.

The Fujifilm X10 captured this model at a glower display at a local public garden. The colours of flowers are lovely as are the skin tones of the model. This hand held shot was taken at ISO 800. 1/110th sec, at f2.8.
Camera review 10 years of use in the street and in the garden: Sample pictures
Back in 2012, I decided to simplify my photographic life and purchase a Fujifilm X10 high-end compact camera.
To this day it continues to be an important part of my photographic arsenal and a camera that is often beside me in the early morning when I’m out in the garden. Fuji’s X10 is really the ultimate street photography camera, portrait and travel camera, but many of the same qualities that make it a great shooter for street photography and portraiture also make it ideal for garden photography.
There is something inherently satisfying about the feel of it in my hand; the smoothness of its mechanical zoom ring and the click of the shutter when I find a subject that piques my interest. But what most Fujifilm fanatics will tell you is that the camera’s multiple film simulations provide the ultimate in creative possibilities. More on Fuji’s brilliant film simulations later in this article.
The small rubber thumb grip and the perfect weight in your hand reminds you that this is no cheap compact camera.
And it wasn’t cheap. In fact, despite its age, it continues to hold much of it’s value on the used market. There is a reason for that and it has to do with the build quality of the camera and the fact it has developed somewhat of a cult following in the world of Fuji lovers.
If you are considering upgrading your camera equipment whether it’s a new camera body or new lenses, consider checking out what KEH Camera Exchange has to offer. Their equipment is all fairly rated so you can rest easy knowing that you are getting exactly what you are paying for in your used cameras and lenses purchases.

An afternoon with this chipmunk and fun setup in the garden resulted in this adorable image. The colours and sharpness of the images is a tribute to Fuji’s fine 28-112mm lens and the 12 megapixel, '2/3" type' CMOS sensor.
Be sure to check out my comprehensive article on Getting the Most out of Your Compact Camera.
For more images from the Fujifilm X10 please check out my Fujifilm X10 gallery.

The 10-year-old Fujifilm X10 is an excellent camera for street photography and just as good for capturing the activity in the garden.
“My goal is to show gardeners what they can expect if they purchase a used, decade-old Fujifilm X10 or even a similar high-end compact camera from that era.”
Who is the market for the Fuji X10?
I think the Fuji marketing team had me in mind when they designed the camera. Back in 2011, Fuji marketers set out to design a camera meant to bridge those of us looking for a digital compact camera that retained the feel and features we enjoyed in our traditional film cameras.
As the highly respected dPreview website wrote back in July of 2012 when the camera was introduced: “Its retro design aesthetic bears the DNA of the company’s X100 and X-Pro1 models with a magnesium alloy body, sleek rangefinder-inspired design and a wealth of external dials and buttons.”

This image was made using the extract colour feature in the Fujifilm. Red was the chosen extracted colour to emphasize the single colour used in the display.

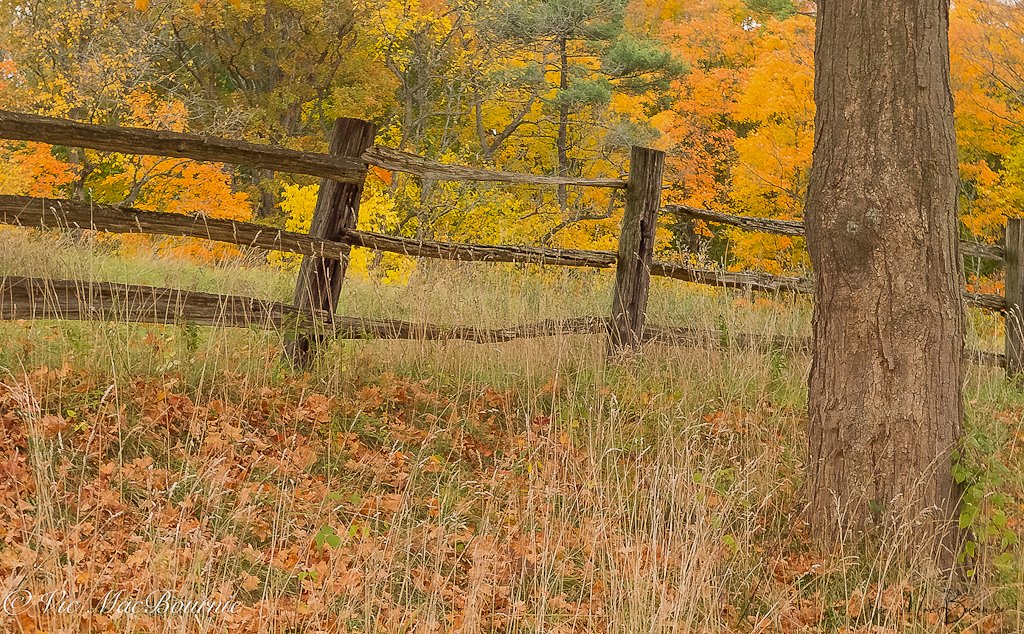
The Velvia setting in the Fujifilm X10 helped to make the colours in this scene pop, to say the least. ISO 200, f2.5, 1/140 sec.
And, if you are wondering how a point-and-shoot digital camera that’s more than 10 years old can perform in the garden, be sure to check out my post on the Canon PowerShot Elph 500 HS.
In fact, one of the features that drew me to this camera in the first place was the quality of the dials. All steel, all with an extremely satisfying click with each turn. The under/over exposure wheel is exquisite. To be honest, the entire camera reminded me of one of my all-time favourite cameras – the renowned Pentax 35mm LX film camera of which I owned many over the years.

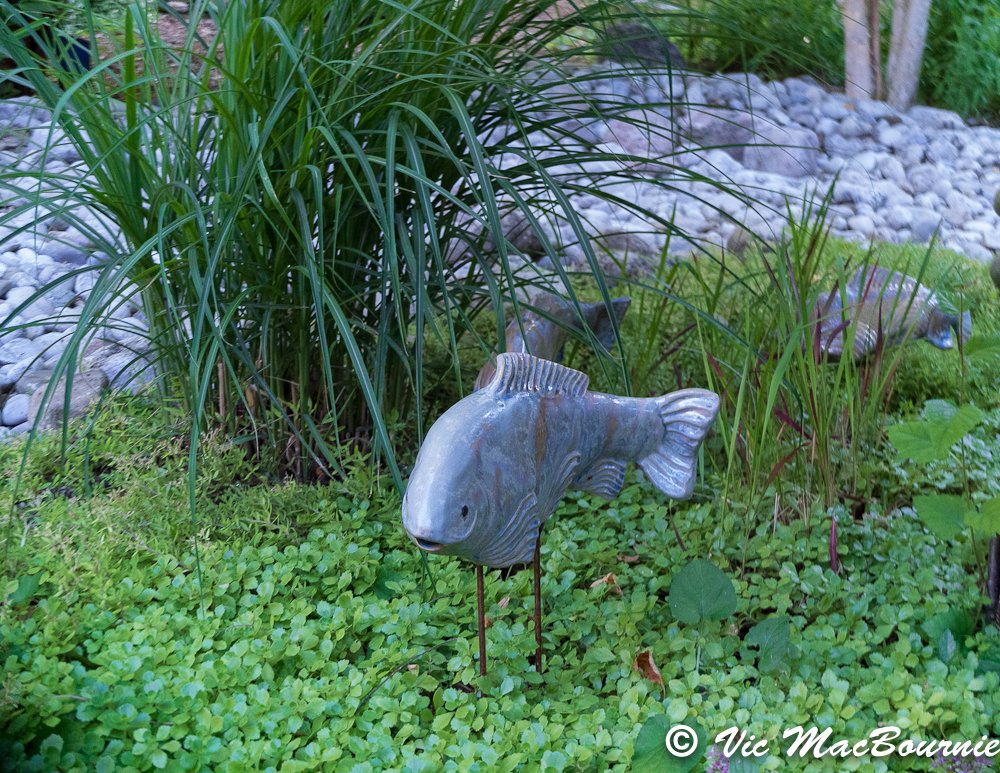
Is it possible to capture garden wildlife images with the 28-112mm lens and the FujifilmX10. This sample image helps to answer the question. It was shot from a Tragopan photo blind on my homemade reflection pond. Wildlife images are possible even with a compact camera and a little planning.
Can the Fujifilm X10 be used to capture wildlife images?
Fujifilm’s 28-112mm lens is really not long enough to capture wildlife images, but with a little thought and a little more work, it’s possible to make solid garden wildlife images as the sample image of the chipmunk above illustrates.
You either need to befriend the animals or birds so that they allow a close approach, or use a blind to get in closer than usual.
The good thing about garden photography is that most of the animals in the garden recognize you as a friends rather than a threat and some will allow a close approach. Some effort on your part to befriend backyard wildlife will go a long way. In the above image of the chipmunk, I used a Tragopan photographic blind to help get in very close.
In fact, I was maybe 3 feet from my homemade reflection pond. Add a few peanuts to the scene and there’s a good chance you’ll get opportunities to catch wildlife.
Still, the Fujifilm X10 does not make catching active wildlife easy. Shutter lag and slow auto focus means that the animal is often gone by the time the photo is taken, but it can be done and done well with some practise.
My first move will always be to grab the DSLR and my 300mm F4.5 lens, but I like the challenge of turning a terrific street shooter and garden photography camera into a wildlife camera/lens.
This series of images shows the intelligent digital zoom in action. The above image is taken with the 112mm optical zoom. The image immediately below shows the above image cropped in Lightroom to approximately 233mm image. The final image shows the intelligent zoom at 233mm. All the images are straight out of the camera.

Cropped to 233mm in Lightroom.

Intelligent zoom image at 233mm.
How to turn on the intelligent digital zoom feature
One feature that makes it easier to capture backyard wildlife is the intelligent zoom feature which increases the range of the lens from 112mm to a whopping 233mm. Granted, it’s digital not optical, but whatever “intelligence” Fuji has used to more than double the lens length certainly works.
Turning on the digital zoom feature can be a little tricky. First off, it only works in jpeg mode and single frame mode. The feature is easily assigned to the tiny function button on top of the camera beside the shutter button.
You can assign Intelligent Digital Zoom to the Fn button by holding the button for 2 seconds, and then selecting the feature.
Once it is assigned, you turn it on by pressing and holding the Fn button again briefly for about a half a second. You will know it is turned on when a sliding zoom scale with a magnifying glass icon appears in the upper left of the LCD screen.
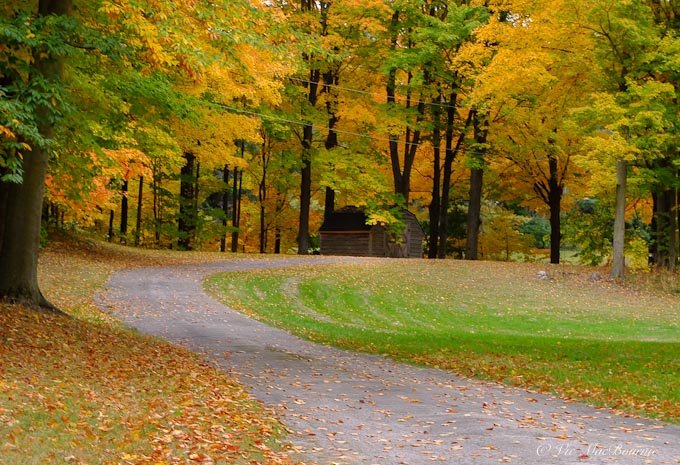
This fall scene was captured on the Fuji X10.
More Great Garden Photography posts
If you are looking for more great Garden photography content, take a few minutes to check out some of my other posts including:
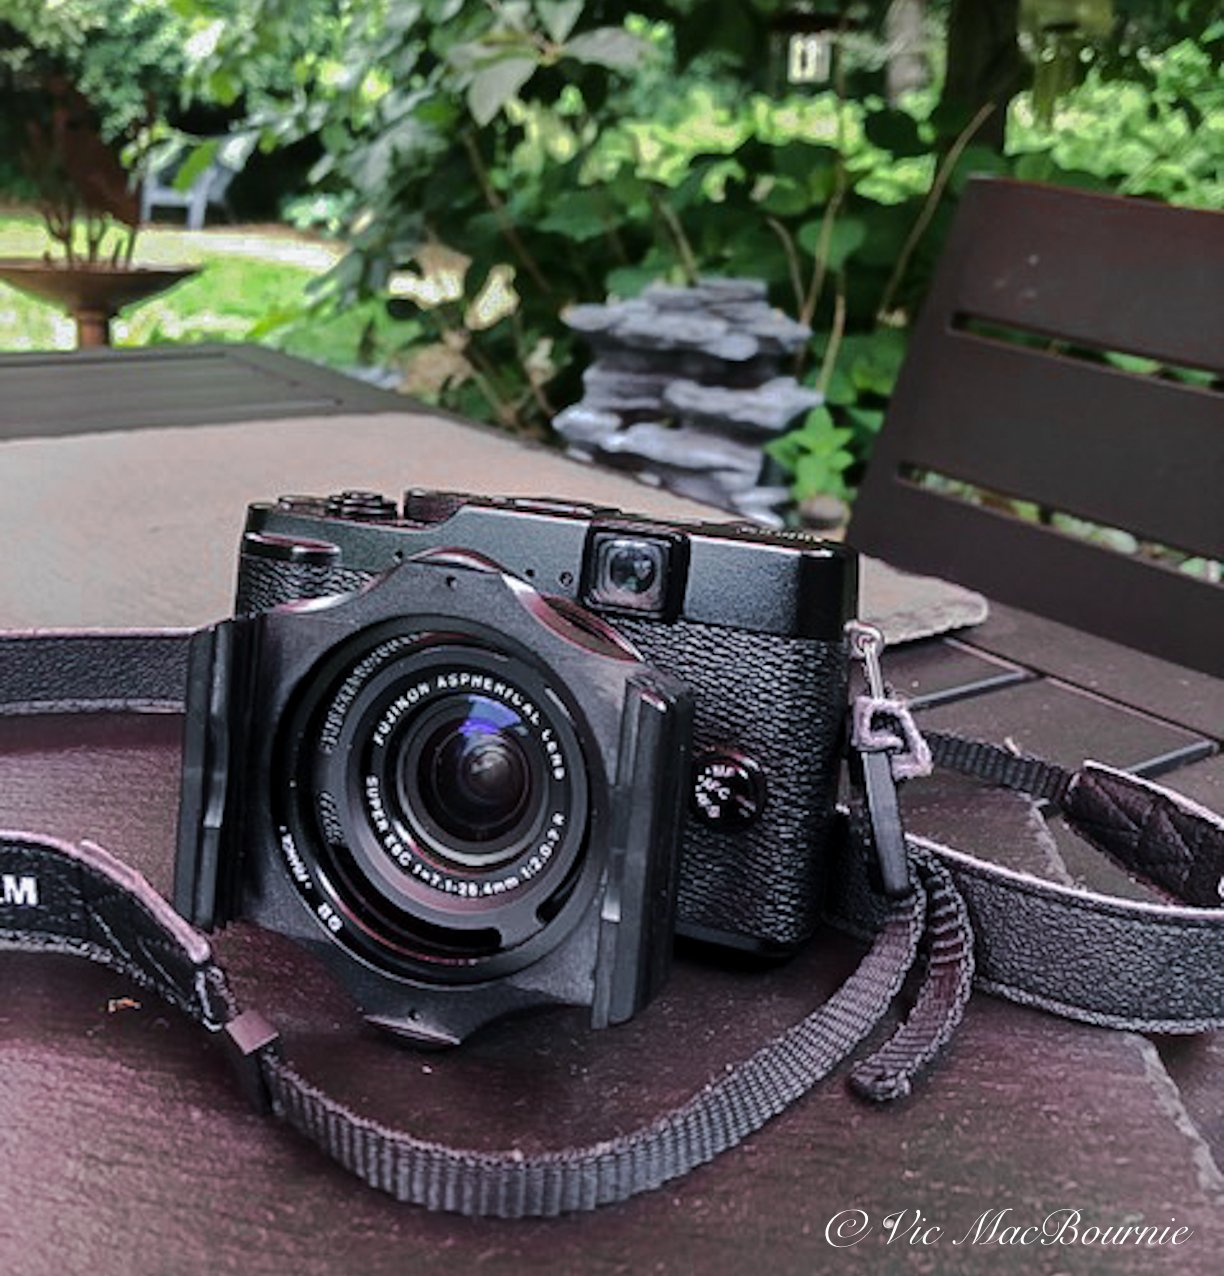
Where was the Fuji X10 made?
It should come as no surprise that the Fujifilm X10 was made in Japan. And, in case you might not have noticed, Fuji proudly stamps “Made in Japan” right in the middle of the back panel where it is impossible to miss.
After my initial purchase, I immediately ordered a lens hood that came with a filter thread that allows me to use 52mm filters, including the all important circular polarizer that removes glare from leaves and other reflections including those in water. In addition to the polarizing filter, I have used a Nikon close-up filter that allows me to use the 112mm focal length in a macro capacity, and a series of Cokin filters that bring even more of an old-school feel to the camera. (For more on Cokin filters, go to the end of this post.)
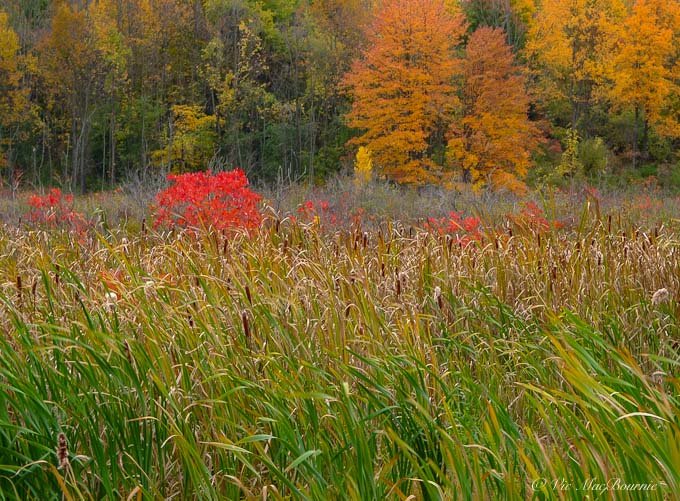
The vivid Fuji colours taken with the Fuji X10 of a wetlands in fall.
All this is great, but can Fujifilm’s X10, with its 12 MP, 2/3-inch type sensor, still compete with today’s modern cameras when it comes to the quality of the photographs and, in particular, when it comes to garden photography? The answer to that question is a resounding yes. However, there are several areas where the camera is showing its age and may not be the ideal choice for every photographer.
In this post, I’ll review the camera ten years after purchasing it brand new. Over the course of one week, I am going to put the camera through its paces in the garden and elsewhere to decide whether it can still hold its own against the competition. Unlike many camera reviews, this is not aimed at photo geeks or pixel peepers. I am including real-life sample images that help provide realistic expectations. My goal is to show gardeners what they can expect if they purchase a used, decade-old Fujifilm X10 or even a similar high-end compact camera from that era. It’ll be a hands on review with lots of example images and still enough geeky camera details to leave you with a solid understanding of the camera and why it’s still being used by thousands of people in the field.

If you ever wondered how sharp the Fujifilm’s X10 lens is capable of being, this critically sharp sample image of a very mobile chipmunk should help answer that question.
Ten years photographing with the X10
After ten years of using the camera – it’s been with me on vacations to Boston, New Orleans, Nova Scotia and two cruises – I have developed an understanding of the camera’s strengths and weaknesses, but I’ve never really explored the full menu of features the camera offers.
It’s just too easy to put the camera on Auto, Program or even Fuji’s unique EXR technology setting and let it do all the work. I’ll admit, setting the camera on auto is what I do most on vacation and I’m not against using these settings in the garden for quick shots. The results are always excellent so why dig deep into the menus on the camera’s 2.8-inch, 460,000 dot LCD screen?
This camera has too much to offer not to dig deep into the menus and maximize the opportunities the camera offers. Too often on auto the camera is set to wide-open aperature, which can give a pleasing background on this outstanding image-stabilized, 28-112mm F2 to 2.8 (35mm equivalent) built-in lens. But, the shallow depth of field can be too easily mistaken for a soft lens if too many of the images are set wide open.
By moving the main control knob to Aperture priority, we can begin to see the real potential of the lens and realize truly sharp images. (see the image of the chipmunk with the peanut in its mouth to appreciate the sharpness of the lens.)

“Okay great,” you say. “What about the images?”
Expect warm vibrant images. Beautifully toned B&W photography, gorgeous soft portrait’s and, most importantly, vibrant flower, garden and nature images. How the heck does Fuji do it?
Fuji X10’s digital film simulations are brilliant
For photographers who still remember the film and transparancy days, Fuji has developed in-camera settings that are digital simulations of their former films – Provia for everyday use, the softness of Astia for portraits and the vibrant colour so many of us nature photographers remember of Velvia for nature. For lovers of B&W photography, Fuji not only gave us a B&W setting, they also gave us Yellow, Green and Red built-in filters to provide dramatic skies, softer skin tones and more contrasty foliage.
All this to say that using these historical films is just too much fun not to go into the menu and dial them in.
Sample images from the Fuji X10
Below is a series of sample images taken in the garden and around my home.


There are also two macro features that let you get absurdly close to let’s say flowers or insects on flowers, multiple drive modes to capture fleeting subjects, “best picture” mode that takes a series of images and helps the photographer pick the best one. There’s a handy feature that takes an image with flash and without flash so that you can compare which is best. In addition, dig into the menu to find the feature that takes a series of images (very quickly) in and out of focus to create a blurred background (bokeh) in an image that never had one.
To get a little more specific, the CMOS sensor means the camera can shoot up to 7 frames-per-second at full resolution, and 10fps at 6MP. The sensor also enables 1080p 30-frames/sec movie shooting. There’s also a panorama mode to capture the entire sweep of your garden.
Can the Fuji X10 shoot RAW?
Add to the list the fact the camera shoots RAW and can process it in camera, and you are left with, even in today’s exacting standards, a camera that is capable of delivering seriously great results in the woodland, on vacation and especially on the street if that is what you enjoy shooting when you’re not photographing your garden.
All this seems just too good in a 10-11-year-old camera.

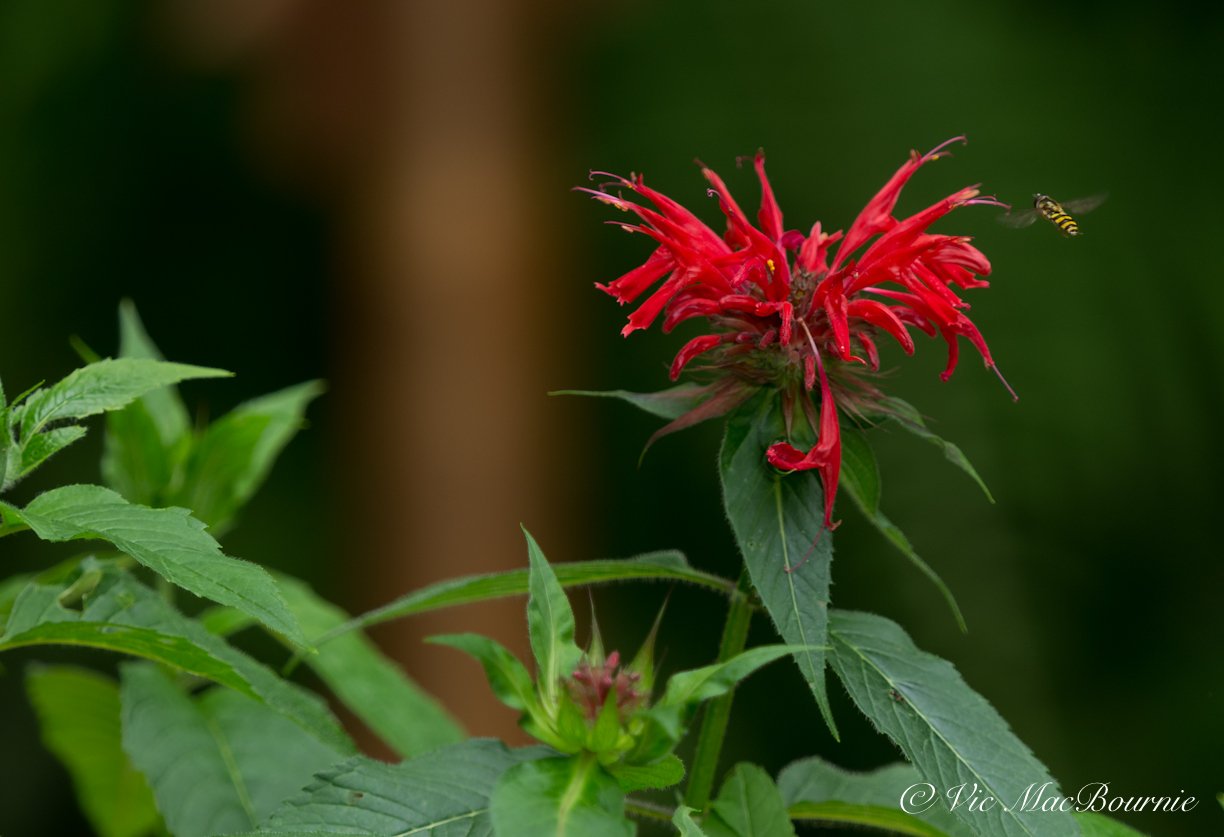
This sample image of a Monarda flower shows the intense colour that can be achieved by the Fujifilm X10 on the Velvia setting.
Fuji X10 28-112mm lens is all a garden photographer needs
A garden photographer really needs a camera/lens to excel in three different areas: wide angle with the ability to capture large vistas, medium telephoto with the ability to move in close to a group or a single flower, shrub, butterfly or even a small mammal or bird, and Macro to move in close or very close to a flower, butterfly or insect in the garden.
The Fujifilm X10 excels in all these categories. The image above of the scarlet Monarda is an example of the camera’s macro features combined with the Velvia film setting to maintain the flower’s vivid colour.
With the macro setting, and a Nikon closeup filter, I was able to capture the chipmunk and roses.
The 28mm (35mm equivalent) at the wide-angle end of the Fuji lens is more than enough to capture wide vistas of a garden bed or interesting section of the garden. It’s also wide enough to accentuate a foreground element, such as a bird bath or colourful grouping of flowers, in the foreground while still including a wide expanse of the garden.
Is the FujiX10 good for portraits?
The moderate telephoto is great for moving in closer to a grouping of flowers, but it really takes its place at the head of the table when it comes to garden portraiture.
Let’s face it, our gardens are the ideal place to capture family members – children, grandchildren and pets – in a natural setting, and a fast 112mm lens is the perfect tool to capture garden portraits.
Fuji obviously recognized this and added additional features to the camera to make portraiture a focus of the camera, the most important being the built-in feature that enables a soft background in images. The camera takes a series of photos and then merges them together to reveal a sharp main image with a lovely soft background. This is important for nice portrait effects, but more difficult to achieve with smaller sensor cameras like the Fuji X10 and other compact or point-and-shoot cameras. The built-in software, handles this issue beautifully in-camera.
The ability to easily dial in the portrait film Astia, which creates beautifully soft skin tones, and excellent bokeh makes the camera a real asset to portrait photographers.
Would I like to go beyond the 112mm magnification? Absolutely. As a wildlife photographer, I am always looking to get more telephoto capacity to get in closer but that’s just me. If you are more of a traditional garden photographer, extreme telephotos are not likely a critical need. In addition, a longer lens would have forced Fuji to make an entirely different camera losing much that has made the Fujifilm X10 the prized camera it has become.
So, is this enough to crown the X10 a gardener’s camera extraordinaire? I think so. But there is more.
More features in the Fujifilm X10
A tiny, built-in flash that actually kicks out enough flash to fill in harsh, mid-day shadows or light up a patch of the garden when the sun is setting.
A hotshoe that allows the photographer to use a mounted or external flash.
A shutter button that can be fired with an old-fashioned cable release.
A panoramic feature for the ultimate in wide angle views of your garden.
A real and useable optical viewfinder for those who hate using the screen on the back of the camera.
The ability to shoot 7 frames-per-second at full resolution, and 10fps at 6MP.
The ability to use 1080p movie shooting.
A solid tripod socket on the camera to assist in getting a sharp image on the camera.
Fujifilm’s X10 in the garden, in the woodlands on the street and at the party
Is the 10-year-old Fuji X10 the perfect camera on the market for garden photography?
Of course not.
Its sensor is small in comparison to many of today’s compact high-end cameras. Its lens, though exceptionally good, lacks the telephoto pull to being able to easily capture small wildlife and fast-moving birds and butterflies in the garden. Its focus is on the slow side and its ability to take a full range of filters can be a little challenging.
But will you wake up in the morning grab a coffee and head out into the garden with the camera in hand ready to capture everything your garden has to offer?
You bet you will.
Not only will you have it with you, you’ll be fondling the dials and zoom ring like you would the interior of a fine Italian sportscar. And the results will both satisfy you and inspire your photographic aspirations to the point where the pocketable camera will be the only one you take when you go on vacations, out for a day of street photography, on day outings or parties and special occasions.
It’s a camera for gardeners looking to capture their creative vision; for street photographers looking to discreetly capture the spirit of their favourite inner-city; and it’s a camera for parents/grandparents looking to capture the beauty of children and other family members in exquisite portraits.
In other words, the Fujifilm X10 is a camera that will inspire you to be the best you can be, and it’ll do it in style.
New compact point-and-shoot cameras to consider
Fujifilm X100V (Amazon link) (Henry’s link) that looks much like the X10 and handles like a Leica rangefinder.
Olympus Tough TG-6 (Adorama Link)for those who want to take their camera underwater for some real cool shots. Known for its excellent macro capabilities. Amazon Link.
Sony Cyber-shot (Adorama link) DSC-RX100 Vll for those who like the Sony brand Amazon link.
Ricoh GR lllx (Adorama link)for those who like to shoot with a prime lens. Amazon link
Canon Powershot G7 X Mark lll (Adorama link) (Henry’s link)for those looking for a high-end point and shoot that both fits in your pocket but carries a large 1-inch sensor, a fast zoom lens and 4K video at a price under $1000. Amazon link
Cameras that compete with the Fujifilm X10 with 12 megapixel sensors
(Below are B&H Camera links to cameras that are no longer available)
Fujifilm X10 fitted with the Cokin system filter holder.
Cokin filters help bring back the fun factor in photography
In a number of the images in the mini slideshow above, you may have noticed images with a strong yellow/blue cast. These images are the result of using a Cokin Yellow/blue polarizer on the camera. The filter is one of many in the Cokin line of filters that can be effective even in this age of digital manipulation.
Polarizing filters can be critical to getting saturated colours in almost any image, but especially garden images when the sun is reflecting off of leaves. They are also extremely effective when trying to take the glare off of water.
Graduated filters, soft focus filters and other fun filters, if used effectively and sparingly in your photography can add a little fun and an old-school/retro look to your images. Also, although many of the filter effects can now be done digitally with Lightroom or Photoshop, it can take a certain expertise in these programs to make the result look natural. Creating the effects in-camera can be more effective at times and add a fun factor back to your photography.
The Cokin system allows photographers to purchase one filter that can be used on multiple cameras with different filter sizes by simply purchasing an inexpensive step-up ring for your lens. For those cameras that have no ability to add filters, the Cokin system allows the photographer to simply hold the square filter up to the lens to create the effects.
I continue to use Cokin filters in my photography as well as traditional screw-on polarizing filters, and urge readers to consider adding a set to your photographic arsenal.

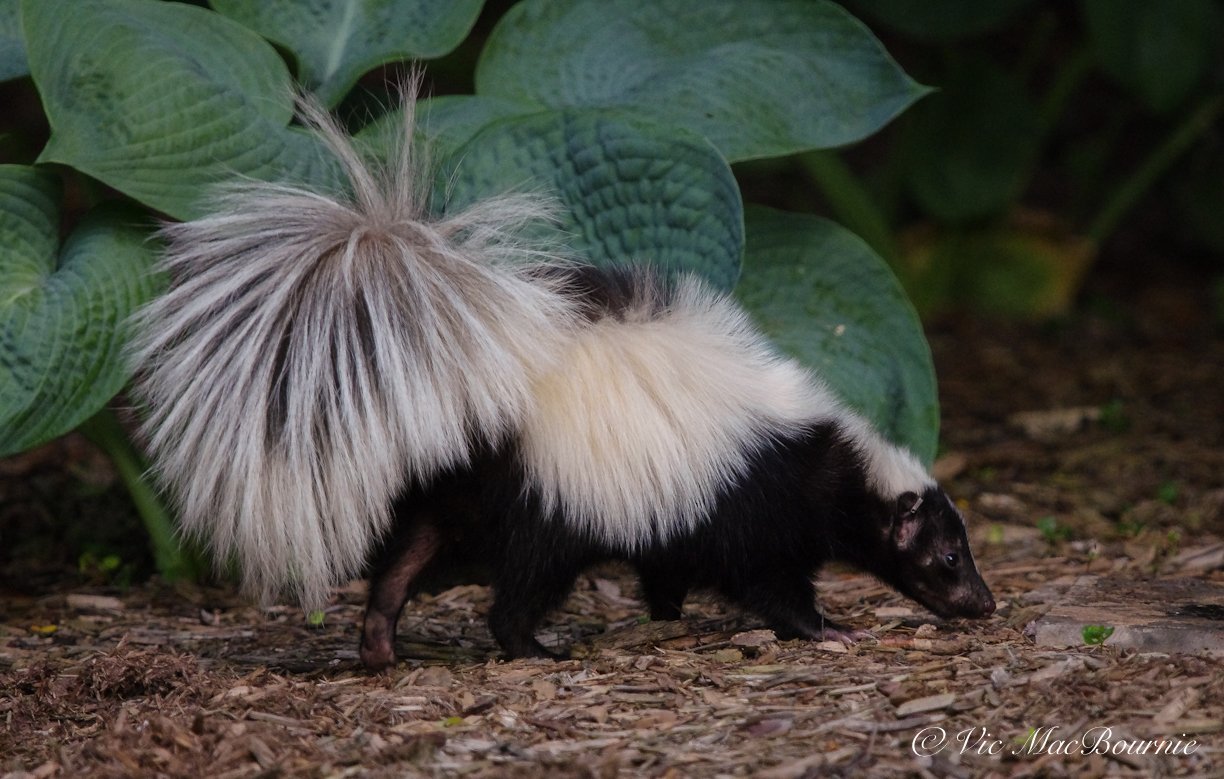
How important are skunks in our gardens?
Skunks are extremely beneficial in our gardens helping to reduce unwanted visitors. These gentle creatures pose no threat to us and are rarely seen accept at night.
An evening of garden photography with a friendly skunk
There is no reason to be afraid of a skunk in your backyard. In fact, skunks are gentle creatures that benefit nature and our environment by controlling insect populations and other unwanted garden visitors particularly the dreaded Japanese beetle, cutworms, hornworms and grubs, along with small rodents like mice and moles.
So, I was thrilled to recently spend some time in the garden and add images of skunks to my collection of garden photography wildlife images.
The negative publicity these animals have to live with struck me the other day when I was sitting in my favourite chair in the garden waiting for the neighbourhood fox to show up. The skunk came in from behind me, (paying no attention to the guy sitting very still in the chair) and proceeded to walk by on her way to another part of the garden. She went unnoticed until I caught the white tail out of the corner of my eye. A beautiful, white fluffy tail carried proudly above her for all to see.
A few weeks earlier the skunk decided to pay me a visit on the patio. I would have let it join me on the patio accept my dog, Holly, was sitting beside me. Thankfully she did not notice the skunk until I quietly asked it to leave the patio with a gentle hand motion and soft, persuasive voice. As soon as it saw me, it moved away just as Holly noticed her. I had my hand on her leash to keep her from going after the skunk. That was another fun adventure but much more stressful with a dog at my side.
There’s no mistaking a skunk for, say, a black squirrel. Although they look similar, they carry themselves quite differently. Unlike the sometimes frenetic pace of black squirrels, skunks move slowly and deliberately, possibly because of their relatively poor eyesight and possibly to let other woodland animals know that they are around.

Our gentle skunk spent the evening with me showing off her beautiful tail and looking for grubs and other insects.
I was lucky enough to spend a few minutes with the skunk as it rooted about the garden not far from me (but far enough.) She did not seem bothered by my camera and flash going off with her every movement. Although I did not hide from her, and was not in my Tragopan blind, she seemed quite happy to go about her business.
Actually, because of her poor eyesight, I’m pretty sure she didn’t even realize I was there, especially considering she was more than happy to make a bee-line directly toward me.
That’s the time our evening photographic adventure came to an abrupt end. When she started moving toward me through the grass where I was sitting, all it took was for me to wave my hand slowly and speak gently to her for the little skunk to realize it might be better for her to head in another direction. She abruptly turned around and waddled off into the ferns to go dig up some more grubs.
It was a great garden photography encounter and one I’ll not soon forget.
What’s my favourite garden photography wildlife lens?
What made the encounter a little more unusual was that there was still plenty of light left in the sky and, although I used the flash at times hoping to create a catch light in the skunk’s little eyes, I much preferred the more natural images taken without flash on my Pentax K5 DSLR fitted with my favourite wildlife lens – the FA300mm F4.5. Originally built for film cameras, the smaller sensor in the K5 gives users an effective 420mm F4.5 focal length. I have a 1.4 converter that I use occasionally to get in even closer.

The white stripe starts on its head, runs the entire length of its body and explodes on its magnificent tail.
Skunks help rid your garden of snakes
Did you know that, much like opossums, skunks are immune to snake venom and are more than happy to rid your garden of poisonous snakes. We don’t have any poisonous snakes where I live so I’d prefer our little skunk keeps mice and voles and other critters in check rather than kill the few snakes I’ve seen in the garden.
Keep skunks safe in your backyard
In our backyards, as long as we do NOT use pesticides, skunks are safe from their biggest cause of death.
Weak eyesight means that skunks’ greatest threat is being hit by cars and trucks while they are trying to cross a road. The evidence is hard not to notice when out for a drive. If you don’t see them lying dead on the road, you certainly smell the results of the collision.
In our garden, it is more likely they will fall victim to a Great Horned Owl who are one of the few birds or animals that see the little stinkers as prey. Turns out Great Horned owls’ lack the sense of smell needed to be repulsed by the odour skunks use as a self defence. That makes them easy, slow moving prey for the owls massive claws.

These fox kits seemed to enjoy playing with the dead skunk more than anything else. The den was situated beside a road so I suspect that it was killed by a car and salvaged my the mother fox for her kits. And yes, it did smell but not too bad.
Do fox consider skunks prey?
I have photographed a dead skunk outside an active fox den (see above) but I suspect that the skunk was a victim of a car rather than the mother fox. In fact, I have watched on our trail camera video of a fox and skunk interacting, and neither was looking for a fight.
Although coyotes, foxes, dogs, bobcats, mountain lions, badgers and big owls are known to eat skunks, few put it anywhere near the top of their list of fine dining.
So I don’t think skunks need to fear a fox or other large predators despite the fact that they will eat them if they find a skunk as road kill.
Are skunks a threat to my family?
Skunks are not a threat to our families. They can be an annoyance for dog owners if a family of skunks decide to build a nest under our deck or shed. If you don’t want them there, ensure that efforts are made to keep them from getting under decks by installing fencing that reaches under the ground and makes it difficult for them to dig under it.
It’s not fair to the animals to move them once they have had their families under your deck. Take steps to encourage them to eventually move on from under the deck (playing music in the area of the den), in the meantime, keep your dog away from the area until the skunks leave. Your dog will survive with daily walks or visits to the local dog park until the skunk family moves on its way.
Skunks can carry rabies, but there is apparently no known deaths caused by contracting rabies from a skunk.
Know when to back off
It’s much more likely you will be sprayed by a skunk rather than bitten by one. It’s important to know, however, that skunks don’t just run around spraying people and dogs at the first chance they get.
The skunk sprays a very strong musk oil from 2 anal glands. Even baby skunks, whose eyes have not yet opened, are capable of spraying in self defence.
Spraying is, however, the last thing skunks want to resort to in self defence because, once they use all their spray, they are left completely defenceless for up to ten days – the length of time it takes for the skunk to replace the musk.
Well before a skunk sprays, it will give you a warning to back off. First it stomps its feet on the ground and hisses making it clear it is very uncomfortable with your presence. It will make their bodies in a u-shape before aiming its anal glands at its unfortunate victim. That’s a good time to gently and slowly back off making it clear that you are no threat.
Why did I get sprayed by a skunk?
People are most often sprayed when they surprise a skunk in very close proximity and don’t have time to assure it that you are no threat. It’s a good idea to always expect a skunk as evening sets upon us. Keep an eye out for them when stepping outdoor into your garden and avoid sudden movements that might be mistaken as a threat. If you are with your dog, be sure to keep it on at SHORT LEASE rather than a retractible one that is best left for walks during daylight hours.
Are there different varieties of skunks?
There are actually 12 different species of skunks but not all of them live in North America. Skunks can also be found in South America, Indonesia and the Philippines.
Striped skunks: Most of us are familiar with the cat-sized striped skunk with the white stripe down the middle stretching through its long black tail. They are the ones at home in the woodland as well as in suburban areas.
Spotted skunks: have three white spots on their faces and four more on their backs in addition to six stripes on their tails. These guys are more the size of squirrels and like to climb trees. These are the fellas who stand on their front paws to take aim at their victims. These skunks can be found in the eastern U.S., Mexico, and more rarely in southern Ontario, Canada. The Mexican pygmy spotted skunk is more the size of a rat and is considered the smallest and rarest of our skunk species.
Hooded skunks: An interesting skunk with faces that are framed by a shaggy white mane that covers the tops of their bodies from head to the tip of their tails. It’s unlikely you will come across this species unless you are hiking in rocky areas of southwestern North and Central America where they live in burrows near streams where they survive primarily on insects.
Hog-Nosed skunks: These skunks feature pig-like snouts that help them root for food in their southwestern U.S. homes or in Central and South America where three other species of the hog-nosed skunk can be found.
Stink Badgers: Recently welcomed into the skunk family in 1990 are found in parts of Indonesia, Philippines.
Check out my article on getting prepared in advance for a skunking. Hint: make sure you have hydrogen peroxide and baking soda handy. Forget the tomato juice unless you enjoy smelling like tomato juice and musk.

Monarda and Cardinal flowers: Native reds Hummingbirds can’t resist
Monarda and Cardinal flower are two native reds Hummingbirds can’t resist. Both have similar tube-like flowers that are perfect for hummingbirds and other pollinators.

A female Ruby-throated Hummingbird works the bright red Bee Balm.
Add these two fine reds to your garden and enjoy the pollinator party
Hummingbirds love reds and the combination of Monarda and Cardinal flowers prove just too irrisistable for them.
You could almost say these native red flowers combine the natural sweet flavours that keep our hummingbirds, bees and butterflies drunk with excitement over the natural abundance of their favourite food. But, that might be pushing the whole red wine thing a little too far.
In our garden, the Monarda begins to bloom in early July and the hummingbirds quickly add them to their daily feeding rounds. I notice, however, that the Cardinal flowers – growing just a few feet away – are not far behind the Monarda. Within weeks the area beside our patio will be a haven for hummingbirds looking to fill up on the sweet natural nectar that these two native reds provide.
If you are looking for more information on growing native flowers, you might be interested in going to my comprehensive article: Why we should use native plants in our gardens.
Our feeders, too, are nearby but given the choice, Hummers will prefer to visit the more natural nectar sources. It’s a good idea to keep this in mind when you are trying to attract hummingbirds and other garden pollinators. Provide their natural food and chances are they’ll visit more often and stay longer.
If using native plants to feed birds and pollinators in your garden interests you, you might want to check out this post on feeding birds on a budget.
Create a natural stage for Garden photography
In addition, the more natural stage for the hummingbirds and butterflies will turn you into a master when in comes to garden photography. There’s nothing like the male Ruby-throated Hummingbird, with its red throat, working the bright red Monarda and scarlet Cardinal flowers. Set up your camera and telephoto lens nearby, grab a glass of your own favourite “red” and just wait for the hummingbirds to arrive. It shouldn’t take long before you are rewarded with some great photographs.
How to grow Bee Balm (Monarda)
Monarda (Monarda didyma) often referred to as Bee Balm is a member of the mint family (Lamiaceae). It joins Wild Bergamot (Monarda fistulosa), that features light lavender to pinkish-white flowers, in the Lamiaceae family that counts 16 species native to North America.
(Go here for my full story on Wild Bergamot )
Monarda can really put on a show. Blooming for up to 6 weeks through mid summer to early fall on tall (up to 4 feet), sturdy square and hollow stems, these attractive perennials have deep roots with shallow rhizomes that account for its spreading habit. It can form large drifts in your garden creating a magnet for hummingbirds and other pollinators including those cool Clearwing hummingbird moths, native bees including bumblebees and, of course, Ruby-throated Hummingbirds.

Like it’s sister, Wild Bergamot, the Monarda flower is actually a cluster of 20 or more flowers (fistulosa) arranged in a round head. The fistulosa (tubular or pipe shapes) make them ideal for long-tongued insects, bees, moths and butterflies to feed on. The plants’ nectar is so sought after by insects that you may notice holes carved out of the flower stems where “tongue-challenged” insects have bore through to get at the nectar.
The plants easily take to a garden and are at home growing along other garden plants, in a sunny meadow-style planting or as specimens in sun, part-shade. Bee balm actually prefers average soil (too rich and you are liable to have tall, lanky plants that don’t hold up well on their own.) Powdery mildew can be a problem if the plants are grown in a wet, humid area without good airflow.
Keep the plants watered but not wet and you’ll be blessed with a great show all summer.
• If you are considering creating a meadow in your front or backyard, be sure to check out The Making of a Meadow post for a landscape designer’s take on making a meadow in her own front yard.

How to grow Cardinal flowers
Cardinal flowers prefer a more wet environment than Monarda so growing them side-by-side will be difficult. Ours grow several feet apart and through hand watering I am able to keep the Cardinal flowers’ feet in more moist soil. Our Cardinal flowers have found a home on the outside edge of a yellow magnolia so also get get less sun than the Monarda plants.
Take a moment to check out my full feature on growing the native Cardinal flower.
Cardinal flowers are considered short-lived perennial but by spreading the seed in your garden, you can enjoy the flowers for years to come. Try placing the spent flower heads atop the soil in a moist part of the garden and you should be blessed with more and more flowers each year. They grow on long spires that can reach up to 4 feet. The flowers bloom as they make their way up the stalk.
In conclusion: Two reds can make a right
Planning your patio should involve more than where the best seating options are, unless, of course, you’re planning the seating options around the best wildlife viewing spots. By making an effort to plant attractive native plants such as Cardinal flower and Bee balm that attract hummingbirds, butterflies and birds, your patio or deck transforms from just a place to sit and entertain, into a place to be entertained.
As summer heats up, I can’t imagine a better time than being outdoors on the patio or deck with my favourite red and a couple of feathered friends dropping by on regular visits.

Ten tips for great garden and flower photography
Here are ten tips to help you improve your garden photography. A good camera and lens is a great start but more important is great vision and attention to technique to ensure good results.

This female Ruby-throated hummingbird was caught feeding on the Monarda. An off-camera flash helped to freeze motion and create a lovely highlight in the bird’s eye.
Grab a coffee a camera and get some great garden and flower photos
Capturing memorable garden and flower photographs involves a combination of great light, creative vision and attention to technique.
It might be hard to believe – given the push for better and more expensive cameras – but these three factors are more important than the type of camera or lens you use.
Having a good camera can certainly take your flower photography images up a level and, at times, help you capture photographs that might otherwise be almost impossible to obtain with lower quality equipment or cameras and lenses that are less capable. But don’t let the quality or the price tag of your camera stop you from jumping in with both feet into garden and flower photography. In fact, your smartphone might be all you need to begin exploring the joy of garden and flower photography.
Be sure to check out my comprehensive post on Garden Flower Photography for more information.
It’s better to have a camera you understand and know how to get the most out of, than carry around an expensive camera that you set on auto and hope for the best.
Is the Fujifilm X10 possibly the best camera for garden photography? Check out my review of the high-end compact camera after owning it for 10 years and find out if it may be the perfect choice for the Best Garden photography camera.

A hummingbird sips nectar from salvia. This image is the result of sitting out in the early morning and watching the hummingbird visit the flowers in a nearby container. A little flash added sparkle to the image.
Getting the best camera you can afford either new or used will help set you on the right path. If you are thinking about upgrading from your smart phone, be sure to check out my comprehensive look at the Best Cameras and Lenses for Garden Photography.
If photographing birds and wildlife is your goal but you lack the expensive lenses to get you in close, there are options that you can take advantage of to help you capture these images. I have found a backyard photo blind from Tragopan Photo blinds to be incredibly helpful to get in close to birds, foxes and other wildlife. If you are interested in pursuing backyard wildlife photography, be sure to check out my article on Photography blinds.
It’s easy to put your garden in the best light
One of the greatest benefits to photographing your own garden is that you can return regularly to ensure you capture the subject in the best light, whether that’s in the early morning, in spring when the greens look their best, or in the dying days of summer when late-season grasses steal the show. When I say best light, I don’t mean strong mid-day sun.
Look for soft overcast light or situations when there is a lot of cloud cover to soften the shadows in your pictures.
Having your subject outside your back door certainly has its benefits. The fact the garden is right outside your door allows you to wait for days with good lighting to take your images. During or right after a rain is usually an excellent time to photograph your garden. Light foggy days in early morning also lends itself to potentially great images.

Moving in close with a true macro lens will allow you to create interesting images that are not easily seen by most gardeners.
Understanding great light for photography will also prepare you to capture beautiful images on vacation or on special occassions.
Be sure to check out my article on some of the best public Woodland gardens in the United States, and the best Woodland/public gardens in Canada to plan your vacation around.
Here are ten tips to help you capture memorable images of your garden or a public garden.
Get up early with your coffee and a camera
Take a walk with your favourite camera
Move in to get up close and personal with your subjects
Get down and dirty in the garden
Put something cool or colourful in the foreground
Telephotos aren’t just for wildlife
Who said everything has to be sharp?
Filters are great fun in the garden
Be a rebel: just go ahead and break the rules
Don’t be afraid. Show some courage and creativity

Morning light filters through the trees onto our fern glen. Underexposing the scene helped to bring out the rays of sun in the image.
Tip #1: Capture the early-morning light
Get up early. That’s the first and most important tip I have. If you do anything, make sure your first cup of coffee in the morning is outdoors and your camera is at your side. The earlier the better. At times, you’ll be blessed with morning dew, other times maybe a little fog or sunbeams streaming through the trees.
There is nothing like sitting on the patio or deck with your coffee watching how the early-morning light kisses the tops of trees before it bathes the garden in a beautiful, soft, warm light. You never know what subjects might present themselves. Many times I’ve been out and a young fox comes into the garden, or a doe and her fawn. Maybe a bird lands in a nearby tree within range of your camera and provides the perfect opportunity to capture a memorable moment.
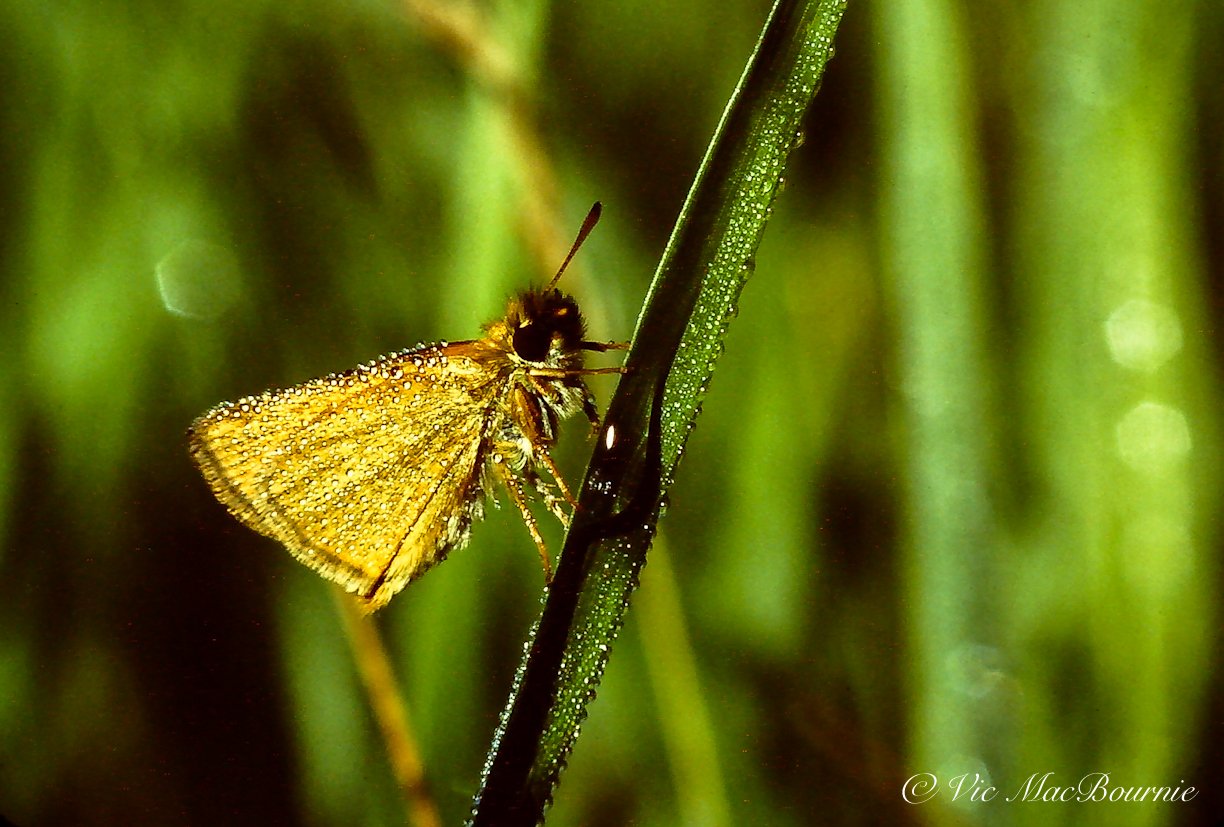
Early morning dew on this skipper is the result of getting up early and capturing this tiny butterfly before the sun has burned off the dew and warmed the butterfly enough to allow it to fly off.
You need to be out there, sitting quietly with your camera at ready and watching for these special moments. And if the weekends are the only time you can swing it, make a date with yourself, your camera and a good coffee this weekend and every weekend possible in the spring through to the fall.
There is no question that having a small, high quality compact camera to carry around the garden is a real benefit. A compact Travel camera or a Bridge camera might be the perfect option for the morning walk about.
If you are considering upgrading your cameras and lenses, be sure to check out the daily offerings at KEH Camera Exchange.
Not many people want to carry a large, heavy DSLR around the garden in the morning.
Capturing a memorable moment in the garden is great, but simply being out in the garden in beautiful light studying how it moves across your landscape is a valuable learning opportunity. Knowing that at a certain time in the morning, light skips across the Monarda lighting it up against a dark background is an opportunity to set up a tripod and capture the moment a hummingbird or butterfly visits.
Tip #2: Take a walk in the garden
While you are up early enjoying your first cup of coffee, go for a walk in the garden. Notice what flowers are about to bloom. Notice how, when you are at the far end of the garden, the rising sun lights up the drift of rudbeckia in a way that is unnoticeable from the deck.
Take that picture now remembering to expose for the brightly lit flowers and not the entire scene. You are probably going to need to underexpose the scene to capture that ray of sunshine on the flowers, rather than setting the camera on automatic and accepting the resulting image. (Or you can walk up to the flowers and take an exposure reading directly), lock that in and step back to capture the scene.
Most mornings, I take my camera and walk around the garden looking for unusual lighting situations and noticing what flowers are preparing to bloom. Maybe there’s a butterfly sitting quietly warming its wings in the morning light, a toad taking shelter under a leaf or a flower about to bloom. Maybe it’s just the way the light hits the fountain grass.
If you are not a morning person, or it’s impossible to get out in the morning with your camera, take the time, instead, to walk the garden most evenings. The warm evening light has many of the same qualities as morning light and can show the garden in different but equally beautiful ways.
Walking around the garden with camera in hand, whether it’s morning or evening, is both an opportunity to capture images as well as get in touch with the finer details of your gardens.

A longer lens helps to create a soft background in this image, which helps to make the chipmunk stand out more.
Tip #3: Make sure your camera has a macro or close-up lens
Being able to capture close-up images of flowers, butterflies and insects is an important part of making interesting images of your garden. Mastering macro photography involves specialized, expensive equipment, but getting good close-up images is not that difficult with today’s modern digital cameras and lenses.
Most compact and Bridge cameras have macro or close-focus capabilities built into them. These may not allow you to get a 1:1 magnification ratio, but we are not doing scientific work here. If they allow you to move in close, it’s probably all we need.
For true macro capabilities you will need specialized macro lenses likely in the 50mm to 100mm range. There are 200mm macro lenses that allow you to get much closer to subjects while being able to keep a good working distance between you and the subject. These lenses demand the photographer use a tripod and or flash systems to get the best results.
If flower photography is your goal, close focus capabilities in most compact cameras are more than enough to get the job done.
If you are hand holding your camera to do close-up images, it’s a good idea to boost your ISO up to increase your shutter speed and help you get sharper images.
Following a butterfly around your garden trying to get it to rest on a flower can be challenging, but if you find one in the morning before the sun warms it, you will be blessed with the opportunity to capture the image without it quickly flying off. If you are lucky, you may be able to capture it covered in morning dew.
In the film days when ISO topped out at between 64-100, taking macro shots involved almost always using a tripod. Today’s digital cameras’ ISO can be boosted to astronomical numbers allowing you to hand-hold many of the images. Try setting your ISO at 6400 and check out the results. If the images are not to your liking, bring it back to lower numbers until the noise (grain) is acceptable.
Experiment with your close-focus capabilities to get comfortable with it so when the Giant Eastern Swallowtail visits your garden and spends some time on your butterfly weed you’ll be ready for it.

Getting down close to ground level helps create a more pleasing image of these anemones. Shooting them from a higher angle would have resulted in a background that included either soil or mulch.
Tip #4: Get down low
It’s rarely a good idea to stand over a plant and shoot down at it. That also holds true for animals, birds and most insects. It’s usually best to shoot your subjects at eye level. For flowers, that usually means getting down on your knees to capture images and eliminate the garden soil or mulch from the image.
By getting down low on a drift of flowers, you can use the other flowers to give you a pleasing background, or shoot through the foreground flowers to create a dreamy look using the out-of-focus foreground and background flowers to isolate a single in-focus flower.
If getting down low is getting difficult, having a screen that tilts up and allows you to look down at the screen can be a valuable feature when you are considering purchasing a camera. Many of today’s cameras offer screens that can be tilted.

The foreground flowers create a centre of interest and help to create a more three dimensional feeling.
Tip #5: Include a strong foreground element
Photographing large expanses of your garden may seem like a good idea, but unless you include a strong foreground object chances are you’ll be unhappy with the results. A wide angle setting on your campact camera, or a wide angle lens on your camera really benefits from having a strong foreground object such as a drift of flowers, garden art or another element that helps to draw your eye into the garden. Having a dominant foreground element helps to give depth to the image and provides a strong centre of interest for the viewer.
Focus on the foreground element and use a large depth of field (higher aperture like F8- F11 or even F16) to ensure the entire image is in focus.
Tip #6: Use your telephoto to simplify the image
A telephoto lens is not just for capturing wildlife and they are not designed for photographers who can’t be bothered to get up to walk over to their subjects. (Although they can be helpful in this regard for us lazy photographers.)
The telephoto lens has many redeeming factors, not the least being a great tool to simplify an otherwise busy garden scene. By moving in close, it’s easier to isolate one flower or a group of flowers to simplify the image. Of course, they are useful for capturing wildlife in the garden as well. A 200mm lens, for example, would enable you to photograph a butterfly while still giving it enough space to not feel threatened.

A telephoto lens allows you to move in close on small subjects and create a very soft background.
Tip #7: Use the telephoto to soften the background
It’s much easier to soften a background to isolate a subject if you are using a longer telephoto lens. Fast lenses (ones that open to F2.8 for example) can create beautifully soft backgrounds.
Lenses that do not usually open up enough to soften the image to your liking, can still be used to create a soft background. Try finding an angle to your subject where the background is farther away. That longer distance will help create the softer, out-of-focus background even for lenses that normally do not create that effect.

Public gardens can be a great place to practise your garden photography.
Tip #8: Experiment with your tools and camera settings
Photographing in your garden is the perfect opportunity to experiment. All those built-in filters in your camera are there for a reason and many of them can be used to great effect in garden photography. For example, consider shooting your garden entirely in B&W. (Check out my full story on B&W garden photography). Most cameras these days have a black and white setting. Look for strong graphic elements in the garden like backlighting or strong side light.
Experiment with the vibrant colour filter setting to punch up the colour on your flowers. My Fujifilm camera, for example, has a setting for shooting Velvia-style images. If you are not familiar with Velvia, it was a highly praised slide film that eventually edged out Kodachrome as the favourite film used by nature photographers looking for more saturated colours. Kodachrome was ISO 64, while Fuji’s Velvia came in at ISO 50. Fuji cameras are now able to offer a Velvia-like image at much higher ISO ratings. A feature that film photographers couldn’t even dream about back in the day.
Other cameras offer similar highly saturated colour filters, some better than others.
While many of the built-in filters look unnatural in garden photography, the soft focus filter can create beautiful results. Most often used for portraits, a soft focus filter can add a dreamy almost romantic look to your garden photography.
Another filter worth experimenting with is a high-key filter that enhances images with light-coloured flowers in white, pink or soft blues and violets.

Don’t be afraid to have fun in the garden, wither by using filters or using selective focus to create dreamy images like the one above.
Tip #9: Follow the rules and then break them
There are a lot of long-standing design rules in photography to help you create pleasing pictures. The first, and probably the most important is the rule of thirds. In fact, most cameras have a built in grid to help photographers with their compositions and take advantage of the rule of thirds. A setting in the camera’s menu gives photographers the choice of setting up a grid system that is digitally overlaid on your camera’s screen. Where the lines intersect on the screen represents strong points to place a centre of interest in your image.
I almost always set up my cameras to include a grid system which also helps me keep the horizons straight.
Take some time to learn basic rules of composition and then, when you understand them, feel free to break them. By breaking the rules, you create tension or intrique in your photographs that, when done successfully, can result in a dynamic image.
One helpful rule is ensuring that any movement in your image has more space in front of it than behind it.
The rule: A bird flying left to right needs more space in front of it to fly into than is behind it. Ideally, you would want the bird at one of the intersecting lines in your rule of thirds grid pattern on the left side of the frame. That would give you a pleasing, natural image which would score well at your local camera club.
Try putting that bird in the intersection of lines on the right side of the frame and your image becomes potentially more dynamic. A bird flying out of the frame rather than into the frame of view is often seen as an error by the photographer. If, however, it is balanced by say a beam of light filling the left side of the frame or maybe a colourful drift of plants, than the image could be a show stopper despite breaking the rule.
The key to success is knowing the rules of composition and knowing when to break them.

Know the rules of composition and then feel free to break them. In this image the bird appears to be looking out of the image, but the tree branches leaning in from the left help to balance the image and makes breaking the rules of composition work.
Tip #10: Don’t be afraid to fail
It’s garden photography folks, there is no pressure here.
Shoot often, shoot regularly, experiment and have fun. Many of us have cameras that sit in a desk drawer only to get pulled out during holidays or special events. Your garden gives you the opportunity to get out daily or weekly to use your camera and experiment with it. It should be fun creating images.
Bring your kids or pets out to the garden and photograph them in it. Set up a bird feeder or bird bath near where you normally sit and experiment with your camera(s).
Finally, when you have built up a large collection of garden images, consider putting them together in your own personal Garden photography book. (Link to my story on creating a personalized garden book). Putting the book together is a wonderfully creative exercise that results in a keepsake, a memory of your garden and the wildlife that visit it.
Tips for Sharing your images on social media
Sharing your garden images on social media is one of the benefits of modern digital cameras. Here are some suggested sizes for posting your images on some of the popular social media sites.
If none of this makes any sense to you, just upload the pictures and don’t worry about it.
Facebook: For your Facebook feed, try 1080 X1350 pixels. For Facebook stories, try 1080 X 1920
Instagram: photos were once optimized as square 1080 x 1080, but have evolved to become more vertical to better fit smartphone screens. The ideal Instagram portrait aspect ratio is now 4:5, and the best photo size is 1080px by 1350px. For Instagram stories try 1080 X 1920 for best results.
Tumblr: 500 x 250
Twitter: For best profile image try 400 X400 pixels. For header photos, try 1500 X500 pixels and for in-stream photos go with 1600 X 1900 pixels.

Focus on Cardinal flowers to attract hummingbirds
If you plant only one flower, make it a Cardinal flower and enjoy the added benefit of hummingbirds. This native North American wildflower is s much at home in the Woodland garden as it is growing alongside a river.
North American native flower that attracts hummingbirds and butterflies
The Cardinal Flower is as close to a guarantee of attracting hummingbirds to your garden as anything, other than maybe a commercial feeder.
But the cardinal flower (Lobelia cardinalis L.), with its spires of scarlet tubular flowers, is certainly more attractive growing throughout the garden than any commercial feeder could ever hope to be.
Be sure to check out my earlier article on how to photograph hummingbirds in the garden and my comprehensive post on Flower photography in the garden.
Adding to its attractive qualities is the fact it is native throughout parts of North America in both the United States and Canada, blooms for a month or longer later in the summer, is slightly aromatic, and is a nectar source not only for hummingbirds but also swallowtail butterflies and other insects and butterflies. The scarlet-coloured wildflower, with delicate blossoms that open from bottom to top on spikes that can reach between two to four feet in height, is a member of the Bluebell family.
If you are looking for more information on growing native flowers, you might be interested in going to my comprehensive article: Why we should use native plants in our gardens.

Here, a Ruby-throated hummingbird feeds at a Cardinal flower a little later in the season. You can see how the flowers on the very top of the plant after earlier blooms have died off leaving a pod of seeds which should be sprinkled about the ground.
What are good companion plants for Cardinal flower?
It’s as much at home in a woodland or shade garden surrounded by hostas and ferns that also enjoy plenty of moisture, as it is as a specimen plant stealing the show in a small, contemporary garden alongside a man-made stream. Look to pair the Cardinal flower with moisture-loving plants that will live happily alongside Cardinal flower.
Where to plant Cardinal flower to easily capture great hummingbird photos
For garden photographers, the plants’ elegant spires stretching up against a blue sky is reason enough to include them in the garden. But the real reason to plant Cardinal flower en-masse is to catch an image of a hummingbird in its natural environment. It’s hard to imagine a more perfect flower to plant in your garden to show off our beautiful hummingbirds in a more natural setting. Plan to spend time, however, working the hummingbird/flower combination. Getting the right light to stop the frenetic motion of the hummingbird requires patience, luck and good lighting.
“Hoping to bring the plant back into the fold, this time in a lower garden within the stone terrace, I picked a seed stalk and placed it on bare soil in a gap next to the flagstones. The next year a seedling sprouted from the gap, and the following year it flowered and went to seed. hundreds of seedlings emerged in the cracks between the stones in the terrace next year. The year after that, a few of these plants flowered and the following year the terrace was a sea of red cardinal flowers. A pair of hummingbirds hovered over the terrace all summer, and my main task was to remove enough of the lush red flowered growth to create paths and a place for my dining table. ”
I have a nice patch of the flowers growing near my favourite patio chair allowing me to easily photograph the tiny, frenetic birds from the comfort of my favourite chair with a coffee – or even better – a glass of wine.
One of the other benefits of planting Cardinal flowers near a patio is the ease of keeping the soil around the plants moist. Hanging baskets and other container plants around our patio get watered daily, so it’s easy enough to water the Cardinal flowers at the same time.
Don’t mistake the plants for weeds. The plants themselves, which appear in spring as dark green leaves, are tapered at both ends. The flowers appear later in summer – July and August – depending on your location.

A cardinal flower in full bloom with the flowers running up the large 2 to 4ft spikes.
Do deer eat Cardinal flowers?
For those of us who are lucky enough to share our backyard with deer, Cardinal flowers have proven to be extremely deer resistant. This might be because all the parts of the plant are considered toxic if eaten in large quantities.
Where do Cardinal flowers grow?
In nature, you’ll find them growing on the edge of woodlands, the banks of streams, near lakes or ponds and swamps. Yes, you can often find them growing happily in moist, wet areas, but you’ll also find them along ditches, along roadsides, in ravines prairies, meadows and even in pastures.
Are Cardinal Flowers native to New England and other areas of the United States?
In the United States they are found growing naturally from Minnesota, south to Florida, Texas and California. They are also native to New England. They are also at home throughout Mexico and through Central and South America.
In Canada, Cardinal flower is native from New Brunswick through parts of Ontario, including down through southern Ontario and throughout the Carolinian zone. In colder areas, adding a mulch layer of leaves over the winter will provide needed protection.
To grow them successfully the plants’ roots need to be kept moist, even wet, but the plants can grow in sun, part shade right through to deeper shade. They prefer to grow in a humus-rich soil, but can do well in medium loam, clay loam and sandy loam.
Cardinal flowers can be easy to grow
In the right conditions, Cardinal flowers are easy-to-grow perennials and will spread in the garden to create lovely drifts of intense flowers. They can, however, disappear quickly if they are not provided with the right conditions because individual plants are actually short-lived perennials. It’s important to allow the plants to reseed themselves in the garden to keep them prospering for years.
Do not cut down the dead and dying stalks without at first distributing the seeds around where they are growing. The seeds need cold stratification to germinate the following spring. One way to better ensure success is to lay the flower stems with seeds in them on top of soil so the seeds disperse and spread on their own. In the picture below, from the book Garden Revolution (link to my review of the book), seeds from a single plant made their way down the terrace following heavy rains a reseeded.

The image of Cardinal flowers taken from the inspiring book Garden Revolution, shows just how spectacular the plant can be in the landscape. These flowers were all grown from a single plant’s seeds spread about the terrace from rains.
In conclusion
It may take a little effort finding native Cardinal flower, but the effort is certainly worthwhile. Not only are they impressive in the landscape all on their own, but the fact they bring our landscapes to life with hummingbirds, butterflies and other pollinators makes them indespensible in our woodland gardens.
In the book Garden Revolution, How our landscapes can be a source of environmental change, (Ferns and Feather book review link) authors Larry Weaner and Thomas Christopher tell the story about how Cardinal flowers played a major role in shaping how they changed their approach to landscaping. Weaner describes his special relationship with the plant in his garden: “A number of years passed and I saw no Cardinal flowers in my yard until one spindly plant emerged from between a grouping of stones. Hoping to bring the plant back into the fold, this time in a lower garden within the stone terrace, I picked a seed stalk and placed it on bare soil in a gap next to the flagstones. The next year a seedling sprouted from the gap, and the following year it flowered and went to seed. hundreds of seedlings emerged in the cracks between the stones in the terrace next year. The year after that, a few of these plants flowered and the following year the terrace was a sea of red cardinal flowers. A pair of hummingbirds hovered over the terrace all summer, and my main task was to remove enough of the lush red flowered growth to create paths and a place for my dining table.”
The image included in the book (above) of a sea of red spikes surrounding the terrace should convince everyone who is not growing Cardinal flower to track them down and get them into the ground as soon as possible.

Solomon’s seal is solid choice for the woodland or shade garden
Solomon’s seal’s arching branches reveal the dangling cream flowers that highlight the spring woodland garden.
Is Solomon’s seal a native North American wildflower?
Solomon’s Seal (Polygonatum), with its elegant arching stems that rise up in clumps through the forest floor, deserves a prominent place in any woodland garden.
This unassuming, eastern North American native plant is completely at home in the woodland or shade/semi-shade garden where it forms patches of attractive plants that spread – always under control – through underground rhizones.

The Graceful arches of the Solomon’s seal reveal the drooping creamy flowers dangling from beneath the leaves.
Like a lovely hosta, Solomon’s Seal is more of a textural plant that might not steal the show with colourful flowers in early spring or even striking berries. Instead, this native wildflower quietly reveals itself in early spring as individual, zig-zag arching stalks that will eventually stretch out to 1-5 ft. long, begin to emerge from the soil. Solomon’s seal has alternate, smooth leaves that grow up to six inches long and about three inches wide with parallel veins. A waxy coating on the round, smooth stems creates a blue-green colour.
How to use Solomon’s seal in the landscape
In the landscape, the Solomon’s seal are best used as an understory plant that helps create height with its arching stems and attractive leaves.
Eventually, clusters of up to one to four white or off-white tubular-shaped flowers dangle beneath the lance-shaped leaves. The flowers grow to about half-inch to 1-inch long.
A variegated form is available that adds a little more interest to the plant if the all-green variety just doesn’t cut it for you.
Although the plant is attractive throughout the spring and summer, its fall foliage really shines in the woodland garden. The arching stems turn a bright yellow as they age and become tattered over time.
For more on using Solomon’s seal in the garden, take a moment to read my article on using textural plants in the landscape.
How to grow Solomon’s seal
Like many native woodland flowers, Solomon’s seal will grow best in moist, loamy, woodsy soil in light shade. Don’t be afraid to cover them in late fall with fallen leaves to protect the clumps during freezing temperatures and eventually build up the soil around the plants.

Solomon’s seal arching branches show off the cream flowers following a spring rain.
In our landscape
We have had both the more common green native plant as well as the variegated form in our front woodland garden for several years where it happily grows through the ground covers creating interesting form for visitors walking up our garden path.
Do Solomon’s seal attract pollinators?
Because it is another early spring bloomer, Solomon’s Seal is an important plant for pollinators ranging from a variety of native bees, including (Bumble bees, digger bees) that gather nectar and pollen from the white or creamy flowers.
Do Solomon’s seal attract hummingbirds?
In addition, Ruby-throated hummingbirds take advantage of the early flowering plants as a source of nectar flying beneath the leaves to sip from the druping, tubular flowers.

Solomon’s seal shows its early fall colours in this image. The native plant is a highlight in the fall garden as yellow slowly envelops the entire plant.
What birds eat the berries from Solomon’s seal?
In late summer, woodland birds will zero in on the resulting blue berries providing nourishment to the birds that help to spread the seeds throughout the garden. The berries are eaten by Eastern Bluebirds, Hermit Thrush, American Robins, Veery and Wood Thrush. In addition the native wildflower attracts insects, which, in turn, help to attract insectivorous birds looking for a quick meal.
I would like to say that the native plants are deer resistant, but they are not. Don’t be surprised if you go out in the morning to find many of the plants munched by our four-legged friends. Deer predation is no reason not to grow these native plants. Instead, think of them as a little natural food for our forest friends.

What’s the best camera and lens for Garden photography?
What’s the best camera and lens for garden photography? The real question you need to ask is: what type of garden photography do I enjoy. A high-end point and shoot camera with a moderate wide angle and telephoto lens that has macro capability is a great choice.
Focus on what you want from your garden photography
The best camera for garden photography is one that is easy to carry around and gives you a range of focal lengths that cover everything from macro for closeups of flowers and insects, to wide angle for vistas of the garden, to moderate telephoto capabilities that enables you to focus in on garden details.

A high-end point-and-shoot camera may be all you need for the majority of your garden photography.
Admittedly, these focal lengths will not satisfy everyone’s needs – especially those looking to capture wildlife images – but it will cover all your basic needs to capture your garden or a public garden. Cameras that meet these requirements include both simple and inexpensive compact cameras, as well as more costly high-end point-and-shoots and small mirrorless cameras . Most will have a lens that generally covers (in 35mm equivalent) 28mm-110mm.
Many of these perfectly usable compact digital cameras and higher-end mirrorless cameras can be purchased used for a fraction of their original price. Ebay, Kijiji and used departments of local and on-line camera stores such as B&H Photo &Video are excellent places to track down fine examples of these used cameras as well as the latest in new cameras and lenses. If you are lucky, you may even stumble across a solid camera at your local thrift store where you can pick one up for less than $10-$20.
And, if you are wondering how a point-and-shoot digital camera that’s more than 10 years old can perform in the garden, be sure to check out my post on the Canon PowerShot Elph 500 HS.
But, when shopping for a new camera, the most important question is not what is the best camera or lens, it’s what is the end use of your garden photography? Let that question guide you in purchasing your garden photography camera.
Determining your needs in a garden camera
If posting images or videos on social media (Instagram, Facebook, Twitter or Tiktok) is your end goal, then there might not be a need for an expensive, professional style camera. Instead, a good used compact point-and-shoot from one of the main camera companies (Nikon, Canon, Pentax, Olympus, Fuji, Sony…) might satisfy your needs at a very low price.
If you are a content creator, hope to print your images for display, or use the images to create a personal garden book (link to my personal garden book article), you might want to upgrade to a high-end compact point and shoot, a flexible Bridge camera or even a DSLR camera. Check out my article on using DSLRs with interchangeable lenses and Bridge cameras for garden wildlife.
If you are serious about capturing beautiful images of birds or need very high quality images for photo competitions, a top quality DSLR or high-end mirrorless camera with a micro four thirds sensors suited up with high quality lenses is your best choice. Olympus and Lumix are among the leaders in this area. I recently purchased an Olympus micro four thirds camera and lenses. For my first impressions, check out my post on the Olympus M4/3 camera here.
Finally, if you love the experience of using a precision instrument that maybe has a retro look, just feels right in your hand and inspires you to create beautiful images whether they are in your garden, in the back alleys, on vacation or just on a weekend outing, then you need to explore the world of high-end enthusiast cameras.

Most cameras will offer good quality macro or close-focusing capabilities. This image was shot using a Lumix travel camera.
Enthusiast cameras – and I would consider my Fujifilm X10 and Pentax Q among these cameras – including several Leica cameras, some high-end Sony cameras, Canon and Nikon, lend themselves to more creative approaches to garden photography.
Check out my article on photographing the garden in Black and White using the Fujifilm X10 and other cameras including the new Monochrome Pentax camera as well as software that converts colour images to BW.

A few of my favourite cameras representing three of the basic styles to consider if you are thinking about purchasing a new camera, whether it’s for capturing garden photography, travel, wildlife or scenic images. On the left is the Fujifilm X10, an older high end point-and-shoot camera. In the middle, a DSLR with 300mm F4.5 lens that is ideal for wildlife including birds. On the right, is a Bridge camera that straddles the point-and-shoot model and the DSLR. The Bridge camera includes a fixed lens that covers wide angle to extreme telephoto at a reasonable price.
First step: Deciding what you need from your garden photography
For many gardeners, a good choice that meets these requirements might be nothing more than a smartphone. You may want to check out my article on Tips for using your smartphone to take garden images.
Others, looking to take garden photography to the next level, will focus on enthusiast point and shoot cameras that are both small enough to carry in your pocket, while at the same time, offering a fully feature-packed camera with a high-end lens covering all the necessary focal lengths including macro capabilities. These camera’s are sometimes referred to as “Travel cameras.”

This image of a Carolina wren at a bird feeder was taken with the Pentax X5 Bridge camera.
Others will look to “Bridge cameras” that feature super telephoto lenses to add the ability to capture high quality bird photos from their favourite seat in the garden.
Still others will look to expensive, professional DSLRs or the larger mirrorless cameras complete with interchangeable lenses ranging from extreme wide angle to super telephoto with an array of macro lenses.
If you have not already guessed, choosing the best camera for garden photography depends in a large part on the photographer and what you want from both the camera and your garden photography.

Hummingbird photographed with Pentax Bridge camera X-5 with a 16 megapixel sensor.
Anyone who thinks they can tell you what camera to buy is likely just trying to sell you something. Although I can make suggestions, only you can decide what camera is best for your needs at this time. Your requirements may change over time as your interests also change.
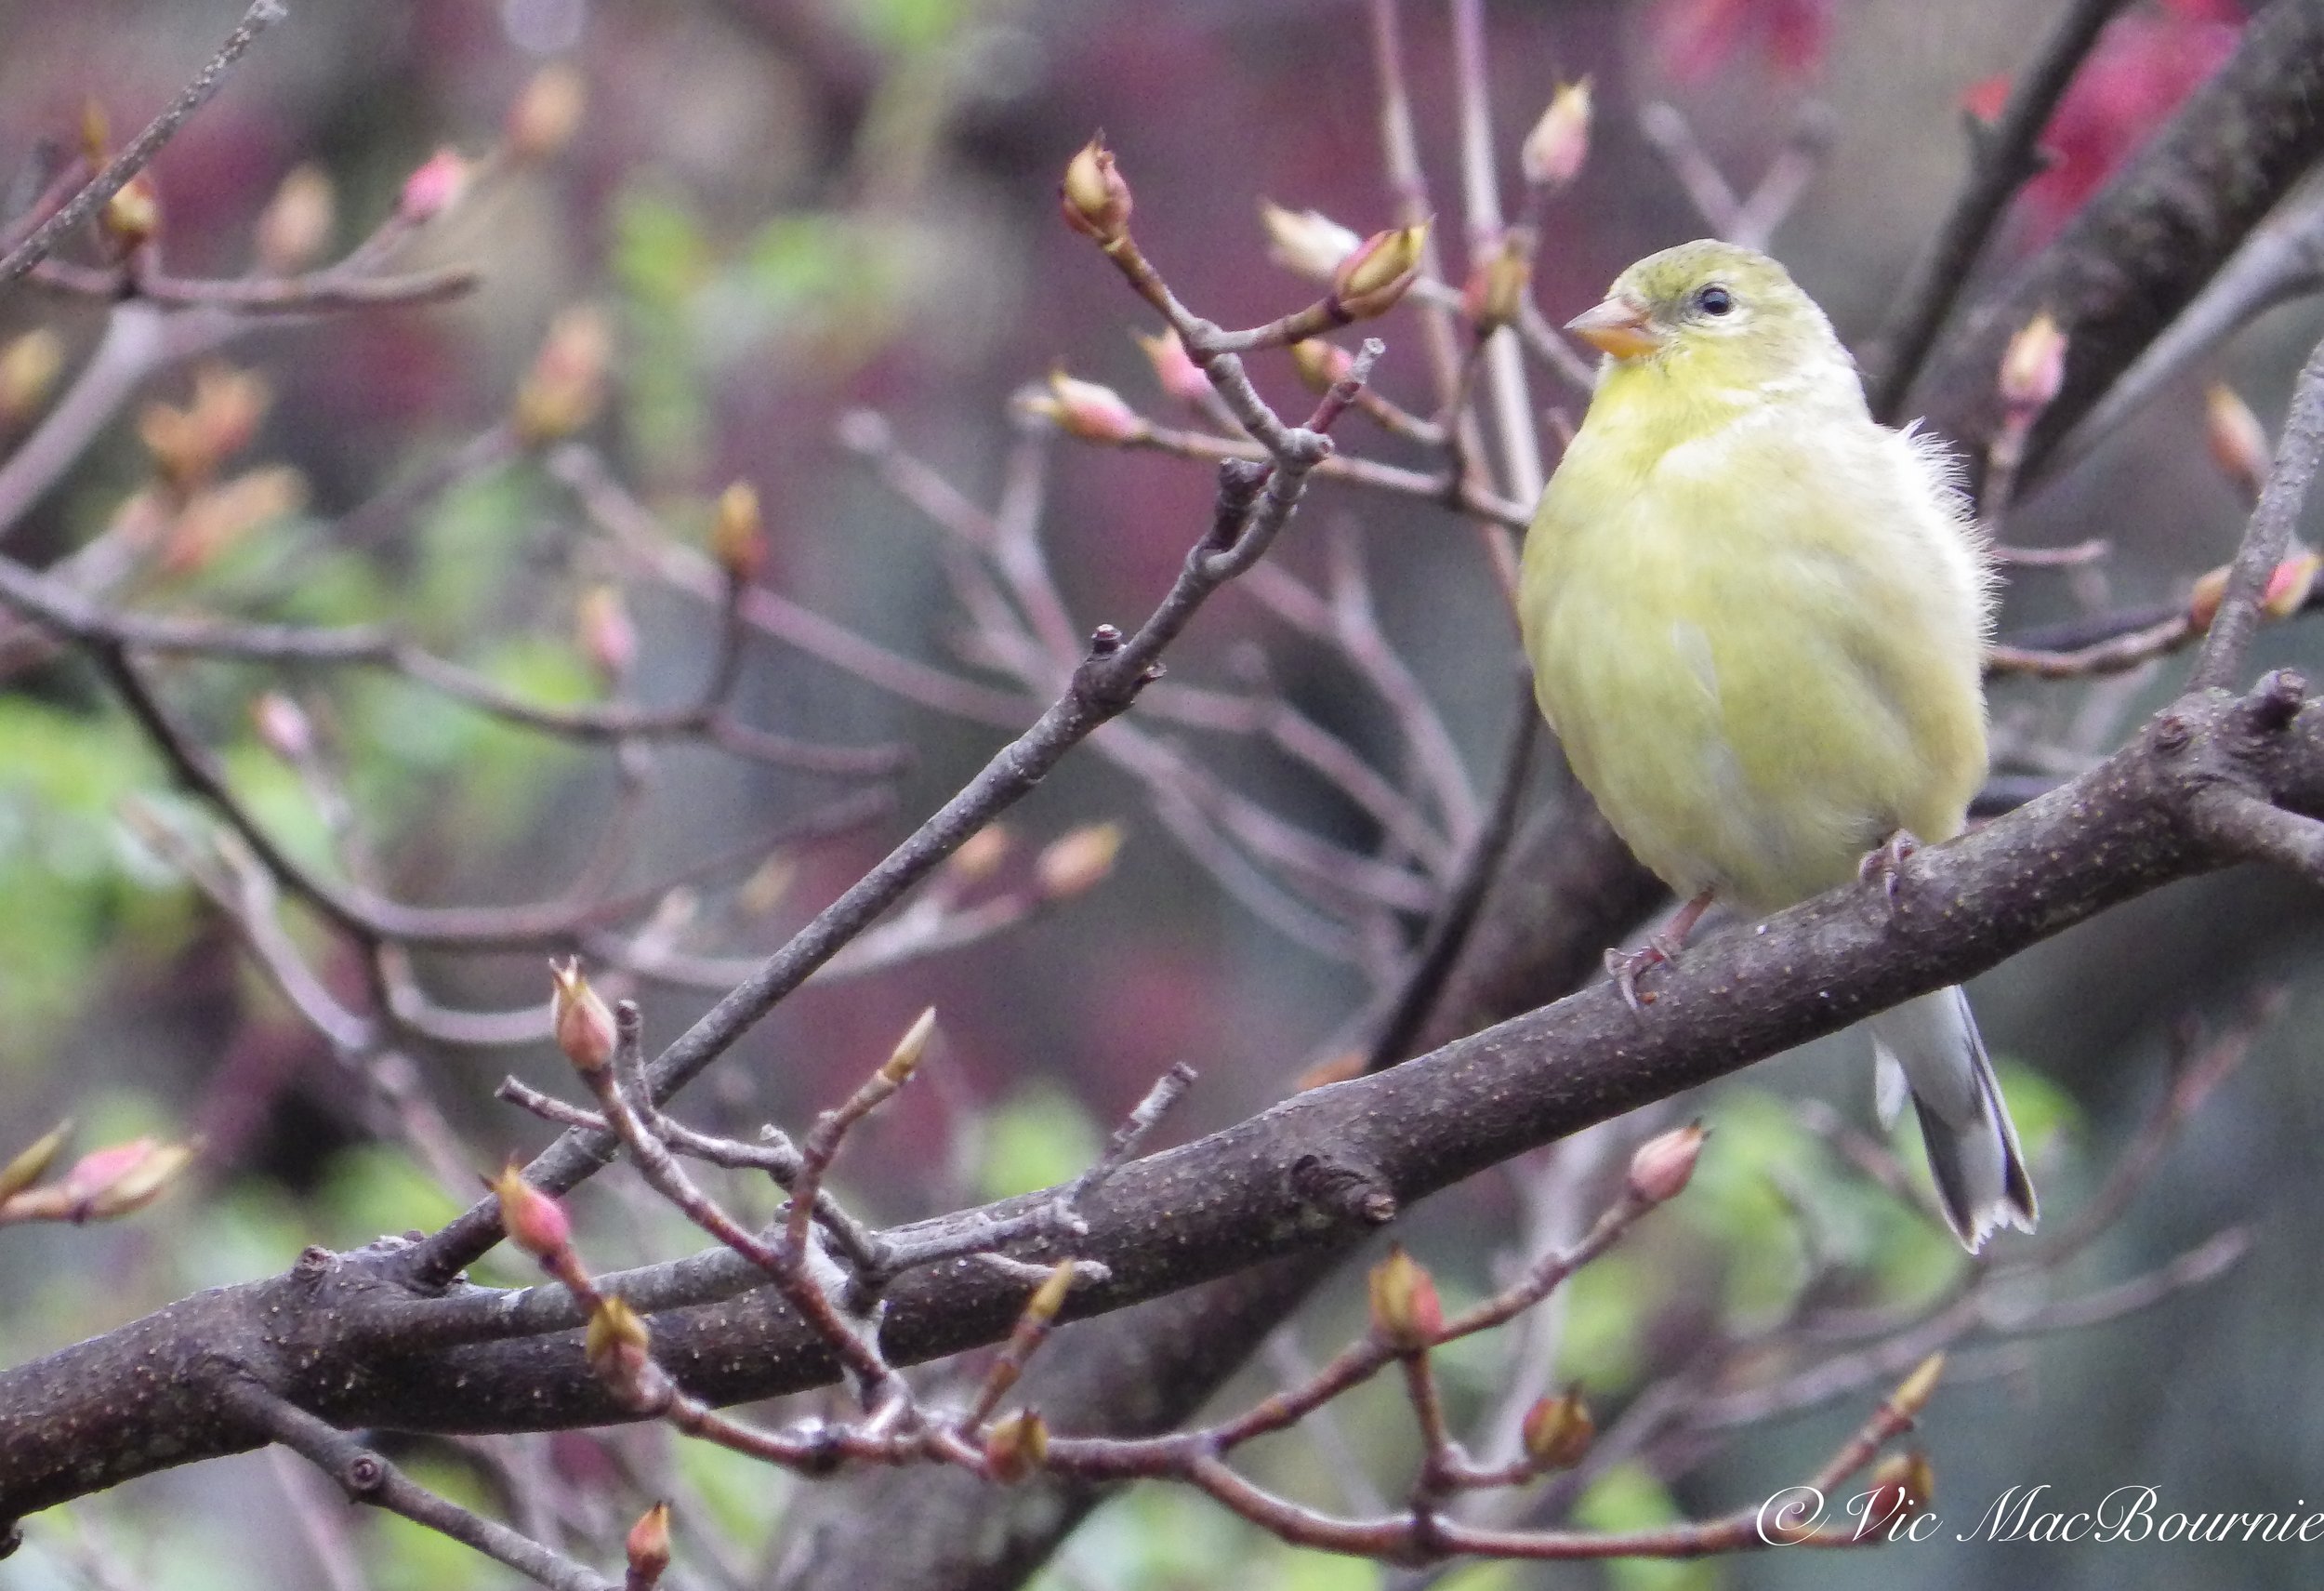
This image of a Goldfinch was taken with a Pentax Bridge camera showing that high quality bird photography is possible with these cameras with built-in superzoom lens.
Photographing backyard birds and wildlife
Photographing garden birds may not be important to you today, but bird photography might be something you want to explore in the future.
It may not be the best time for you to invest in an expensive camera and lens that can capture beautiful bird images. Some of these cameras and long, fast telephoto lenses can cost as much a a good used car. A compromise might be a good Bridge camera that has a built-in long lens at a fraction of the cost. Don’t expect to get similar results as a seprate camera and lens costing ten or twenty times the price, but they can be a good camera to introduce you to the art of bird photography.
Later, if you decide to take the next step in bird photography, you can upgrade to a camera (mirrorless or DSLR) that takes interchangeable lenses.

When it comes to getting up close to birds and other wildlife, most photographers will choose to use a modern DSLR or mirrorless camera with interchangeable lenses. This image was shot with a Pentax K5 DSLR equipped with a 300F4.5 lens that becomes a 420mm with the cropping factor. This image was severely cropped to create the portrait, which you cannot do with smaller sensor-equipped sensors.
The ultimate all-round Camera Shootout
I am not a fan of recommending particular cameras to readers, but I can share what other UTubers consider to be their favourite cameras. Mattias Burling, for example, has an informative channel that focuses on many high-end point and shoot and mirrorless cameras that are perfect for garden photography. The following are some of his favourite cameras and why they are his favourites.
In his video the Ultimate all-around 2021 Camera Shootout, Mattias reviews four of his favourite cameras that include: The Ricoh GR3 he calls the ultimate “street King”, Fujifilm X-E4, Pentax Q7 a small but powerful miniature camera, and the Fuji X100v that he describes as a technical gizmo. Not all these cameras are available new, but can be found on the used market for good prices.

Ricoh GR3 is a simple, elegant camera.
He rates them on a number of factors starting with price. The two Fuji cameras are the most expensive, followed by the Ricoh leaving the Pentax Q7 the winner not only for the price of the camera but all the many mini-interchangeable lenses that can be purchased for a very reasonable price. Click on the link here to see my full review of the Pentax Q system of cameras.
When it comes to size and weight, The Pentax easily takes top spot again followed by the Ricoh GR3 and the two Fuji cameras.
When it comes to grip and button layout, the Ricoh takes first followed by the two Fuji cameras and the Pentax.

Fujifilm’s X100v is an elegant retro-look camera.
Next up was the speed of the cameras with the Ricoh GR3 taking points for fast focus but both Fuji cameras taking top marks with the X100v taking first and the X-E4 taking second with the 10-year-old Pentax taking up the rear.
Both Fuji cameras take top spots in the viewing displays, with the Ricoh in third and the older Pentax last.
Both Fujis also scored points for their viewfinders, not available on the Ricoh or Pentax.
When it came to image quality, Mattias compared tones, dynamic range, sharpness and colours his favourites were in order the Ricoh, Pentax, Fuji XE-4 and finally the X100v.

The miniaturized Pentax Q7 is packed with big-camera features including a line of miniature high quality lenses.
Finally, he looked at lenses where the Pentax Q came in first with its complete line of interchangeable lenses in miniature form. Fuji’s XE-4 finished second, followed by the 18mm Ricoh lens with macro, and lastly the Fuji X100v.
When it came to build quality, the Fuji X100v took top honours, followed by the XE-4 and the Pentax Q with Ricoh finishing last.
The Pentax took top honours for its looks and the joy factor in usability which Mattias says is “at the end of the day” the most important feature.
For more on the Pentax Q line of cameras and lenses, check out my comprehensive post here.

Another favourite is the Fujifilm X-E4 with a flipping forward screen.
Okay, so which camera came out on top? It should come as no surprise that they all scored 19 points making it a four way tie.
No surprise that a group of top cameras all came out with the same score in the end. All have their strong and weak points. What you have to decide, are what features mean the most to you and find those hidden gems that satisfy your most important needs and wants.
The camera’s above represent a small number of the camera’s available.
You will notice that Nikon, Canon, Olympus, Panasonic Lumix and Sony cameras are among those not listed here. All these manufacturers have outstanding cameras that fall into this category and should be included in the list of options if you are in the market.
My cameras include several Pentax cameras including the K5 DSLR, a KX Bridge camera and the original Pentax Q. I also enjoy shooting with the Olympus M43 system, the Fujifilm X10 and an older Panasonic Lumix travel camera. All have a place in my camera bag although I usually only have one or two with me at any given time depending on what I expect to shoot that day.
Deciding what you need, what you can afford and the type of photography you want to explore is the first step in discovering the joy of garden photography.
Pros and Cons of different camera styles
If all cameras were created equal, purchasing one would be simple. It’s not. There are so many pros and cons to cameras that it would be impossible to list here, but we can discuss the pros and cons of the different camera styles.
Simple point and shoot cameras
A very simple, inexpensive point and shoot camera is capable of documenting your garden, but you may quickly become disappointed with the results and limitations of the camera.
Pros
These cameras are quite inexpensive and perfect for someone starting out and not in need of high-quality images
Simple point and shoots are often available at ridiculously low prices on Kijiji or at discount stores.
They can be great starter cameras to introduce children to the joy of garden photography.
With careful technique, the cameras are capable of good images entirely usable for social media and small 4x6” prints.
Cons
A fixed focal length lens can be a limiting factor that makes moving in close to your subject difficult.
The shutter lag (time between pressing the shutter and taking the picture) can get frustrating if you are trying to capture moving subjects such as insects, butterflies, birds or mammals.
The size and quality of the sensor is likely too small and of lower quality to give you satisfactory results over time.
The look and feel of the camera in your hand may not inspire you to do your best work.
High-end point a shoot cameras for enthusiasts
Pros
The best choice for gardeners wanting high-quality images in a small, carry-around-everywhere package.
Great for the garden, but also for vacations, daily outings and images of your children or grandchildren.
Most feature high-quality lenses with the ability to get close enough to capture insects and butterflies.
Many feature zoom lenses from wide angle to telephoto that allow you to capture garden vistas as well as acceptable images of birds and mammals.
Most feature built-in effect filters and some provide the ability to accept filters such as a polarizing filter (important to reduce glare from leaves and water.)
Many will accept additional accessories such as external flashes, add-on lens hoods, custom cases and remote releases.
The best cameras will inspire you to get out in the garden and explore the camera’s capabilities.
Cons
The best of these cameras can get quite expensive and may be more than most are willing to spend.
Despite their high-price tag, the cameras can still suffer from shutter lag.
Many of these cameras have short telephoto lenses ranging from 28-105mm, which falls short when trying to capture birds from a distance.
Bridge Cameras
Pros
Compact size for full-featured camera
Extreme telephoto for small subjects like birds
Good macro capabilities
Adjustable LED screens for taking pictures at ground level
Cons
Shutter lag makes capturing moving subjects difficult
Smaller sensor limits size, quality of images.
Electronic viewfinder may not be suitable for some photographers.
Extreme telephoto is slow and focus can be a little unpredictable.
Although the cameras are equipped with long telephoto lenses, it is difficult to get a soft background compared to fast telephotos on DSLRs and mirrorless cameras.
DSLRs and mirrorless cameras
Although digital single lens reflex cameras are still available, they are quickly being replaced by cameras without mirrors. If you are a die-hard DSLR shooter, more and more are available on the used market at good prices.
Pros
Allows for a complete line of lenses from extreme wide angle to extreme telephoto as well as specialized macro lenses.
An array of accessories that enable you to tackle difficult situations from macro lighting, to remote capture of birds and mammals.
Many are workhorse cameras that are weather resistant.
Larger sensors create outstanding image results, low in noise (grain), and able to shoot in much lower light conditions.
The images are easily cropped without losing too much quality. (see fox portrait below).
Able to shoot extremely fast to capture 20 plus frames per second.
Cons
These cameras and lenses can be quite large and heavy to carry for long periods of time. Mirrorless cameras are smaller and lighter but still large in comparison to most of the cameras discussed above
Cameras and lenses can get very expensive making some of the specialized lenses almost unattainable for average photographers.
Provides the most flexibility of all cameras.
In conclusion
Like I said earlier, I don’t like to tell readers what cameras to purchase. New, more updated cameras are coming out monthly and advances in digital photography – although slowing to some degree – continue to push the boundaries. I can’t say what cameras to purchase but I can recommend that you make every effort to purchase the best camera you can afford on the used market.
I like to purchase from Ebay and Kijiji but don’t hesitate to purchase cameras and lenses from local camera stores or on-line stores like Adorama Camera or Keh Cameras. Photography is very much a “must have the latest device” hobby, so it’s an opportunity to purchase excellent used cameras and lenses off photographers looking for the latest and greatest.
With a little searching, you can find outstanding bargains on high-quality used cameras.
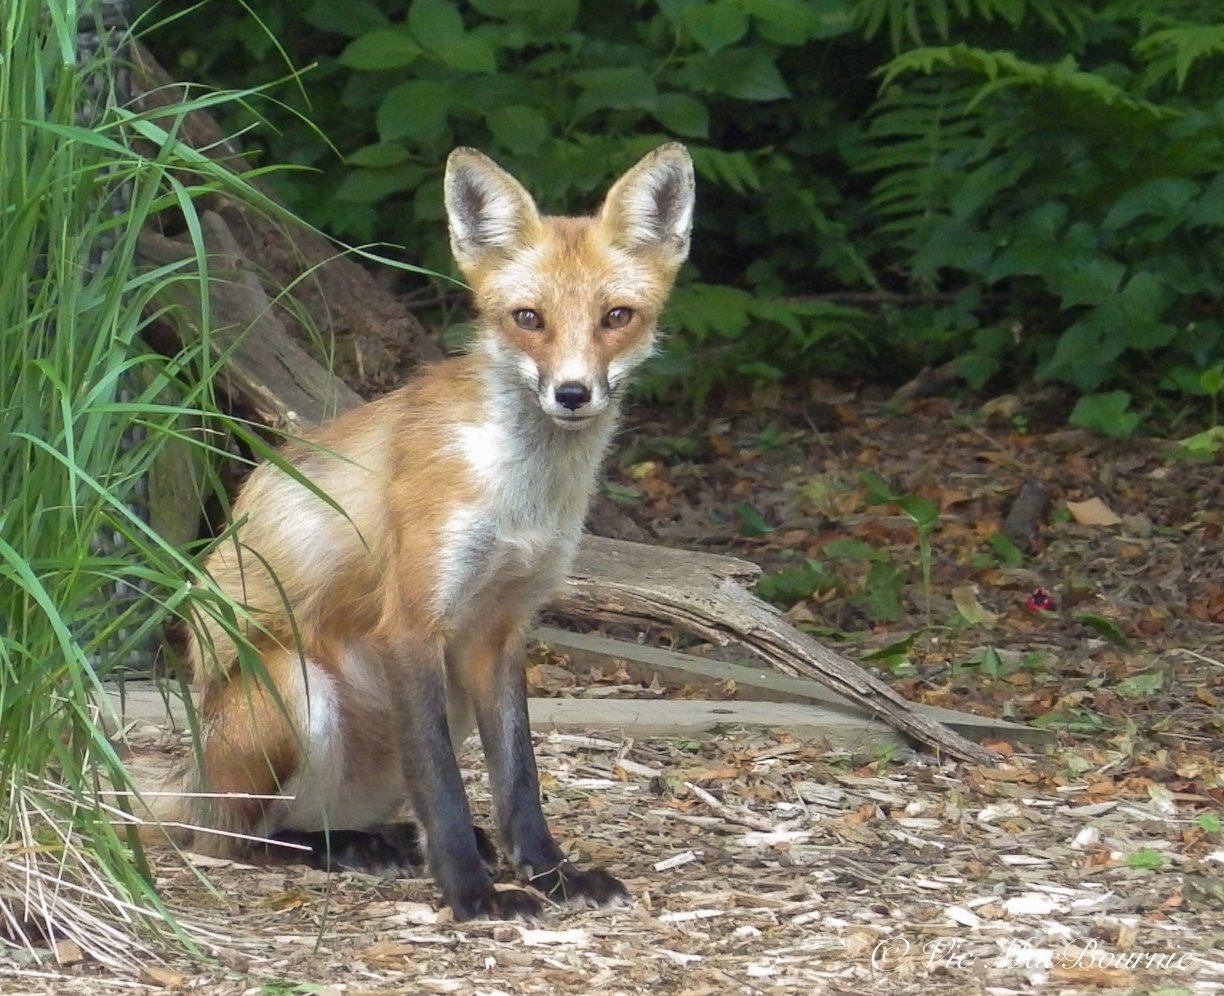
Tips to photograph wildlife in your woodland garden
Creating the right environment to be successful in the garden involves a lot of hard work. But, in the end, it pays off. It’s not luck that you saw an oriole, a fox or hummingbird in your garden. It’s the result of that hard work you put in earlier to create the right conditions.
Bridge camera is great choice for garden photography
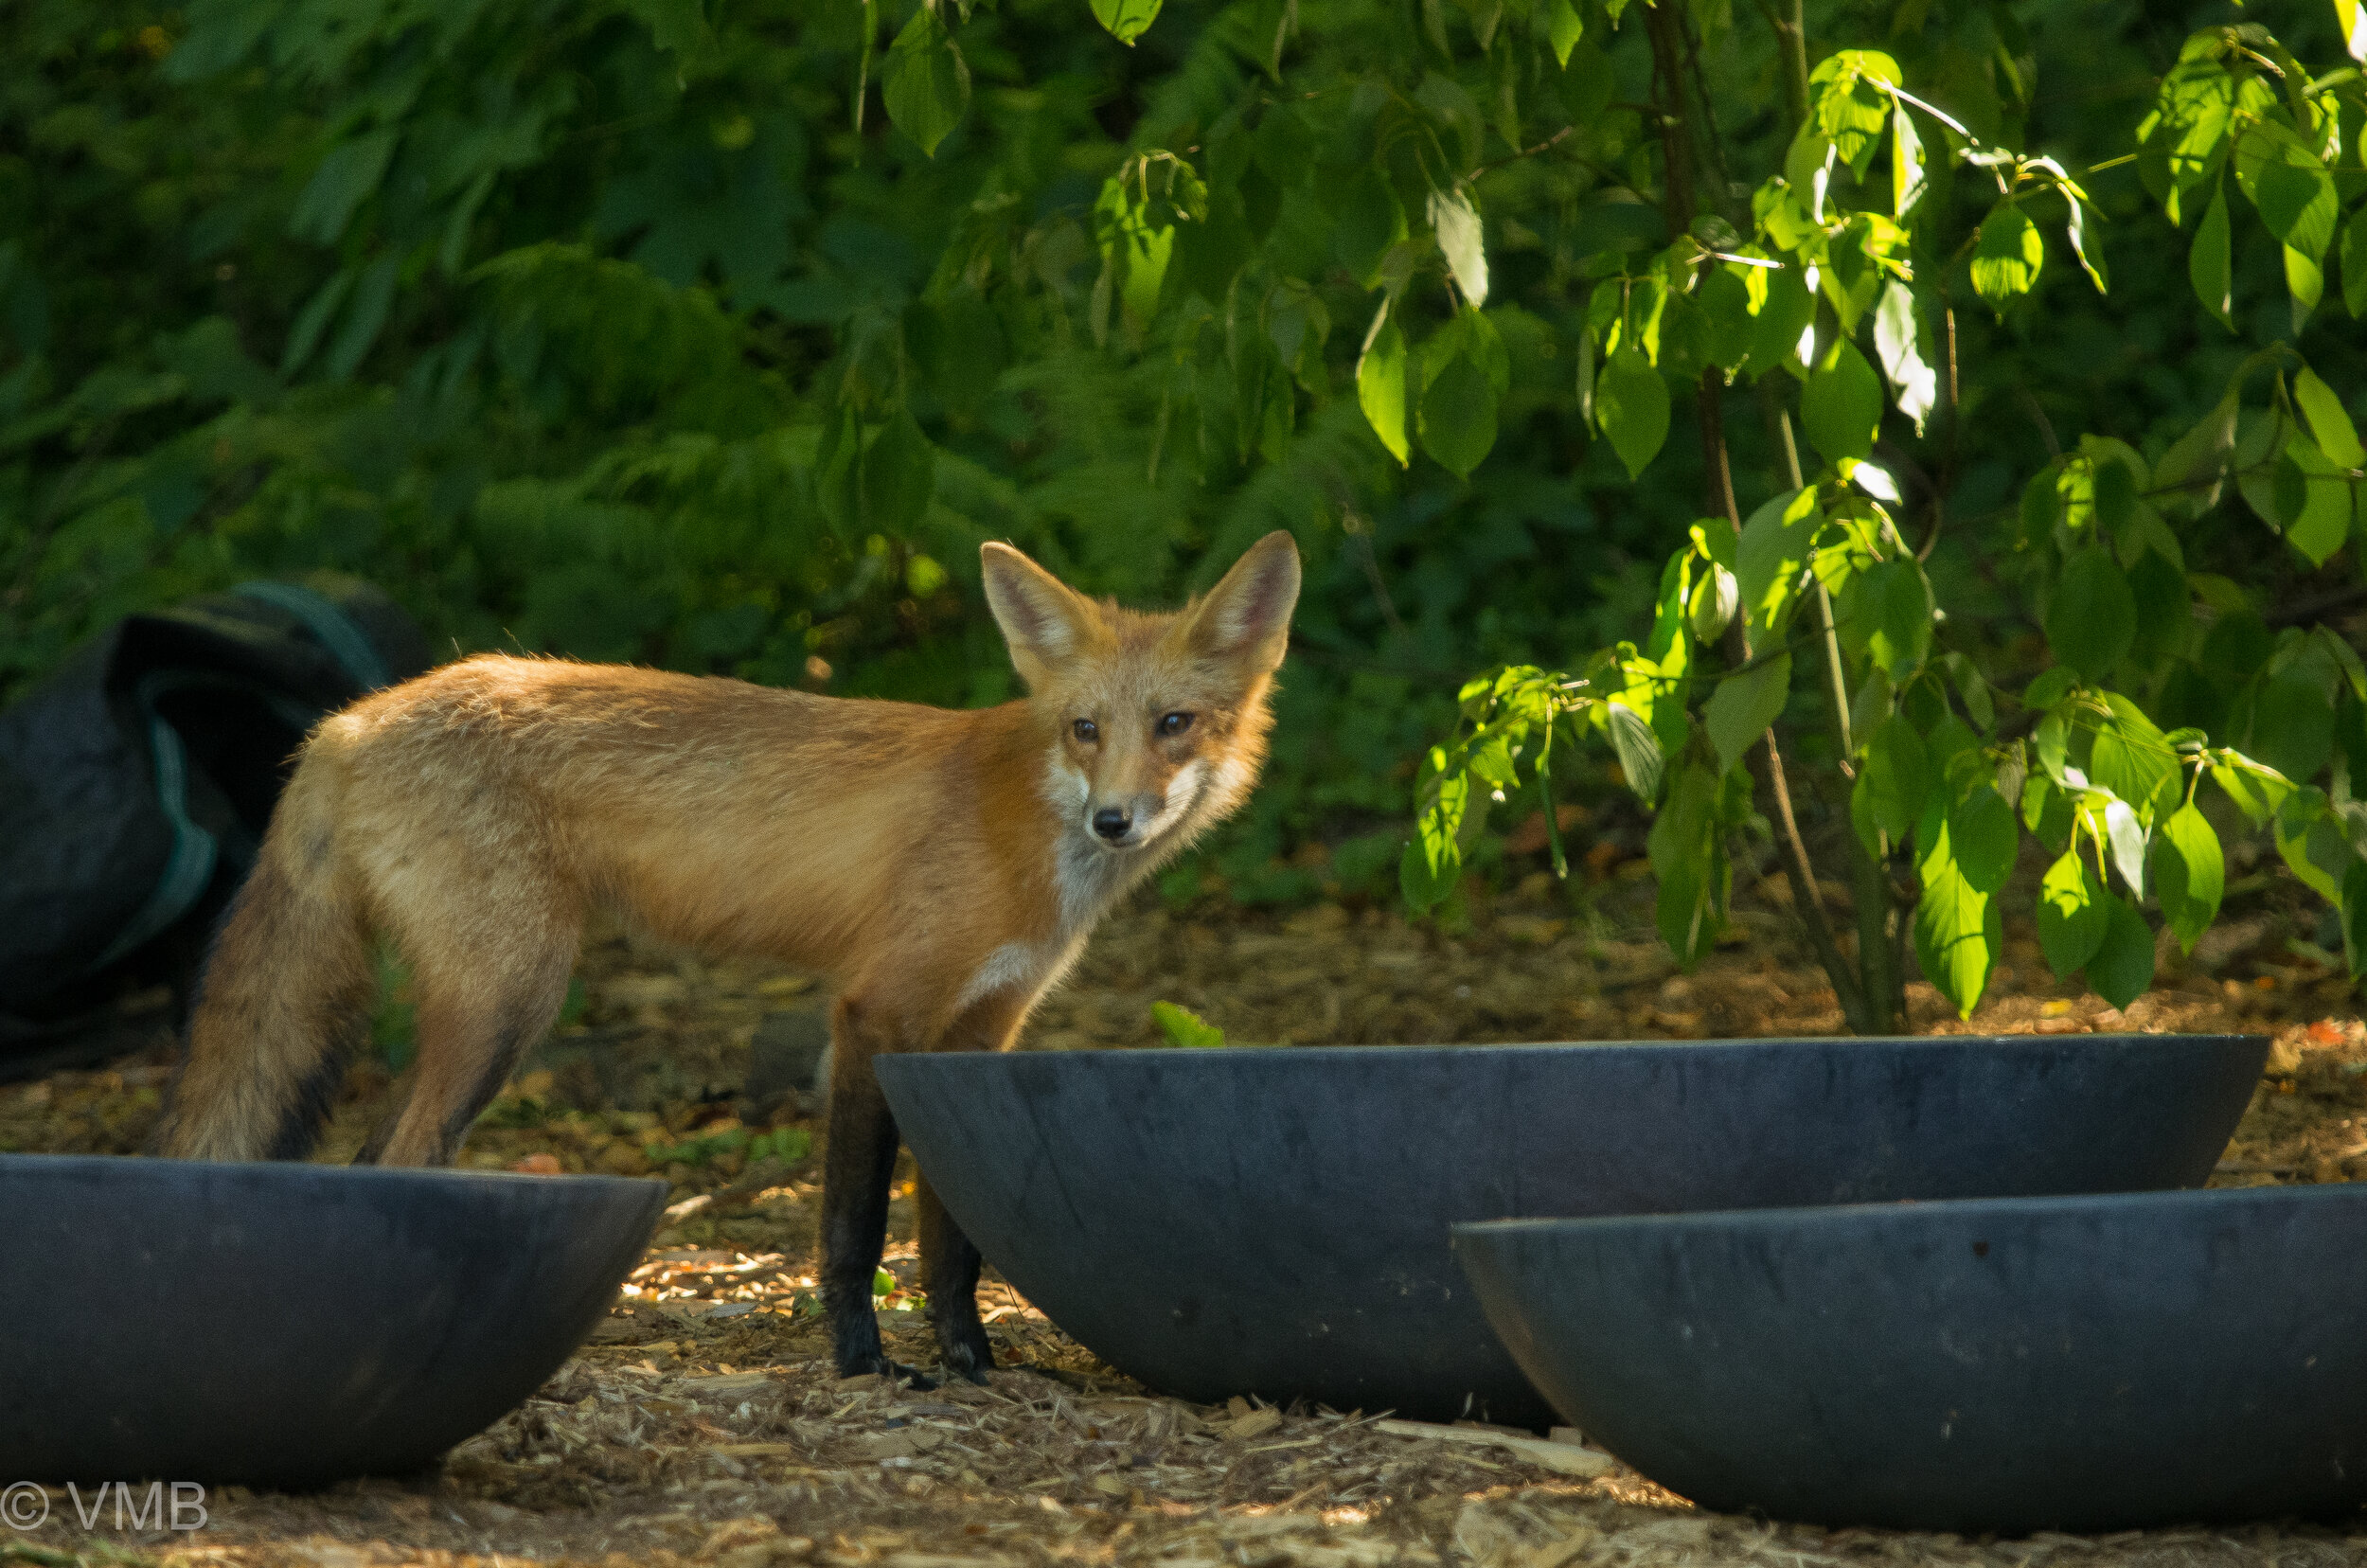
One of our neighbourhood foxes dropped in for its daily visit. It helped that I was armed with my camera on a monopod and my favourite lens.
This fox image is an example of how the right environment created an opportunity to capture an image that presented itself.
It began with a decision to work on getting a good image of a hummingbird feeding at a native Cardinal flower, but ended hours later with a memorable image of a fox.
Let me explain.
The cardinal flower was at its prime and I knew that, if I wanted to use it to get an image of a hummingbird feeding, I needed to act swiftly. So I set the camera on a tripod, filled up my coffee and waited.
(If you are interested in exploring garden photography at a higher level, be sure to check out my comprehensive post on the Best camera and lens for Garden Photography.)
If you are looking for a new camera or lens, check out B&H Cameras & Video for a complete line of cameras and lenses.
And, if you are wondering how a point-and-shoot digital camera that’s more than 10 years old can perform in the garden, be sure to check out my post on the Canon PowerShot Elph 500 HS.
The hummers came to the feeders surrounding the Cardinal flowers but only stopped at the flowers three times for a brief moment.
About three hours into the shoot, I noticed a fox standing by our shed looking my way. It was by no means stressed by my presence. In fact, it seemed perfectly happy to share the yard with me provided we stayed at a comfortable distance.
How often have you been in the yard and a great photographic opportunity presented itself to you? Too often, we are not prepared. Chances are, all we have is our smart phone by our side and the resulting image is nothing but a poor replica of a memorable moment.

The Pentax X5 and other bridge cameras from major manufacturers allow the photographer to be ready when the opportunity arises. I was sitting out in the garden when this fawn decided to visit. The 580mm reach on the Pentax X5 allowed me to get in close without scaring the little fawn.
But on this day I was in luck. The camera was already set up with my favourite 300mm F4.5 lens on a monopod.
I couldn’t ask for a better situation. Even our dog Holly had yet to notice the fox that trotted over to our three large water bowls and helped herself to a long drink.
A few quick bursts of photos from the 35mm DSLR camera and off she went. Like a ghost. There one moment … the next, gone. It was over as quickly as it began.
The lesson learned was simple: Be prepared.
Today, even if I just go out to enjoy my morning coffee, I always have a camera by my side ready for action. Sometimes it’s a simple “Travel camera” (read my travel camera review here) with a wide angle to short telephoto lens that is great for basic garden shots but will not likely get you close enough to most wildlife.
If you are looking to upgrade your camera equipment – be it a new camera body or lens – be sure to check out KEH Camera Exchange for the best prices on excellent used equipment. You can also trade in your used gear to help curtail the cost of new equipment.
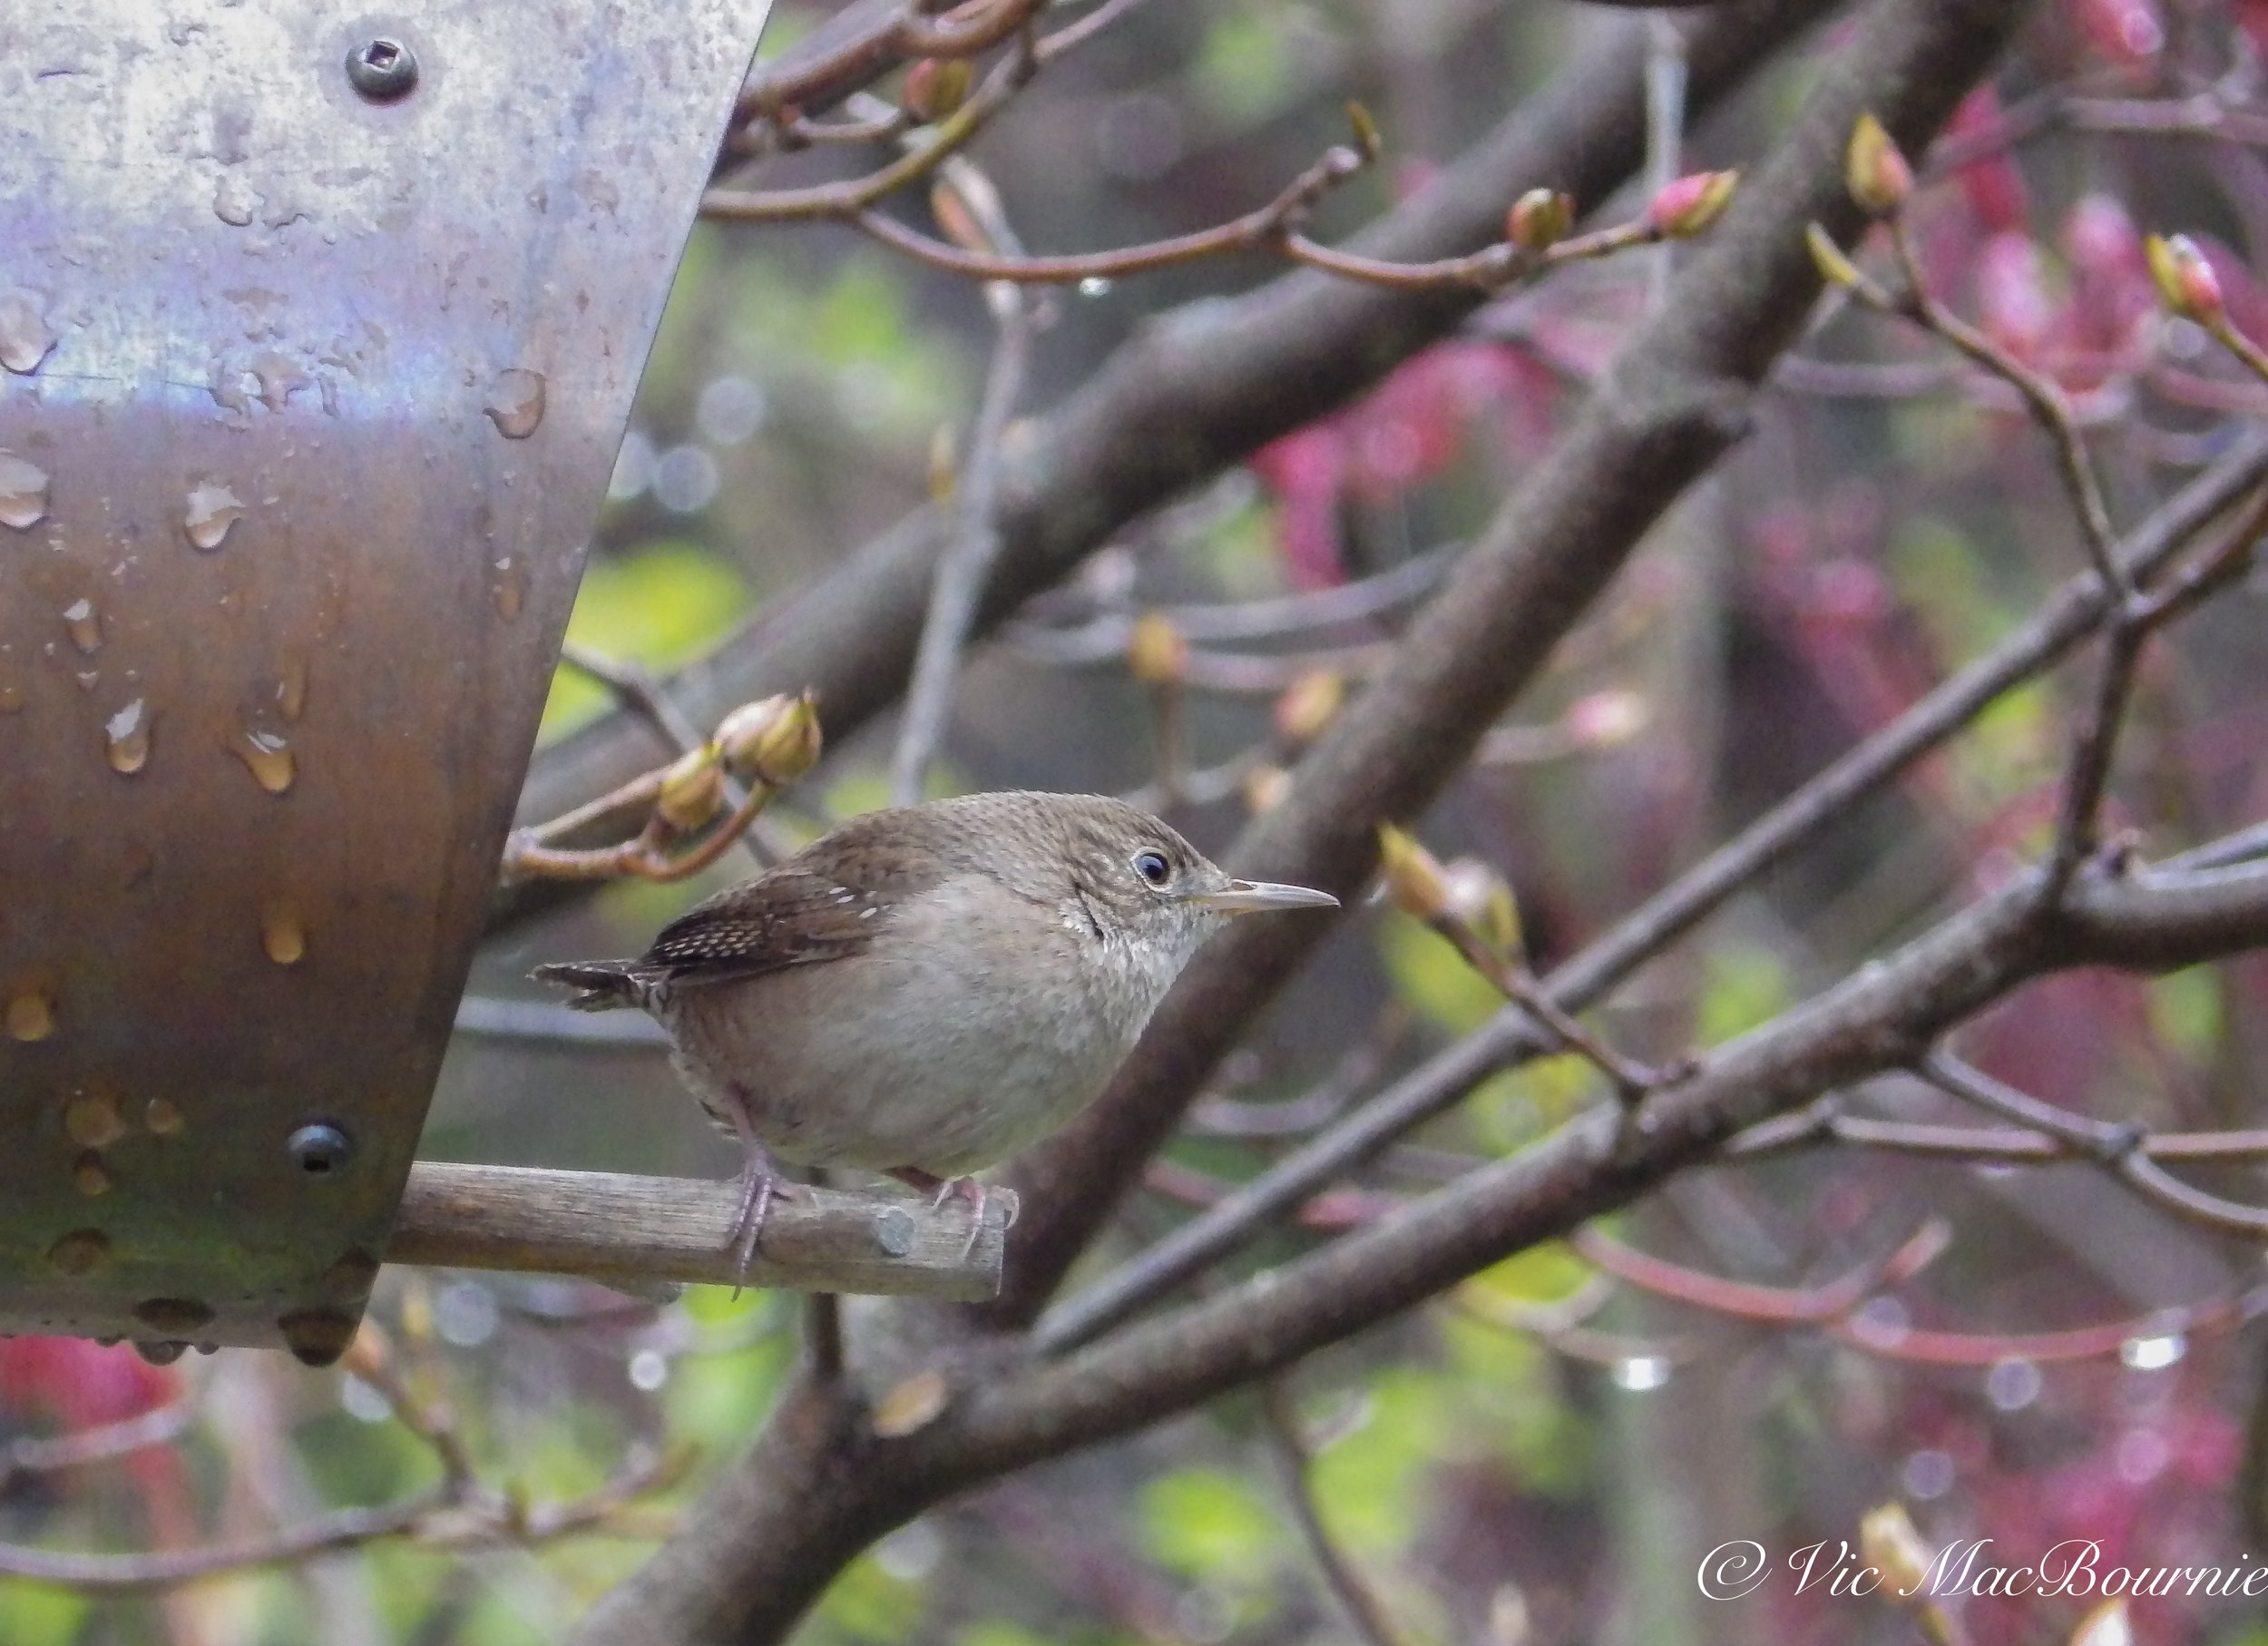
This Carolina Wren was photographed with the Pentax X5 Bridge camera that comes equipped with a super telephoto lens capable of shooting wide angle images as well as telephoto shots and even close-up macro type images.
Most likely, it is my versatile “Bridge camera” that allows me to shoot everything from long telephoto images of wildlife, including birds and butterflies, to sweeping wide-angle garden vistas, to macro shots of flowers and insects.
On this day, I happened to have my 300mm lens on the camera and ready to go, which made capturing the fox image possible.

This young fox decided to pose for me for a minute giving me time to focus the Pentax X5 “Bridge” camera to capture the image. I needed to use the full zoom power of the X5 (500mm) to capture the image.
More recently, however, I have a “bridge camera” with me. I have used the camera for more than a year now and have come to appreciate its versatility, with its ability to go from extreme telephoto to wide angle and even a very usable macro mode.

Bridge cameras, which are offered by all the major camera manufacturers, can be the perfect camera choice for garden photographers looking for a single extremely versatile camera that is at home photographing garden vistas as it is birds and other wildlife. Add to that versatility the ability to get in close to flowers for macro photography and it’s hard to believe that everyone is not lining up to purchase one. These cameras can be described as mid-priced cameras situated between a simple point-and-shoot and a more serious 35mm SLR with a complete line of lenses. Bridge cameras look like a typical digital single lens reflex (DSLR), but without the interchangeable lenses.
The bridge camera offers a built-in lens sporting a wide angle to long telephoto lens. The combination creates an easy-to-carry-around versatile camera that can deliver very good results with a little practise.
But they are not by any means perfect.
My bridge camera uses an electronic viewfinder in addition to the back LCD screen to view the image. The electronic viewfinder takes getting used to and falls far short of a optical viewfinder found in traditional DSLRs. To add to the difficulty of using the Bridge camera is a significant “shutter lag” meaning an excessive amount of time between when you press the button to take the image and the time it is actually taken. This shutter lag can mean the difference between getting the shot and missing it entirely.
In addition, because most of these cameras are so dependent on electronic viewfinders and the electronic zooming of the lens, some of these cameras tend to exhaust your batteries quickly, especially if you use the large back LCD screen as your primary viewer or to check your images regularly. My camera uses regular AAA batteries, which can be convenient when you are travelling, but compared to rechargeable batteries, can also be expensive to use. The other issue I have with the Pentax (which is no longer available) is the fact I cannot easily add filters to the front of the lens. This may not be a problem for most photographs, unless of course, you need to use a polarizing filter to remove glare from leaves or a pond.
Like most Bridge cameras, the Pentax X-5 bridge camera that I am using came with a very long 26X telephoto lens (the equivalent zoom for traditional 35mm cameras of about 22-580mm.) Most bridge cameras come equipped with a lens that provides the photographer with both a solid wide angle lens as well as a super-long telephoto lens.
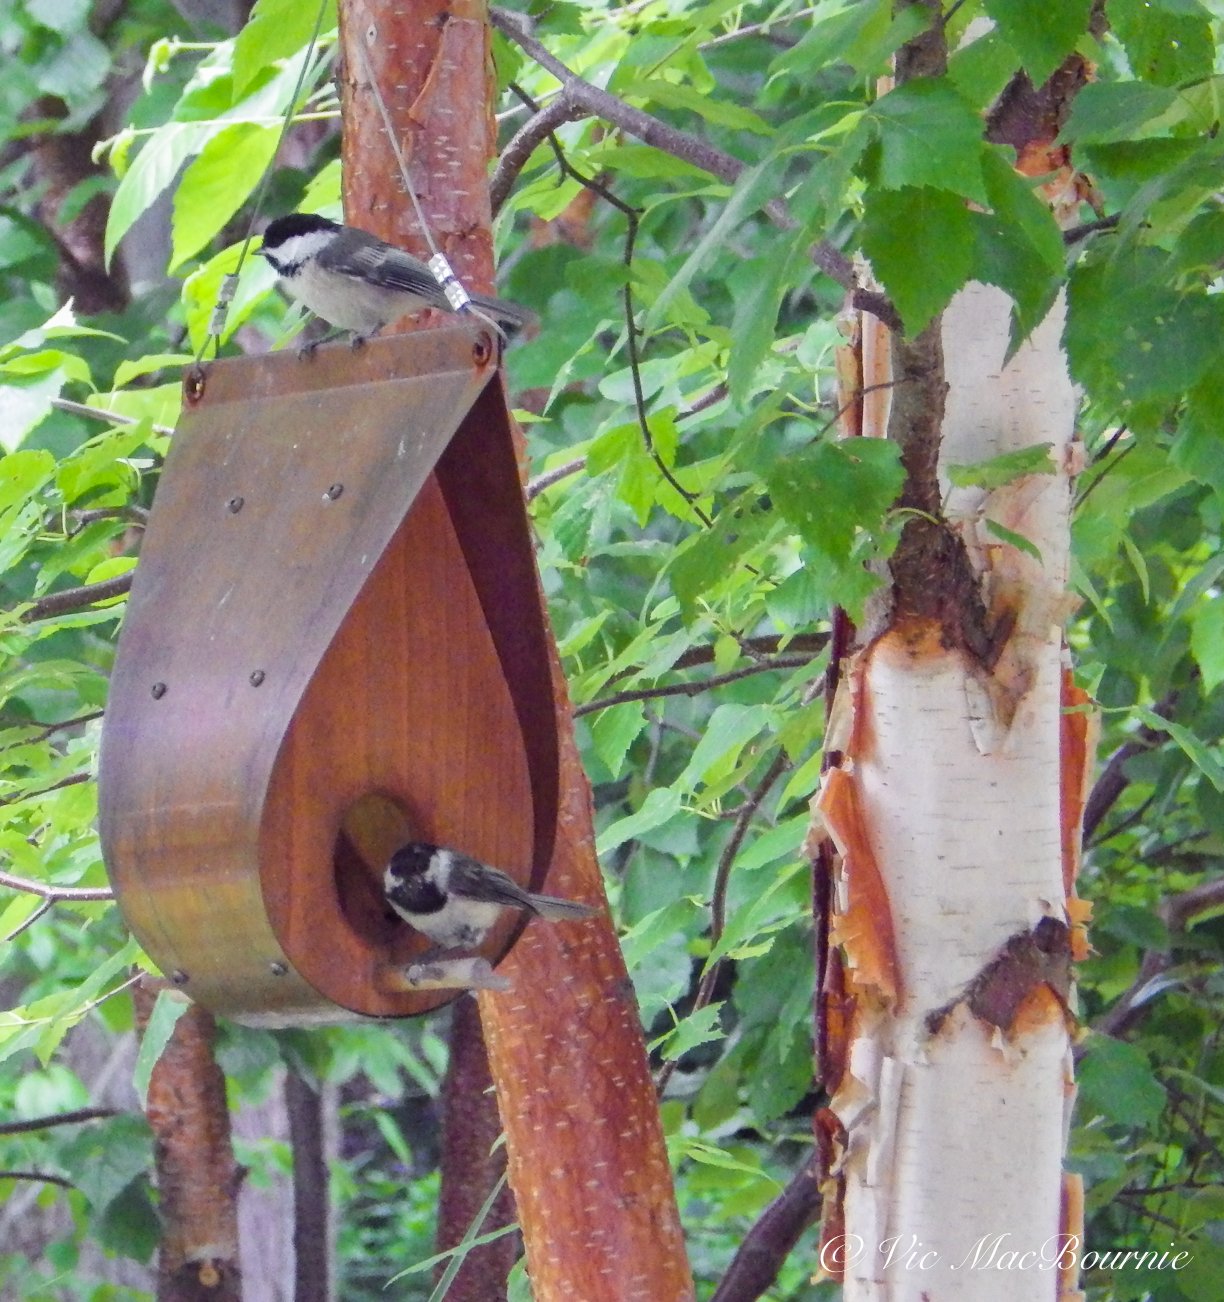
This image taken with the Bridge Camera is an example of the type of images that are possible just sitting in the backyard waiting for the right opportunity.
Bridge cameras like my Pentax X-5 also come equipped with an impressive macro feature making it the perfect camera to carry with me into the garden for casual macro shots. For more serious macro photography, I will mount a 50mm or 100mm dedicated macro lens on a 35mm SLR camera.
Being prepared, having the right tools at hand and, of course, some luck on your side can mean the difference between getting the shot and missing it.
Even seeing wildlife, let alone getting good photos of them, depends on a lot of factors going your way.
Luck certainly plays a role in any shot, but I like to think that it plays a smaller role than most people think.

A macro image of a clematis taken by the Pentax Bridge camera the X5, on macro mode. This shows the versatility of the camera and its lens that is able to go from long telephoto (see above image of the Fox) to extreme macro without changing the lens.
Being out in the yard for more than four hours patiently waiting for the hummingbirds to cooperate creates the opportunity to be successful. Still, I was unsuccessful getting that shot of the hummingbird. Instead, I had to “settle” for the fox shot.
I like to think you create your own luck.
Setting out large water bowls meant to provide local wildlife with a fresh water source helped create that opportunity for the photograph.
Creating a natural garden, providing a source of natural food and moving water in the form of bubbling rocks and fountains, not using pesticides, having woodpiles … these all provide the right environment to getting the photograph, or the opportunity to observe the wildlife that call our property home.
PopPhoto website lists their favourite Bridge Cameras in this informative article starting with the best overall camera going to the Sony Cyber-shot DSC-RX10 IV, the Canon PowerShot SX70 HS as the best Wildlife camera and the Panasonic Lumix FZ80 as the best budget camera.
It doesn’t have to be a fox. It could have been a bird, a butterfly a reptile, or even a photograph of a beautiful tree or grouping of flowers.
The day before this shot was taken, I was trying to capture some photographs of birds enjoying my new solar-powered fountain, when a little chipmunk decided to hang out with me for a while. So I got “lucky” and was able to get some great shots of the chipmunk too.
Getting lucky is really about creating the right environment to get photographic opportunities and then taking advantage of these opportunities.
It’s the same in your everyday life. Put yourself in the best environment to succeed and chances are you will.
Getting up early, spending time in our gardens, getting up close and intimate with flowers. These all create the opportunities to be successful.
I’ll be out again soon working on getting the shot of the hummingbird at the cardinal flower. Maybe I’ll get “lucky” and the hummer will cooperate this time.
This page contains affiliate links. If you purchase a product through one of them, I will receive a commission (at no additional cost to you) I try to only endorse products I have either used, have complete confidence in, or have experience with the manufacturer. Thank you for your support. This blog would not be possible without your continued support.

Perfect grass: Waste of time or ideal backdrop?
So you’ve got a perfect lawn. That don’t impress me much. In fact, the perfect lawn is becoming a thing of the past for anyone who cares about the environment. It’s time to explore a more naturalized landscape that is becoming popular as more gardeners realize the environmental impact of traditional lawns.
Is it time to replace lawns with more ecological alternatives?
“So, you’ve got a perfect lawn. That don’t impress me much.”
Every time I look out into a sea of perfectly manicured green grass, complete with in-ground sprinklers, an annual contract with the local lawn pesticide company and an obsession with a common non-native ground cover that, quite frankly, is a boring monoculture, I cringe.
Sure, a little grass might have its place, but it pales in comparison to a beautiful, healthy garden full of native plants that attract pollinators, butterflies and other fauna. Slowly more homeowners are understanding the horrors that a massive sweep of perfect lawn can bring to a landsccape. Extensive use of fertilizers, herbicides and pesticides combining into a lethal brew that not only kills the soil the grass depends on, but leaks into our rivers and streams or into our wastewater where taxpayers are forced to pay to clean it again.
And, to make matters worse, that perfect lawn does not come cheap.
That might be the reason more and more homeowners are choosing to actually cover their property with an expensive carpet of synthetic lawn, all in the name of obtaining the look of a “perfectly boring lawn.”
For those who think the synthetic lawn is the ideal alternative, consider its potential environmental impacts: it absorbs heat, has to be sanitized from pet waste, it compacts the soil under it, and restricts any real hope of encouraging insects and worms to flourish either above or below ground.
Used sparingly, synthetic grass has its place I guess. It can solve some common problems homeowners in small urban yards face. But there are probably better, less expensive and more environmental friendly alternative ground covers or mulch that can get the job done.
Grass is without a doubt the most expensive ground cover you could choose
In fact, that green grass so many homeowners strive for is costing them big time.

In our front garden, all the grass has long since gone, replaced by plants, trees, groundcovers, stone, rocks and natural cedar mulch.
One estimate has the average cost of an American homeowner, just to water the lawn, at about $570 a year. That doesn’t take into account so many other factors including environmental/ethical costs of achieving that perfect green lawn.
There are the chemical pesticides, herbicides and fertilizers (banned in many Canadian cities), lawn repair, aerating, rolling, dethatching and it goes on and on. Oh, and let’s not forget the cost of the tools needed to keep the lawn looking perfect.
The bigger the lawn, the more expensive the tools. Consider a riding lawn mower valued at about $2,000 for your average model. You can pay more, a lot more, if you really want to cut that beautiful lawn in style. Forking out $3,000 for the pleasure of owning a machine to cut your lawn for 5-6 months a year would not be an exageration.
If a riding mower is unnecessary or out of the price range, a regular high quality lawnmower should set you back between $500-$700. There’s even robot mowers that will set you back several thousand dollars. Then there are the the must-own, loud and obnoxious gas-powered edgers, the leaf blowers that now seem to have become grass-clipping blowers or dust movers in most urban neighbourhoods.
Add the heavy, lawn-crushing rollers homeowners have been convinced are vital for that perfect lawn.
Yes, crushing what little air is left in the sickly, chemical-filled soil so the lawn looks flat is critical. Following a good rolling, is when the aerators come out to pull plugs out of the soil to add back some of the air that was just taken out of the soil by the heavy roller. And, let’s not forget the deep-grass rakers known to remove thatch – better known by gardeners as organic material slowly breaking down naturally into the infertile soil.
And the fall brings out the leaf vaccums because no grass worshipper would want to leave any organic matter on the lawn or garden to break down and improve the soil.
Does anyone else see the absurdity in all this?
It’s difficult to put a real price on this lawn obsession, but it’s clear there are a lot of companies making a big-time profit on homeowners’ blind obsession with their lawns.
One person who decided to dig into his monthly water usage compared the same time period from May 13 to August 11th. He found that during this period his water usage went from 9,724 gallons of water to a whopping 19,448 during the same period year-to-year.
What made the stats even more alarming was that the difference was almost entirely attributed to one month - the month of May. The water usage in that month alone went from 8,700 gallons to 2,251 gallons. The reason? He watered his lawn every other day because he chose to lay new sod in the front yard. His lawn is small, requiring moving his sprinkler only once to cover the entire front property and he only watered for 15 minutes at each location.
What was the real price of laying that beautiful new sod?
Just think of how much water is being used on larger properties to obtain the perfect lawn.
It’s absurd.
Here are a few things to consider:
• The average homeowner spends up to 100 hours every year walking behind a noisy, exhaust-spewing lawn mower.
• In 2005, lawns covered an estimated 63,000 square miles of America - about the size of Texas
• Most brands of grass seed contain almost nothing but Kentucky bluegrass and other introduced species not built for most Canadian or American backyard conditions.
• A typical cost for spring treatment by a lawn care company can range from $300 to $500 that include aeration and power raking (both unhealthy choices for your lawn.)
•The biggest drain on our water resources during the summer is outdoor use, primarily lawn and garden watering, according to a British Columbia, Canada report. Compared to residents’ winter water use, summer use is close to 65 per cent more.
• In many areas throughout North America, most of the rainfall or precipitation occurs in the winter months, not the summer.
• A garden hose can deliver (and waste if left on) more than 600 litres (132 gallons) of water an hour.
• A typical lawn needs a maximum of 25 mm (one inch) of water per week. Any more is likely wasted and is beginning to cut off oxygen to the roots of the grass and threatening its vigour.
Why do we love our lawns so much?
Lawns are the most grown crop in the United States. That’s sad when you think that no-one gets any nutritional value out of this so called crop. Lawns are grown simply to make the fronts of homes fit in with the neighbourhood and the homeowners look and feel good about themselves.
In Britain, TV gardening superstar Danny Clarke revealed recently that small garden lawns are one of the most common mistakes he sees gardeners in that country make. Danny says sacrificing border size for lawn is a mistake he is seeing over and over again. The result is tiny, narrow borders with little room for more than one or two plants stretching along a fence.
Even in the official birth place of the lawn, gardeners are realizing the amount of work lawns, even small ones, take to maintain. Clarke explains, “You spend more time mowing your lawn and looking after it than you do tending to your plants.”
He goes on to explain that “lawns never look 100 per cent unless you are on them 24/7, weeding and feeding them. To keep a lawn looking good you need to be mowing it, believe it or not, at least once a day.”
Well, I’m not sure about cutting it every day, but the longer you allow grass to grow, the more stress you put it under with each cut.
Clarke goes on to explain: If I had a small garden I wouldn’t have a lawn. I would ban lawns and just have plants. Plants are what makes your garden. If you want an aesthetically pleasing space, then the more plants you have in there the better”
• If you are considering creating a meadow in your front or backyard, be sure to check out The Making of a Meadow post for a landscape designer’s take on making a meadow in her own front yard.
On our property the lawn is almost gone
On our property, the lawn has slowly disappeared over the 20 plus years we’ve lived here. What once took about 1.5 hours of lawn cutting and edging, now takes maybe 10 minutes. All the grass has been removed in our front garden, and about 90 per cent removed from the back. All that actually remains is a small round patch in the middle of the yard that acts as an open area and forest edge for the plants and trees in the perimeter.
According to an article in Scientific American: “To have a well maintained lawn is a sign to others that you have the time and/or the money to support this attraction. It signifies that you care about belonging and want others to see that you are like them.”
The long history of lawns
The lawn as we know it was invented in the 18th century for English country estates. In those days, owners could count on a cool, rainy climate in addition to an army of servants to keep up with the yard work. Introduced to North America a few decades later, European turf grasses like Kentucky bluegrass allowed North Americans to grow a patch of green on their property as a symbol of prosperity.
Well, at least we could try. Lawn care experts say most Canadian homeowners set themselves up for a war against nature they cannot win using the standard arsenal of non-native turf grasses—no matter how many hours of labour, gallons of water and piles of fertilizer they employ.
To this day, lawns continue to be a sign of financial success. Many homeowners hire landscapers to guarantee the perfect lawn without having to invest their own time to cutting, bagging and edging their lawns.
But the days of the perfect lawn are disappearing fast. Water, pesticide and herbicide restrictions, along with increased awareness of the environmental costs, possibly through increased social media presence, are forcing homeowners to rethink the value of a wasteful lawn.
Lawns are thirsty and bad for the environment
According to Scientific American: Lawns require the equivalent of 200 gallons of drinking water per person per day.” It reports that Californians, for example, have taken to shaming (#droughtshame) neighbours who persist in watering their lawns.”
As Bob Dylan once wrote: “The times they are a changin.”
Even if older Canadian and American homeowners refuse to give up their perfect lawns without a fight, their more environmental-aware children are slowly adopting a more natural landscape design aesthetic.
One only needs to take in the garden designs beginning to dominate shows like the famed Chelsey Flower Show in England to see that naturalized gardens are more and more on-trend. The growing movement embraced by a younger generation reflects a more natural lifestyle and the return of naturalized lawns welcoming more native wildflowers, encouraging clover and other flowering weeds.
Over the course of more than 20 years in our home, my wife and I have eliminated 80-90 percent of the grass on the property. It’s been a long, arduous journey but I have gone from probably two hours of lawn mowing to maybe 10 minutes. The great swaths of grass have been replaced by living and non-living ground covers. Natural cedar mulch river rock and pea gravel make up the non-living ground cover, while sedum, ferns, mosses, and traditional ground covers make up the remainder of the living mulch.
Gardening on a budget links
Ten money-saving tips for the weekend gardener
DIY Bark Butter feeder for Woodpeckers
DIY reflection pond for photography
Click & Grow is ideal for Native Plants from seed
Remove your turf and save money
Hiring students to get your garden in shape
This page contains affiliate links. If you purchase a product through one of them, I will receive a commission (at no additional cost to you) I try to only endorse products I have either used, have complete confidence in, or have experience with the manufacturer. Thank you for your support.

When is the best time to move a plant, shrub or tree?
What’s the best time to move that tree, shrub or plant? Moving plants is always a little scary but if done well, it can be done successfully. here are some tips to make sure the move comes off without a hitch.
The question many gardeners often ask is either, can I move this plant now, or, is it too late to move this plant or tree?
My answer is a simple one – “It’s almost never too late to move a plant, tree or shrub.”
In my opinion, it’s never a bad time to move a plant, shrub or tree if it is not doing well where it is currently planted or you just can’t live with a plant in a particular spot any longer. With the exception of extremely late in the fall when the ground has either begun to freeze up or is just days away from serious frost, or in winter, gardeners should not worry too much about moving most plants.
Now, that’s not to say every plant is going to transplant successfully. There are plants – especially those with long tap roots – that are extremely difficult to move. If you are careful, however, and take steps not to stress the plant too much and give it a nice new home with good soil in a preferred spot, chances are it will bounce back quickly and be much happier in its new location.
There’s also some ideal times to move trees, shrubs and plants. If either a plant is not doing well in the area it is currently located, or, if it has to be moved for various reasons, don’t hesitate to get the shovel out and get busy making the move.
So far this spring I have already moved a small Dogwood tree (Cornus Florida), a Pagoda Dogwood Tree (Cornus Alternifolia) three Golden Carex plants, a group of Milkweed plants and Black Eyed Susans that were moved from the front of our yard to the back garden, and a clump of Monarda that got divided to spread the plant around the garden. The common milkweed plants turned out to be the most difficult because of their long tap roots. it too a few days for them to recover but luckily I chose to move them during rainy and cool period in early June.

Early fall when the soil is still warm is the perfect time to move plants, shrubs and trees. Just make sure that the plants get several weeks in the ground prior to the soil freezing for the rest of the winter. Remember that the soil will stay warm long after we get our first freezing temperatures.
In addition, in the next few days, I expect to move a grouping of Solomon’s Seal, Canada Anemone, Bunchberry and who knows what else will find a new home before the heat of summer hits us all.
Over the years I have moved so many plants and trees it’s hard to remember them all, but I do recall moving a huge Blue Spruce, three Eastern White Pine, numerous hostas, ferns, Japanese Maples and a large Red Maple that was growing in a corner of the yard and is now three storeys high.
Out of all the trees, plants and bushes I have moved, I can only think of one dogwood that I have lost because of the move. However, many of the plants and trees that have found new homes have experienced serious set back as a result of the move.
It’s important to reduce your expectations after the transplant. If you are moving a flowering tree in early spring, chances are it will not flower that year or maybe sparingly. If it’s a perennial, it may not flower or the flowers may be sparse and smaller than usual.
In the first year after the move, much of the plant’s energy will be going into re-establishing its root system before it begins its growth period. The best you can do is to keep it well watered for the first year. Refrain from over fertilizing the plant so as not to encourage a lot of new growth which can stress the plant while it is trying to establish a good root system.
If you do use a fertilizer try not to use one with a high nitrogen content. The best fertilizer for root growth is one that is balanced with enough phophorous that will promote vigorous root growth when it is applied over the entire root zone of the plant. Phosphorous is represented by the first number (of 3) listed on the fertilizer. Look for a fertilizer with a 3-1-1 or 6-2-2 NPH label.
If you are looking for more natural sources of high-phosphorus fertilizers consider adding the following around your plants (information derived from https://greenupside.com/):
Bone Meal – contains 12 to 16 per cent phosphorus by weight. It is easy to obtain and a good source. Add some Bone Meal into the hole before replanting.
Bat Guano – 4 to 8.6 per cent phosphorus by weight. If you know where a group of bats are roosting, possibly in a box in your garden, this might be an easy source of phosphorous. See my earlier post on bats in the garden.
Hair – is known to contain about 26 per cent phosphorus by weight. Know a barber or hair dresser?
Enriched Rock Phosphate – contains 17 to 30 per cent phosphorus by weight
Fish Meal – contains 4 to 6 per cent phosphorus by weight
Cottonseed Meal – contains 2.5 to 3 per cent phosphorus by weight
Worm Casting – contains 2.5 percent phosphorus by weight
Blood Meal – contains 1.5 per cent phosphorus by weight
Manure – contains 0.2 to 4 per cent phosphorus by weight
Compost – contains 0.5 to 1 per cent phosphorus by weight

This Carex was not happy where I originally planted it along with a couple of others. In fact, when I checked it again this spring the roots had hardly taken to the very dry soil. I waited until spring to remove them and replant them in an area where I could ensure their roots would receive regular watering. Sometimes moving plants to an area that is more accessible to water is reason enough dig them up.
What is the ideal time to move a tree, shrub or plant?
Early Spring is best time to make a move
Although it may change to some degree depending on the plant, tree or shrub, early spring before new growth has begun is almost always the best time to move a plant. Unfortunately, that is not always a good time for gardeners to get out and begin digging up plants, even if they know exactly where they were planted.
Inevitably, the task is left until later in the spring when the new growth is up and the plant is easily identified. This is still a good time because the soil should still be quite damp from winter melt and spring rains.
After a good rain
Other than the spring, the next best time to move a plant, tree or shrub is after extensive rains preferably several days of rain. This ensures that the rain water has infiltrated deep into the ground and saturated the root system. Not only does this make digging out the plant much easier, it helps to severely reduce the stress of pulling the plant out of the soil making successful transplanting more likely.
Early fall can be a good time for a move
Early fall can also be a good time to move a plant. By fall, plants are beginning to approach dormancy creating a window for gardeners to move plants, or plant new ones before first frost. In Zones 5-7, there is a two-month window from about mid-September to mid-November before the first fall frost makes successful transplanting more risky. Gardeners are looking to make the move while leaving a large enough period of time for the roots of the plant to settle in and get some kind of foothold before a serious frost.
Tips to help move the plant, tree or shrub successful
If you have a sandy soil or you think it is is dried out give it a good, deep watering the day before to make the move less stressful on the plant. If it’s a delicate plant and you want to give the move every chance of success, you could go around the dripline of the plant with a sharp spade the day before the transplant to begin freeing up the plants and give the fine external roots a day or two to recover from being severed.
Keep the plant well watered leading up to the move, but not so saturated that the existing soil falls away from the roots when you dig the plant out to make the move.
Have your new planting hole already dug before digging out the plant that will be going into the hole.
In the past, it was thought that the new hole should be filled with new, highly fertile soil mixed with compost and a slow release fertilizer. There is a school of thought that says this practise can lead to a plant with roots that can become root bound if the surrounding soil is of low quality. A good compromise might be to create a planting hole with a mixture of about 50 per cent high-quality soil and compost and 50 per cent of the original soil that was removed from the hole. This combination gives the plant a good start but encourages the roots to eventually spread out in search of nutrients etc.
You can add some bone meal to help the roots get a good start.
And, of course, water your plants in well in their new home.

How to grow sunflowers
Looking to grow sunflowers this season? Here is a guide to growing them in your landscape as well as in containers, including growing tips on the massive, single-flowered variety as well as the smaller, multi-flowered varieties.
Are sunflowers difficult to grow?
Everyone loves sunflowers and growing them is generally simple.
The majority of annual sunflowers (Helianthus annuus) ask for nothing more than lots of sun and water combined with average soil. Generally speaking, the more sun they get the larger the flower will be and the stronger the stems will grow to hold up the large flowers. Fertilizer is unnecessary – maybe some added compost – but mulching will help to hold moisture in the soil. Sunflowers have a very deep tap root that is more than capable of finding water several feet (up to four feet) below ground.

A goldfinch sits atop sunflowers in late summer.
Woodland gardeners, however, may find that their gardens’ lack of sun requires a little more effort and planning to ensure success. Adding to a lack of sunny areas, if deer are regular guests in your garden, there’s a good chance you will also have to take extra steps to get the plants to adulthood.

The rewards of planting sunflowers are many: Fun cheery flowers from summer into the fall and even longer if planted in succession; a tap root that helps to bring nourishment from deep in the soil to the surface; and, especially a natural food source for birds and other backyard wildlife that put sunflower seeds very high on their nutritional needs. (Check out my complete story on providing birds with natural food sources.)
Growing your own sunflowers is great for the birds, bees and butterflies, but don’t overlook the fun you will have photographing them as they brighten up your garden when they begin to bloom. For my comprehensive post on taking a creative approach to photographing sunflowers and ten tips to capture them go here.

A dwarf sunflower in early May grows in one of our new containers.
In this article, I’ll take readers step by step – over the course of a spring and summer – through the process of growing sunflowers and bringing them to maturity both in containers and in the landscape. I’ll be starting some early under lights in our Click and Grow (link to my article) complete with its automatically timed grow lights and self watering system.

One of our dwarf sunflowers in the window box at the end of May. The main flower is almost done, (see dying flower image below) but new smaller flowers are now sprouting off the main flower.
We will also be growing sunflowers in small peat containers that will later be transplanted into the landscape. Other seeds will get their start later in spring in our outdoor raised planters away from hungry deer and still others will be directly sown in our large outdoor planters. Finally, I’ll plant a number of seeds directly into our garden and do my best to get them to maturity despite an abundance of deer and other fauna that visit the garden.
For more on the value of sunflowers in our gardens, check out Fields of Gold: Sunflowers and Goldfinches.
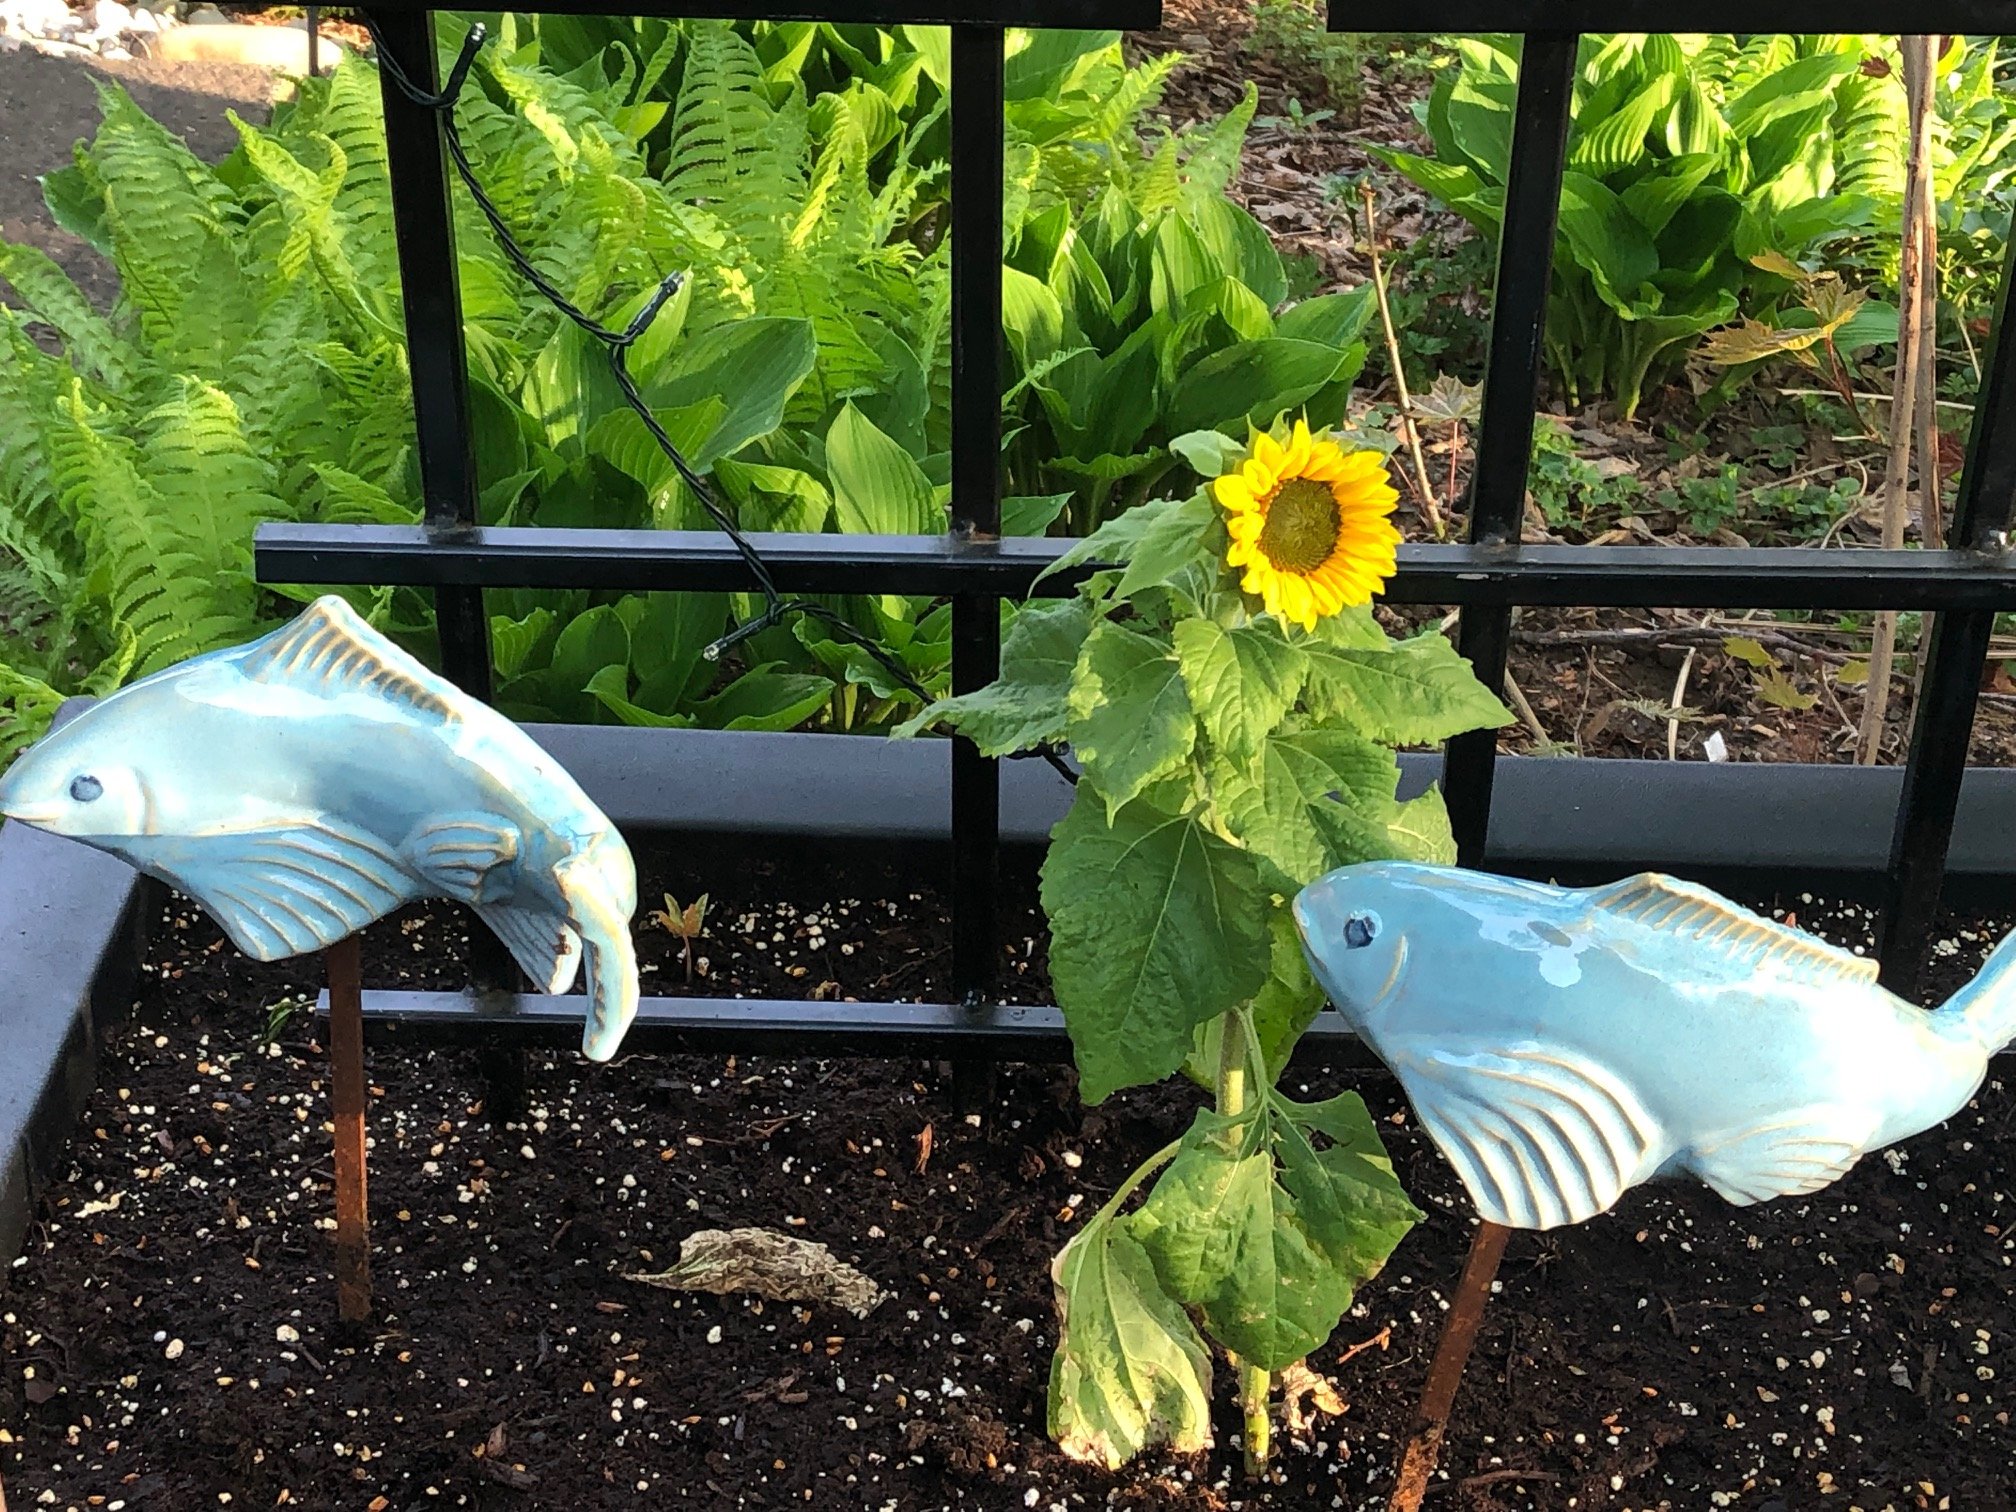
A dwarf sunflower shares it home with a few of our small, ceramic Fish in the Garden.
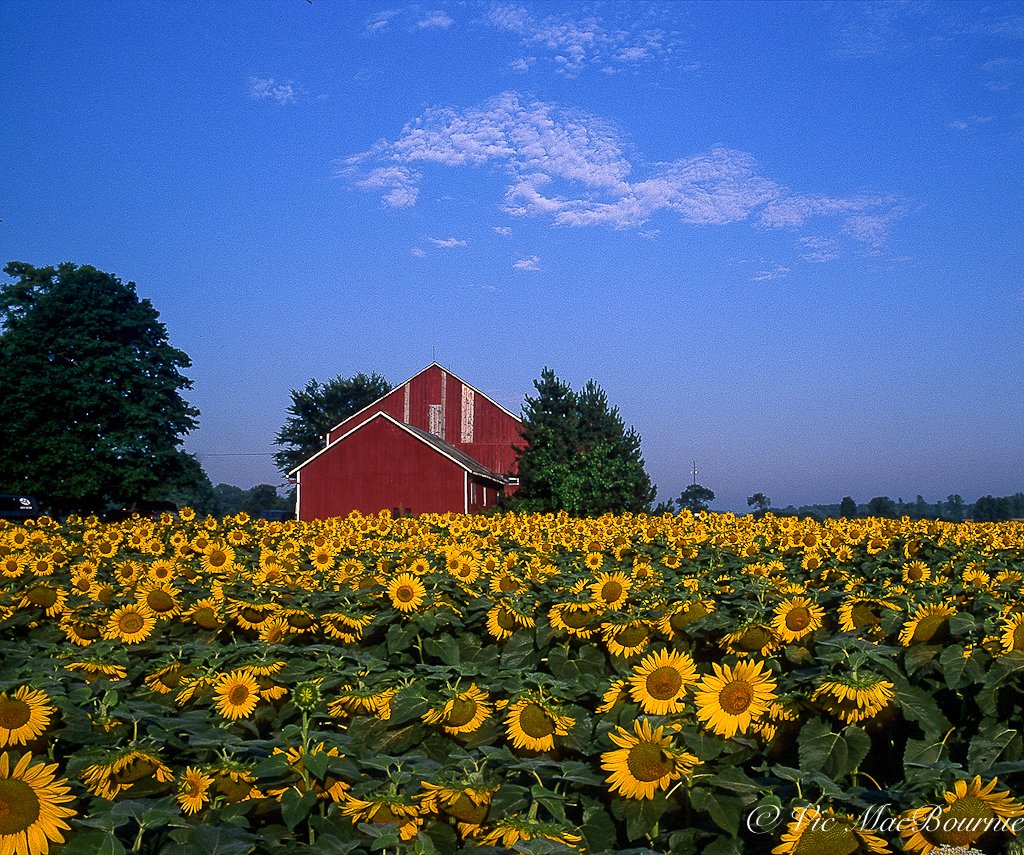
A field of sunflowers stand out against a beautiful blue sky and red barn at a nearby seed farm.
Do deer eat sunflowers?
Let’s start with our number one question: Do deer like to eat sunflowers? Anyone with a bird feeder knows that deer love sunflower seeds, but we are more concerned with them eating the plants rather than the flower head and seeds when it matures.
Deer love the tender shoots of sunflower when they first emerge and will nip them off until the stems begin to get more robust and they thicken and grow too tough to be appetizing. If we can get the plants to this stage, the deer tend to leave them alone for the remainder of the growing season.
I’m sad to say that I did not have much luck getting the plants to this stage before squirrels, deer and rabbits decided to dine on them. (I think part of the reason for this is that I started to grow the plants inside too early and the green plants stood out in the otherwise brown landscape just a little too much. This spring I’ll wait another couple of weeks to put them out into the garden when there is more for the wildlife to dine on.)

Sunflowers offer perfect opportunities for garden photography looking as good death as they do in bloom.
(Early June Edit) It’s early June and so far we have had mixed success. The dwarf sunflowers that were grown in the Click and Grow lighting system did well. They grew fast and I was able to get them into several containers by mid May where they continued to grow. Three of these dwarf varieties have bloomed, but it wasn’t long before chipmunks and squirrels went in for the kill and decided the flowers were there for their lunch.
Two small sunflowers (dwarf varieties) growing in a new large container were attacked by squirrels and decapitated but luckily I was able to get a flower from it. (See second and third images above.)
• I planted a multi-flowered variety in a large container in the front garden that was doing very well until a squirrel or chipmunk decided to use it as a swing. The plant was healthy and about 3-4 feet tall with a large bud forming getting ready to flower before it was broken off. I thought growing it up through a trellis should provide a little protection and give it support. But in the end it was broken off before flowering.
If a sunflower bud is broken off will it regrow a new one?

The broken stem of the sunflower seen here with what’s left of the bud on the soil below.

The above image is one of ten to 12 blooms that emerged even after squirrels broke off the main stem of the sunflower.
Unfortunately it is unlikely that a sunflower will regrow a bud once the main one has been broken off. Even if the stem is alive and appears to be doing well, once the bud has been broken off or removed, the chance of flowering is unlikely. If it is a clean break, and you get it early, or if the bud is broken but still hanging on, you may be able to save it by taping it up with a gardener’s tape.
July Edit: Forget everything I wrote directly above about regrowth after the stem has been broken. Our multi-flowering sunflower suffered several bud-stem breaks from squirrels or chipmunks, but it now has 7-10 sunflower buds on it. So, to answer the question “If a sunflower bud is broken off will it regrow a new one?” the answer is YES they can. Sunflowers, especially multi-flowering varieties, can regrow buds after the main leader has been broken off. The image above is an example of the plant in flower.

A sampling of some of the sunflowers we will be growing this spring through summer. Follow along as we take the sunflower from seed to fully mature specimens, while navigating deer and other obstacles in the gardens and in our containers.
What are the best sunflowers to grow?
There are many different sunflowers we can grow including a perennial native wildflower and an assortment of annuals. When it comes to annuals, there are basically two types – single and multi-flowering. The single-flowering sunflower sports a large (sometimes greater than 12 inches) flower on a tall, stout stem that can easily reach 8-16 feet tall.
The multi-flowering form combine several flowers usually consisting of a main flower with smaller secondary ones on a stem that can reach 6-8 feet high but is more often 4-6 ft.
One annual cultivar that is popular is the everblooming sunflower from Proven Winners called Suncredible Yellow that flowers on a heavily-branched plant with blooms that are about 4 inches across and do not need deadheading to continue blooming. The plant grows to about 3 feet tall and blooms longer than similar sunflowers lasting well into the fall.

A lovely stand of native perennial sunflowers growing wild in a nearby field.
The native perennial (zones 3-7), Woodland Sunflower (Helianthus divaricatus) is a lovely multi-flowering wildflower that will attract bees and many butterfly species including Checkerspot and Painted Lady. The flower is much smaller than the traditional annual variety. It can be planted along woodland edges in full sun or partial shade along side Black-Eyed Susan for example and, unlike the annual plants, is deer resistant. (Check out my post on why we should be using native plants in our garden and how they help birds and other predators.
Our woodland sunflowers are beginning to show buds and I expect flowers to begin emerging in the near future. This will be the second year the woodland sunflowers will be in the garden, so I am hoping for a good show this year.

Large sunflowers planted in large clumps can be impressive and extremely important for both pollinators and birds.
Last spring, I planted the native perennial woodland sunflowers in a back part of our garden and am looking forward to seeing how they perform this year.
But, we are here to talk about the wide assortment of annual flowers ranging from the massive flowering types, to the medium ones good for both containers and in the landscape, as well as smaller dwarf varieties that are ideal for containers.
All are excellent choices, but consider how best to use them in your landscape.

A Click and Grow kit that includes an experimental kit to allow gardeners to grow whatever plants they like including native widflowers as well as sunflowers.
What are the best sunflowers for containers
If you are planning to use the sunflowers in containers, use a dwarf variety for best results, unless the container is quite large. Remember that the root systems of sunflowers are extensive and include a large and aggressive tap root. (There is a list below of some of the better multi-stem and dwarf varieties.)
The dwarf variety that I started in the Click and Grow have done well and made it into the garden containers in mid May. Most flowered quickly before the beginning of June and are now providing our chipmunks and squirrels with early snacks.
The big boys are probably best at the back of the garden or used as a large windbreak or privacy screen in a long line of plants. If you are planting them in this way, it’s always a good idea to stagger the plants to give them room to grow and air around them to circulate to prevent mildew and fungus problems. Leave at least six inches between plants (more is probably better) and make sure they get all-day sun or close to all-day sun.
The mid-size sunflowers are an excellent choice providing the sunny cheerfulness that only sunflowers can provide, but in a more manageable size coming in at 5-6 feet in height.
Here is a short list of some of the better sunflowers.

A closeup view of a sunflower.
Tall single-flower sunflowers
Skyscraper: Sunflowers can reach heights of up to 12 feet and produce 14-inch petals.
Sunforest Mix: Rises from 10-15 feet.
American Giant: This sunflower can reach up to 15 feet and a flower face that grows up to a foot tall
Russian Mammoth: Expect heights of 9 to 12 feet with a huge flower face.
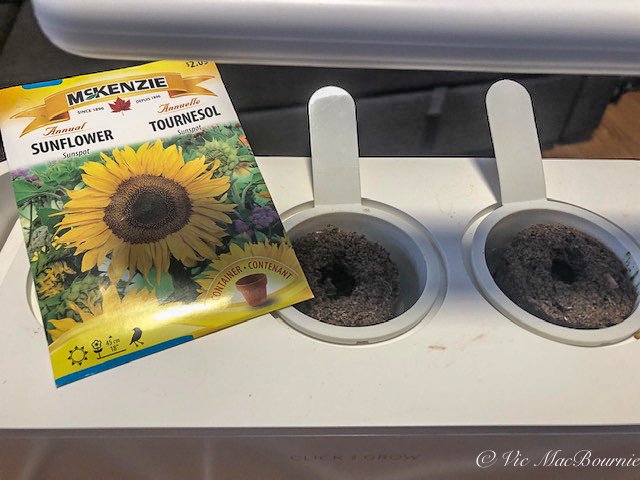
Sunflower seeds placed inside the soil from the Experimental kit and ready to be grown through the systems automatic timed grow lights and self watering system.
Smaller, dwarf sunflowers include:
Sundance Kid: This bicolour red and yellow flower grows from between one to two feet tall.
Little Becka: Is a pollenless sunflower that sports red and yellow petals and grows between one to two feet tall
Pacino: This muti-flowered plant has a bright yellow face and grows to between 12-16 inches.
Sunny Smile: Another plant in the 12-15 inch range with bright yellow petals and a dark-brown centre.
Coloured sunflowers include such show stoppers as Moulin Rouge with its solid red petals, Terracotta sporting cream and orange petals, and Chianti: dark purple petals and dark centre.
If you are on the lookout for high quality, non-GMO seed for the Pacific North West consider West Coast Seeds. The company, based in Vancouver BC says that “part of our mission to help repair the world, we place a high priority on education and community outreach. Our intent is to encourage sustainable, organic growing practices through knowledge and support. We believe in the principles of eating locally produced food whenever possible, sharing gardening wisdom, and teaching people how to grow from seed.”

Canada Anemone: A native ground cover for woodland garden
Canada Anemone is native ground cover that is ideal for the woodland garden that enjoys a little sun and would benefit from a fast-spreading ground cover with a lovely flower.

Native bees zero in on Canada Anemone
The Canada Anemone (Anemone canadensis) is an ideal choice for a native ground cover that will not only light up the woodland garden in spring when it is in flower, but will also create a lovely textural cover throughout the summer.
I started my little patch from a single plant purchased at the local horticultural society’s annual plant sale. In a few short years, that single plant quickly spread into a good-sized size drift that greets spring with their clear white flowers and yellow centres that can stretch out to be over an inch wide with five sepals held up on long stalks. The flowers stand above the foliage that resembles that of Wild Geranium. New foliage growth emerges a light green giving the plant a fresh look.
The drifts of flowers spread through rhizomes and depending on the soil they either spread quickly in rich, mesic to wet soils, but slower in drier, more well-drained soils. Our soil is definitely dry, but they still spread with great vigour. They can often be seen near sandy dry lakes as well as meadows.
The wildlflower is native to most of eastern North America and is common in the upper midwest and Great Lakes area where I live.

An aerial view shows the flower in both its open and un-open stages as well as the ferny foliage that resembles the foliage of Wild Geranium.
It is a favourite of the early native bees and other pollinators, but our resident rabbits and deer never seem to touch the plants. That could be because they are smart enough to know that all of the parts of the plant are considered toxic.
Making room in our gardens for more and more native plants is vital for the survival of our native fauna, from insects and caterpillars that have developed a relationship with these native plants over centuries, to our native birds that depend on the insects and caterpillars to feed themselves and, even more importantly, their young in the spring when insects are often difficult to find.
They flower about the same time as non-native Epimediums, which enjoy a more shady location. I can see some large drifts of these Canada Anemones growing together with clumps of Epimedium in a part-sun, part shade environment. The ferny foliage would work well with the larger, and more colourful foliage of some Epimedium throughout the summer months, once flowering has ended.
Our little drift will be contributing to more drifts throughout our garden when I transplant some of these original plants to different parts of the garden later this year when the flowering has dried up.
Looking for more information on ground covers? Please check out my other posts on ground covers I use in the woodland garden.
• Bunchberry perfect ground cover for woodland garden
• What is the easiest ground cover to grow?
• Three great ground covers for the woodland garden.
• Creeping thyme as a ground cover

Fall is a good time to transplant them but any time after flowering should be fine, especilly if you are transplanting them in shaded area and give them lots of water to help get them a good start.
These plants may look delicate, but don’t mistake their delicate beauty for weakness, these are a hardy, native ground cover.
Canada Anemones are perennials that grow well in zones 3-8 and reach about a foot tall when in flower.
Like any good ground cover, they are quick to spread and fill in those empty patches in your garden. Plant them in full sun to partial shade for best results and expect blooms from late May into June.
They prefer a wet to medium site but have done well in our dry sandy loam with a layer of mulch to keep the soil cool in the hot sun.

Growing Canada Anemone from seed
Growing these plants from seeds can be difficult.
The seeds actually need double stratification in a cold moist environment before germination and, therefore, could take up to two seasons before plants emerge if seeds are sown directly in the garden in fall.
Best to just get some plants from a friend or a good reputable native plant nursery.

What insects and pollinators are attracted to Canada Anemone
Any native flower that emerges early quickly attracts a host of insect pollinators and the Canada Anemone is no different. Watch for small Carpener Bees, Sweat Bees and Mining Bees visiting the flowers. A host of beetles are also attracted to the flowers, including long-horned and tumbling flower beetles just to name a few.
Obviously, backyard birds will also be checking out the early-blooming flowers for a quick meal of delicious insects.
Making room in our gardens for more and more native plants is vital for the survival of our native fauna, from insects and caterpillars that have developed a relationship with these native plants over centuries, to our native birds that depend on the insects and caterpillars to feed themselves and, even more importantly, their young in the spring when insects are often difficult to find.
Consider replacing non-native ground covers, such as Lilly of the Valley and Periwinkle, with native varieties that perform as well if not better than their non-native counterparts and provide important sources of food for native birds, mammals, reptiles and amphibians.

This grouping of Canada Anemone flowers offer a perfect opportunity to experiment with some selective focus photography.
Another great flower for selective focus
When the Canada Anemone is blooming, it’s time to get out the camera and experiment with a little selective focus. Use a long lens and shoot through the flowers with your lens “opened up” to its widest opening. Now focus on a flower in the distance and let the foreground and background go out of focus.

Experimenting with selective focus on a grouping of Canada Anemone.
You could get a similar effect with a macro lens by allowing the flowers in the foreground to go out of focus while focusing on a more distant flower or grouping of flowers.
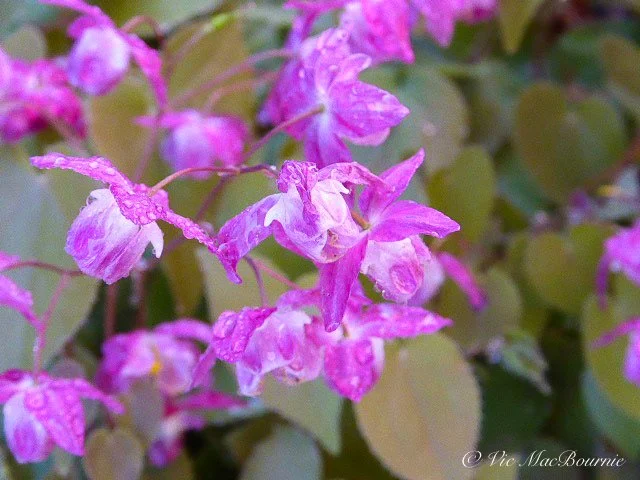
Epimediums: Woodland plant whose time has come
Epimediums are quietly making a name for themselves among gardeners looking for a delicate woodland foliage plant with beautiful spring flowers.
Call them what you will – Epimediums, Barrenwort or Fairywings – these often overlooked, non-native plants don’t get the attention they deserve in the woodland garden.
But their time is coming.
Actually, according to garden author Allan Armitage, that time has already come. He wrote in his 1989 book Herbaceous Perennial Plants, that the Epimedium is “a genus whose time has come, with plenty of attributes and very few faults.”
I can’t agree more and although its time has come, there are still many gardeners unfamiliar with this plant. The word is getting out, however, and there are now hundreds of cultivars with many more still in the works.
Epimediums are easy-to-grow perennials that are grown more for their foliage than their beautiful early spring delicate flowers. They perform both as a ground cover in a shady or semi-shady area, or a specimen plant. Most grow to about 6-12” high in zones 5-8 and like rich humusy soil, but will do well in dry soil under a forest canopy.

Epimedium in our Japanese-inspired garden forming the perfect backdrop for the ceramic fish from Fish in the garden.
As gardeners begin to recognize the value of these plants both as a ground cover for their delicate “fairywing” flowers in multitudes of colours ranging from yellow to orange, red, pink, purple and various bi-color combinations, and as a specimen plant that boasts – much like hostas – outstanding foliage from spring through to fall, there is no doubt they will gain in popularity.
Unlike hostas, they are not bothered by slugs, deer or rabbits.
Epimediums are easy to grow, long-lived shade perennials that thrive in well-drained, humus-rich, moisture retentive soils.
Epimediums are an herbaceous member of the barberry family of plants, but unlike the woody members of the family, they do not share any of the invasive characteristics that have made the woody barberry family members such a bad reputation.
For the most part, Epimediums form either a low mound or slow-spreading ground cover.
They grow in shade to part shade in gardening zones 5-8. These delicate but hardy plants can put up with the dry soil once they are established and can do well under trees with extensive roots. Perfect for us woodland gardeners.
They range in height from 6” to 2.5’, but expect 12″ to 18″ from most established 3-4 year-old clumps, where they are often as wide as they are tall.
Their mostly heart-shaped leaves look their best in spring when the emerging foliage takes on a variety of colours including reddish colorations or markings depending on the variety.
Because they flower early in spring in clusters on long arching stems, they have value for pollinators.

While the flowers of the Epimedium are beautiful in bloom, it’s the foliage that attracts most gardeners to these plants.
Why are Epimediums not as popular as hostas
So why haven’t these plants captured the attention of gardeners? Maybe its the names they go by – Barrenwort sounds more like a disease than a beautiful plant – and Epimedium, even if you can remember the name, doesn’t quite inspire most of us to run to the nursery.
Cost is another factor. While there certainly are hostas with big price tags, even the more difficult-to-find hostas are coming down in price as propagators continue to do their work and make them more available to gardners.
Epimediums still have not reached this level of propagation and remain a little costly for many of us. Unlike hostas, Epimediums are slow spreaders and are best propogated by division. They grow slowly and spread even slower, but once they get established, they form substantial, well behaved clumps that add a delicate touch to a garden bed where other plants might struggle to grow.

The delicate flowers of the Epimedium lend themselves perfectly to the woodland garden.
How to use Epimedium in the woodland landscape
In our woodland garden, I have Epimediums growing in the front and back gardens, including two lovely groupings of the pink/red and white variety growing in the Japanese-inspired garden at the front of our home. The delicate, two-toned flowers and the elegant, soft foliage fits in perfectly and form the ideal hi-light for the garden statuary and moss-covered rocks. They also form a delicate transition from the river rock into the garden where they grow alongside an impressive ghost fern and native wild geranium.
Elsewhere in the woodland garden, you’ll find yellow versions growing along a pathway leading to the front door, another clump softening a mossy rock among the pachysandra and wild columbine.
In the back garden, I have placed more of the yellow Epimedium under a mature Linden tree and along a small stepping stone path of flagstone that includes a number of native woodland plants from trilliums, to geranium, ferns, columbine and groundcovers of Mayapple, wild strawberry and low-growing sedums.
In an excellent article about Epimediums on the Piedmont Master Gardeners site the following examples were used on how best to use the plants in the landscape.
Use it as ground cover in a mixed shade garden where it can fill in the spaces between trees.
Use it as a border along a woodland path where the foliage will soften the edges of pathways.
Use them as an edging or border in front of taller plants in a shade garden where their foliage can add a complimentary transition between the lawn and garden plantings.
Use them in a shaded rock garden
Use them for erosion control where the dense, rhizomatous root system can do its job of holding soil in place.
Plant them with other woodland plants such as Allegheny spurge, Columbine, ferns, hostas, lungwort and wild ginger, just to name a few, to create a beautiful woodland floor tapestry.
Best methods of propagating Epimedium
Epimediums grow by underground woody rhizomes and should be divided in spring after flowering or later in early fall preferably after a rain.
The A-Z on Epimediums
If you need more inspiration to include Epimediums in your garden, look no further than Garden Vision Epimediums where they boast the “largest selection of shade-loving Epimediums for sale in the United States.
The images on the website offer a taste of what you can expect in your garden when you choose to add them. Be sure to check out their informative “About Epimediums” page for everything you ever wanted to know about the plants.
Here is a great link listing nurseries in the United States that specialize in selling mail order Epimediums as well as a list of sources that specialize in on-site sales. In Canada, most high-end nurseries will carry at least a few varieties, but for the ultimate selection, look no further than the folks at Fraser’s Thimble Farms, The rare plant specialists for an extensive selection of mail order Epimediums. They also specialize in rare orchids and other rare plants. UK gardeners should check out the selection at Burncoose Nurseries and mail-order firm. Their Epimedium Growing Guide will help give you a taste of what you can expect in your garden.
Back to the American growers. The Mission of Garden Vision Epimediums in the US is “Preservation through Cultivation” and they say they have many Epimediums that gardeners will only be able to find at their nursery located in Templeton, Massachusetts, about 50 miles northwest of Boston.
“A great diversity exists among Epimediums, but it is not readily available to the public. We gather these rarities, determine their true identity and propagate them for distribution. We think of ourselves as facilitators, spending a tremendous amount of time and money to acquire new plants, study, identify, test and propagate them quickly for sale to fellow collectors, propagators and gardeners. The price of a plant often represents the difficulty and cost of acquiring and/or propagating it, as much as its rarity. Many of the Epimediums you see here you will not be able to find elsewhere.”
Time to get planting fellow gardeners.

Cooking with cast iron on the BBQ
Cooking with cast iron has to be one of the most rewarding and exciting ways to prepare meals outdoors in the garden, whether it’s on the open fire or in the BBQ.
Cooking with cast iron turns everyone into a pit master. It’s too bad most weekend BBQ warriors don’t spend the time or effort to make cast iron part of their cooking arsenal.
If that sounds like you, keep reading because I think you will realize that you need at least one cast iron skillet.
Why you need a cast iron skillet
Hey, you might say, “I like to cook right on the grill and I don’t want anything between the hot flame and my food.”
Did you know that by using a cast iron skillet you can actually impart savoury and smoky flavours into the food you are cooking. That can be good if its complimentary, and bad if you are imparting yesterday’s filet flavours into your pie crust. But it’s mostly great when your skillet is adding flavour to your food.
Did you know you can perfectly sear meats in the cast iron pan and then transfer the pan directly into the oven or just leave it in the BBQ to cook slowly, creating the perfect one-pan cooking experience.
Did you know you can throw that same cast iron cookware directly into an open campfire in the backyard or at the lake.
Did you know that, with a little care, cast iron pans can last forever. Many families are so in love with their cast iron that they even pass them down over generations.

A bottle of high quality vegetable oil and a rag is really all you need besides the oven to season your cast iron cookware.
It’s okay if you are just learning, I am too
Let’s make this clear, I’m no expert when it comes to cast iron cooking (I’ve managed to collect a couple of skillets a two-sided Vermont Castings griddle and a Vermont Castings Dutch Oven), but I’m ready to go all in to learn the ins-and-outs of this ancient art of cooking. If you are looking for a solid skillet to start with, Lodge Skillets are excellent starting points at a reasonable price.
In fact, I recently joined a couple of Facebook groups dedicated entirely to cooking with and collecting cast iron cookware. If you ever doubted the passion people have for cast iron cookware, just spend a few minutes in one of these groups.
Part of my interest in cast iron cooking began with the purchase of our Vermont Castings Vanguard propane BBQ that came with a couple of heavy, well-made cast iron cooking grids. Seasoning up those was so much fun that I immediately went out and purchased the Vermont Casting cast iron griddle accessory.
Below image (link) is the 14-inch seasoned skillet from Camp Chef that is the perfect size for quick meals.

That’s when things really took off – pancakes, eggs, little breakfast sausages, onions, mushrooms even smash burgers all became easily within reach once the griddle came on scene.
A small skillet followed, then a larger one for my Jambalaya dish, and finally the ultimate – a special Vermont Castings Dutch Oven made especially for their excellent BBQs. But the Dutch Oven can also be used on and in the stove as well as on open fire pits.
Over the next few months, I hope to share some of my favourite recipes with readers.
Cooking outside on the BBQ or over an open flame is an excellent excuse to spend time out in the garden and, I can’t think of many better ways to fully experience our gardens than spend time nursing a four-hour cook in the dutch oven listening to the birds singing and then sitting down with family and friends for a great meal al fresco style.
Before we can do that, however, we need to season those cast iron skillets, griddles and Dutch Ovens.
How to season cast iron cookware
Before you begin using your cast iron cookware, you will have to take some time to “prepare” the items to begin creating the “seasoning coat” that ensures a hard, non-stick coating and makes cast iron cookware so desirable by those who worship its cooking qualities.
Even if your cast iron comes “pre-seasoned,” it’s a good idea to add between one and three more preseasoning treatments to the cookware before using it. The more “seasoning” the better, but you can slowly build up the seasoning with each cook if you want to cut corners.
Even if you read that it is not necessary to season a preseasoned skillet or other cast iron item, take my word– just do it.
To add the first “seasoning” to your newly purchased “preseasoned” cookware, it’s a good idea to first wash the item with a mild liquid detergent in hot water. (In the past using soap was not recommended because of the strong Lye that was used to make soap. Today’s detergents do not use lye and are mild enough to use on cast iron.)
Some say not to use soap in this step because it will likely remove some of the thin coat of preseasoning that was put on at the factory. I think you can go ahead and use a bit of soap but a scrubbing with just hot water will be enough.
Once that is completed, dry the cookware off with a cloth and put it into a hot oven for a few minutes to complete the drying process.
Next, remove the hot cast iron item from the oven, place it on a safe surface and use a soft cloth to rub a very thin layer of vegetable oil (preferably avocado, grape seed or a high quality virgin olive oil) over the entire surface of the cast iron cookware including the bottom, sides and handle but paying special attention to the inside and sides of the skillet or other cookware.
Before putting the item into the oven, use a clean, dry cloth to remove any access oil.
Then, turn up the heat in the oven to high (preferably 500 or greater) and leave the cookware in the heated oven for about an hour. After an hour, let the item cool naturally inside the oven. (This can also be done inside your gas or woodburning BBQ).
Repeat, as necessary to acquire the number of seasonings you want on the cookware, but, after the initial seasoning, more can be slowly added following each use.

The Vermont Castings specially designed Dutch Oven is perfect for using on the BBQ, in the oven, on the stove or even on an open campfire.
Here are the seasoning steps in point form
Give the preseasoned skillet a quick cleaning with hot water. You can add a little mild liquid detergent if you wish.
Dry the skillet with a soft cloth and heat it on the stove or in the oven to remove all the water on the surface.
Use a high smoke point oil like canola and rub it into all areas of the skillet including the non-cook surfaces.
Once it is fully coated, use a clean cloth to wipe off any excess oil.
Place the cast iron pan upside down in your oven and use either a piece of aluminum foil or a cookie dish to catch any oil drips that may occur. Providing you have used a thin coat of oil and wiped off the access, you should not experience any dripping.
Heat oven to its highest temperature and bake the cast iron for about one hour.
Turn off oven and allow the pan to cool naturally.
Once the cast iron is cool to the touch, you are free to begin using the item to cook.

The Vermont Castings Dutch Oven made especially for use with their BBQs.
How to maintain the seasoning on your cast iron cookware
Once you have established the initial seasoning, maintaining the cookware is quite simple. Following every cook with the cast iron cookware, ensure the item is clean either by washing it with hot water and a mild detergent if necessary, or preferably, just by wiping it out with a clean cloth, drying it thoroughly and adding a thin coat of oil before heating it in the oven or BBQ on high for 15 or 20 minutes.
This should maintain and enhance the coating and non-stick qualities over time.
How to fix dirty or rusty cast iron cookware
Depending on what and how you cook a particular dish, you may have to take additional steps to clean a skillet, griddle or Dutch Oven from time to time. If there are burnt-on food items remaining on the cookware even after a wash with hot water, consider using a plastic or wooden spatula to remove any stuck-on or burnt food. If this does not remove the items, you can add a teaspoon of coarse salt and a sponge to scrub off any particles. The dry salt will help to scrape off the carbon left on the cookware but not scratch off the “seasoning.”
Be sure to carefully wash off the salt and season the cookware following the cleaning and storage of the cookware.
And that’s it folks. Oh, one last thing. If you do leave your beloved skillet out in the rain and it gets a little rusty, simply follow the steps above and after a few seasonings it should be back to perfect.
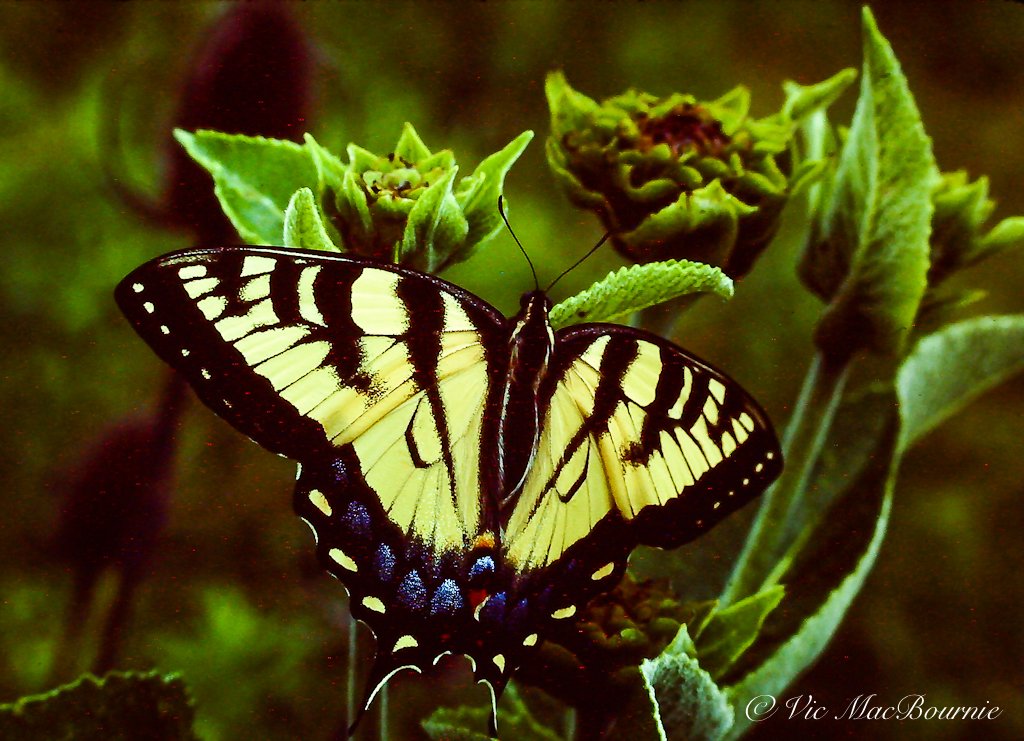
Celebrate No Mow May along with the butterflies, birds and bees
The No Mow movement is sweeping the world after getting its start in Britain. It is now being picked up by environmental groups, cities and towns and individual homeowners looking to do their part to help native flowers and fauna.

The No Mow May movement is picking up steam around the world. We can all play our part by just doing less.
Plantlife gives birth to No Mow May movement sweeping the world
Turns out we have permission not to mow our grass in May.
Not only do we have permission, some very important people, environmental agencies and lovable tree huggers are actually encouraging us not to cut the grass. Instead, just let it go and see what comes up. They promise we might even be pleasantly surprised.
Turf grass has long been considered a waste of time and money, but ever increasing information points to extensive turf grass being extremely detrimental to native fauna from insects and pollinators to mammals, amphibians and reptiles that are losing habitat at an alarming rate.
Need proof? Check out my earlier article about why we need a whole lot less grass in our lives.
We can thank some folks in Great Britain at Plantlife for this little grass-cutting reprieve. In their own words: “Plantlife is a British conservation charity working nationally and internationally to save threatened wild flowers, plants and fungi . We own nearly 4,500 acres of nature reserve across England, Scotland and Wales. We have 11,000 members and supporters and HRH The Prince of Wales is our Patron.”
Talk about working to save native plants, Plantlife can boast some pretty serious achievements.
For example, Plantlife, with its HQ in Salisbury and field staff spread across Britain including national offices in Wales and Scotland, was instrumental in the creation of the Global Strategy for Plant Conservation and is a member of Planta Europa, a pan-European netwok of more than 60 wild plant conservation organizations.
So Plantlife might have led the way, but now environmental groups, cities, towns you name it are jumping on board to declare May as No Mow Month to kick off spring and provide a healthy boost to native flowers and grasses, and the bees, butterflies, birds and other wildlife that thrive in more natural landscapes.
• If you are considering creating a meadow in your front or backyard, be sure to check out The Making of a Meadow post for a landscape designer’s take on making a meadow in her own front yard.

Letting areas of the yard go back to nature can result in native wildflowers springing up in places you would never expect.
Cities and towns take No Mow May to new levels
Here in Ontario, for example, a town outside Toronto, East Gwillimbury, is actually encouraging residents not to cut their grass to “ help support pollinators during this crucial spring period as they are seeking their first food sources of the season such as dandelions and other flowers typically found in lawns. This movement is important as research indicates a mass extinction of insects is underway. Of particular concern in recent years, is the decline of the bee population.”
Residents are asked to avoid mowing lawns until June with the goal of preventing disturbance of overwintering insects and amphibians that may be burrowed or hiding in leaves and lawns, and to increase food sources to pollinators.”
And, if that is not enough, they are turning it into a competition where residents sign up for the challenge, pay $5 and receive a lawn sign to “show neighbours” they are supporting No Mow May.
All the donations are going to the David Suzuki foundation Butterfly Way. The Butterfly Project has expanded to hundreds of communities throughout Canada with more than 1,000 volunteer Butterfly Rangers who, together with recruits planted pollinator patches in thousands of yards, gardens, schools and parks in 2021.
Greenpeace gives No Mow a boost
Even Greenpeace has jumped on board to promote the No Mow May Challenge. In an article on its website, Greenpeace points to why a flowering meadow is so much better than a well-mown lawn.
Greenpeace states: “By compiling several European and American studies in a meta-analysis, the Université du Québec à Trois-Rivières has revealed that lawns create manufactured ecosystems with low biodiversity, a condition that worsens as the intensity of mowing increases. Lawns that are mowed more frequently are linked to a decrease in the number of invertebrates and have less plant diversity, while the presence of pests and invasive species goes up. We have every reason to think twice about our obsession with perfectly manicured lawns.”
Bee City USA joins in the No Mow May fun
In the United States, similar projects are underway. Bee City USA, an initiative of the Xerces Society, has been promoting No Mow for a number of years and report that in 2020, residents of Appleton Wisconsin, a Bee City USA affiliate, convinced their City Council to suspend their weed ordinance for the month of May. More than 435 registered property owners participated in the campaign and the local university joined in to study the results.
The Bee City USA website points out that the findings were very impressive. “Not only were the abundance and richness of bees higher in the yards of properties participating in No Mow May, but they were way higher. Participating yards had three-times higher bee species richness and five-times higher bee abundance than nearby parks that had been mowed.”
Getting back to Plantlife, the originators of No Mow May. The website reports that last year (2021) the conversion to wilder lawns resulting from the No-Mow approach, saw records of bee orchids, snake’s-head fritillaries and eyebrights. To further dru home the results, it Plantlife reports that a “three-acre meadow can be home to 9 million flowers producing enough nectar to support a half million bees every day.”
if that’s not reason to take a break from mowing in May, I’m not sure what is.
And don’t forget, Letting the grass grow is a big step in creating the perfect environment for fireflies to breed.
Okay so you just can’t live without a well-manicured lawn for a month. Maybe you are having a garden party or some important event that means not cutting the grass is not an option.
What else can you do if No Mow is a No Go
You can help pollinators throughout the spring and summer by:
Planting a specialized pollinator garden in the backyard. Look for a variety of native flowering plants, such as Asters, Bee Balm, Milkweed and Coneflowers, or other natives depending where you garden. Try to achieve varying bloom times that begin blooming in spring and continue through until fall.
Maybe you can find a small section of your yard that can remain uncut all summer long. Even a small area in an out-of-the-way corner of the yard left uncut can make a difference to pollinators, insects and other wildlife looking for natural habitat.
Consider decrease the mowing frequency throughout the summer. Let your lawn grow a little longer than normal, cut it higher when you do cut it and keep the mowing to only once or twice per month.
Mow at the highest setting. This allows low lying flowers to continue to grow and decreases re-flower time for those that are mown.

Tips to create a mini meadow-inspired garden
Creating a mini meadow garden in a sunny area of your yard is an excellent way to attract a variety of pollinators from bees to butterflies and everything in between.
Can I have a meadow garden in a small space?

A monarch works a sunflower in a naturalized flower border.
Just like you can create a woodland-inspired yard in today’s smaller urban backyards, so too can you find a sunny spot in your backyard to create a meadow-inspired garden that will bring you many of the same joys that a full-sized meadow offers.
That includes a natural, ever-changing planting with an abundance of colour and texture that is a magnet for birds, butterflies, bees and other pollinators.
In a small garden, you may not be able to have the meadow of your dreams, but with the right plants you can have one most gardeners only dream about. And creating it is relatively simple.
I have been working on creating a meadow-inspired garden across a small hill located at the back of our yard that gets strong afternoon sun despite being under the canopy of two old crabapple trees.
By transplanting native grasses such as Little Bluestem, Black-eyed Susans, Purple Coneflowers, native sunflowers and other meadow plants, I have been able to fill in a good portion of the hillside garden. I expect to see some positive results from my efforts this summer as the plants begin to grow in and take shape. More native plants and seeds will follow this season to help fill in any empty areas. I’m also counting on nature to do its thing as well to help me along the path to a lovely little meadow-inspired garden.
In their book, Garden Revolution, How our Landscapes can be a source of Environmental Change, Larry Weaner and Thomas Christopher, write: “Native meadow is likely the best answer to North America’s over reliance on lawn, a means of saving the enormous quantities of water, fertilizer, herbicides, pesticides, and fossil fuels annually invested in the cultivation of turf. Unlike shrublands and forests, meadows can be established from seed in a relatively short time to gravitate toward open space and expansive views, attributes not common in a forest or shrubland.”
The authors ask why, then, does grass continue to dominate our landscapes?
They point to the quality of seed that has been sold in the past to create these meadows and the desire by homeowners to have an instant meadow in a single season.
“Meadows can work, but only if the gardener selects plants and uses techniques that reflect the local habitats and ecological processes that will affect their survival and proliferation.This is why successful meadow will look quite different in different regions.”
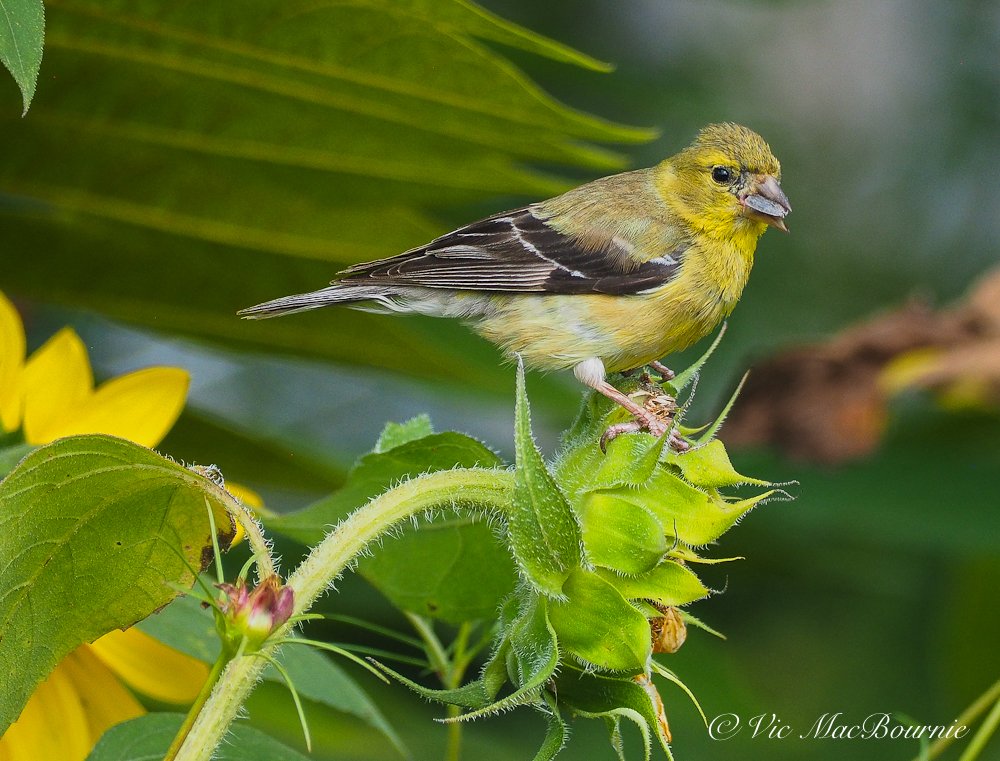
Goldfinch works on a sunflower in a naturalized flower border.
For more on creating a naturalized meadow and wildlife habitat, be sure to check out my post Fields of Gold: Sunflowers and Goldfinches.
Their approach to creating a successful meadow is a fascinating look at working with nature using native plants and a more ecological approach. Although it is aimed at creating and maintaining large meadows with the least amount of work, their approach is certainly one that works in a mini meadow-inspired garden.
If you have visions for a larger meadow, Garden Revolution is a must read gardening guide to creating meadows and other inspirational gardens by working with native plants.
If you are interested in exploring this approach in greater detail, check out my more extensive post on Garden Revolution here.
• For more on creating a meadow garden, check out this comprehensive post on how Garden designer Angela den Hoede created one at her home.
• If you are looking for ideas on using low-growing ornamental grasses, be sure to check out my post on Five low-growing ornamental grasses.
The following, however, are some tips on creating your mini meadow-inspired garden.

A monarch takes a moment to work on the flower of the common thistle. Letting your meadow go a little “weedy” can attract some beautiful friends for a visit.
What’s the difference between a Meadow or Prairie garden?
Whether you choose a meadow-inspired garden or a prairie-inspired garden, the process is somewhat similar.
• If you want mostly colourful flowers, then a meadow-inspired garden is the direction you want to go. Use ever-blooming annuals to get your garden going. In fall dig them into the garden and replant for next year. Or plant your meadow with perennials that also flower generously (oxeye daisies, coreopsis and black-eyed Susans). Eventually a combination of the two will give you a good start on your continuous flowering meadow.
• If you are more a fan of grasses than you might want to lean to a more prairie look. Grasses rather than flowers hold centre stage in the prairie garden. In mid summer, however, the prairie leaps into bloom with wildflowers that complement the height and habit of grasses.

• A meadow planting is shorter than the prairie-inspired garden that features grasses like Big Bluestem, compass plant and others that can easily reach head height and beyond. If you still like the prairie look, there are plants that stay on the shorter side such as Prairie Dropseed, grama grass, foxtail barley, butterfly weed and blanket flower to name just a few.
• In a meadow garden, more attention will have to be paid to maintaining the existing flowers because these gardens tend to want to move toward grasses unless given proper guidance.
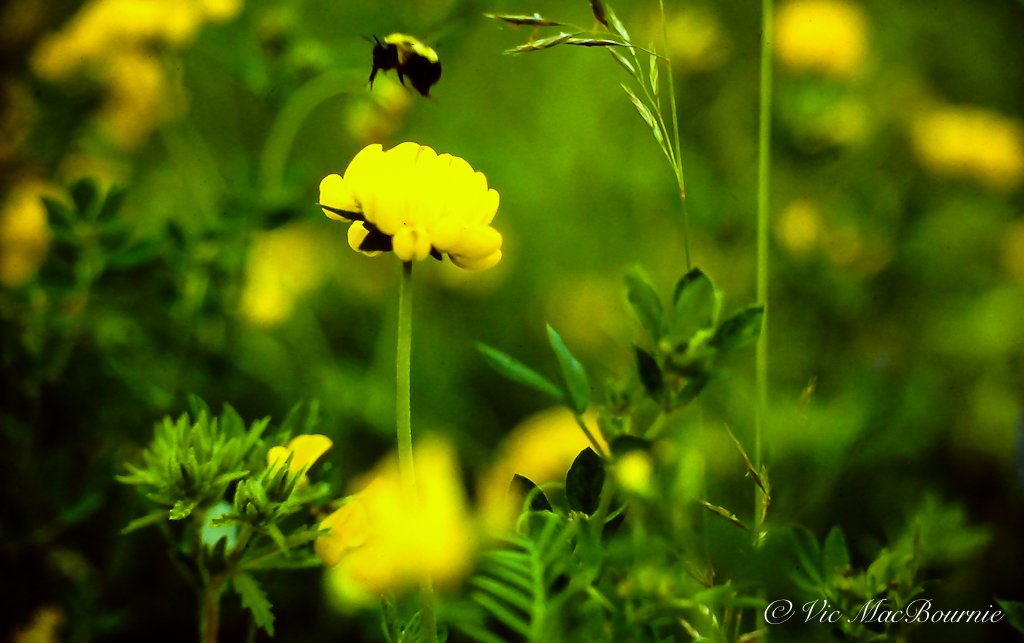
It won’t take long for pollinators like this native bumblebee to find your mini meadow.
Six steps to a Meadow Startup
Sally Roth, in her informative book Natural Landscaping: Gardening with Nature to Create a Backyard Paradise, provides the following steps to create a Meadow-inspired garden.
Strip or smother existing sod.
Till or turn the soil until it is smooth.
Water the area thoroughly with a fine to medium spray.
Wait for weed seeds to sprout. Slice off with the blade of a hoe, taking care not to disturbthe soil. Repeat as often as you have patience for.
Sow meadow garden seed.
Weed until meadow seedlings are well on their way.
For a fast Meadow mix from seed, Roth suggests the following plants be included
Baby blue eyes: (Nemophila menziesii) This delicate low-grower has charming blue flowers above a ferny foliage.
Bachelor’s-Buttons: (Centaurea cyanus) Branched and bushy plants with long-lasting blooms in blue, pink, rose, white and deep red-purple.
California poppy: (Eschscholia californica) Vivid orange flowers that form cups above lacy gray-green foliage. Pink and purple cultivars are also available.
Calliopsis: (Coreopsis tinctoria) A graceful, knee-high plant with abundant gold, russet, mahogany, or two-toned daisies and ferny foliage.
Corn cockle: (Agrostemma gitbago) Simple, silky flowers in vivid magenta-purple atop a branching midheight plant with grayish foliage.
Other plants to consider include: field poppy, Scarlet flax, Cosmos, Tickseed, sunflower.
If a more perennial style garden is more to your liking consider the following plants
Birdfoot violet, Black-eyed Susans, Bluets, Butter-and-eggs, Butterfly weed, Foxtail grasses, Goldenrods, Heath aster, Heliopsis, Little Bluestem, Moth mullein, New England Aster, Oxeye daisy, Panicled aster, Wild bergamot, Winged sumac and Yarrows.
If you are on the lookout for high quality, non-GMO seed for the Pacific North West consider West Coast Seeds. The company, based in Vancouver BC says that “part of our mission to help repair the world, we place a high priority on education and community outreach. Our intent is to encourage sustainable, organic growing practices through knowledge and support. We believe in the principles of eating locally produced food whenever possible, sharing gardening wisdom, and teaching people how to grow from seed.”
Tips to attract birds to your mini meadow
Remember to plant the flowers that set seeds that you know will attract birds later in the season. Both annual and perennial sunflowers (see story) are good for starters, as are cosmos and coneflowers.
Allow the “weeds” to take root. The seeds and or fruits of lamb’s quarters, pigweed, pokeweed and ragweed will attract a variety of birds.
Leave areas of the garden undisturbed as much as possible. These are excellent areas for birds to tuck their nests in to shrubby plants or even grasses.
Plant perennials that spread into large colonies to create cover for the birds.
Leave the leaves and don’t cut your meadow until spring or, if necessary, late winter so that birds can seek food and shelter in standing plants throughout the cold months.
Butterflies you may attract to your meadow-inspired garden
Depending on where you garden, you can expect to see many of the following butterflies in your mini meadow-inspired garden.
Buckeye
Cabbage White
Common blue
Common Sulphur
European skipper
Gray hairstreak
Indian skipper
Meadow fritillary
Monarch
Orange sulphur
Painted Lady
Pearly crescentspot
Red admiral
Red-spotted purple
viceroy
Zebra swallowtail
Much of the information from this article is from Sally Roth’s informative book Natural Landscaping. For more in depth information check out her gardening book.

How to attract Giant Tiger Swallowtail to your garden
The Giant Yellow Tiger Swallowtail is one of the largest butterflies in the United States and Canada. This “generalist” woodland butterfly is able to survive on a number of host plants in the wild and in our gardens. It is certainly among the most beautiful butterflies in our gardens.
If the Monarch is the queen of garden butterflies, the black and yellow Giant Eastern Tiger Swallowtails are surely the kings.
In our garden, Swallowtails are certainly more numerous than Monarchs during the summer. I see them fluttering about checking out our Coneflowers, Black-eyed Susans and any other safe flowering landing spot they can find. Some specimens are just spectacular boasting a wingspan of between 3.1 to 5.5 inches (7.9 to 14 cm).
The Giant Swallowtail is the largest butterfly in Canada and parts of the United States. In Canada, it is only native at the southwestern tip of Ontario but has been seen as far North as Winnipeg, Manitoba. In the north, they are common from May to September. In the eastern United States, the Tiger Swallowtail is one of the most familiar butterflies, but its range stretches from southern Vermont to Florida west to eastern Texas and the Great Plains.
Females are larger than males and Tiger Swallowtails in the south tend to be larger than those in more northern regions.

Male yellow Tiger Swallowtails have four black “tiger stripes” on each of its forewings. The females, which can be yellow or black, have wings with strong, almost florescent, splashes of blue running across the back end of its wings.
Swallowtails, unlike the Monarch butterfly that depends on milkweed as a host plant, are generalists although they like to lay their eggs on citrus trees in the south and the more common Hop tree and Northern Prickly Ash in more northern regions. Gas Plant and common rue (Ruta graveolens) are also two plants that the larvae use as a host plant.
The caterpillar will pupate in early summer into a well camouflaged chrysalis. After about 12 days, the butterfly emerges. A chrysalis that forms in late fall will not hatch until late spring preferring to overwinter in the debris of our gardens.
This is the reason we do NOT clean up our gardens in the fall or early spring.
Farther south in warmer climates, it’s possible to have three successful hatches.
A single green egg is laid on a plant prior to the birth of a small caterpillar. As the caterpillars age they turn green with two black, yellow, and blue eyespots on the thorax.
The caterpillar turns brown prior to pupating. It will reach a length of 5.5 centimetres (2.2 in). The chrysalis varies from a whitish color to dark brown. Hibernation occurs in this stage in locations with cold winter months.
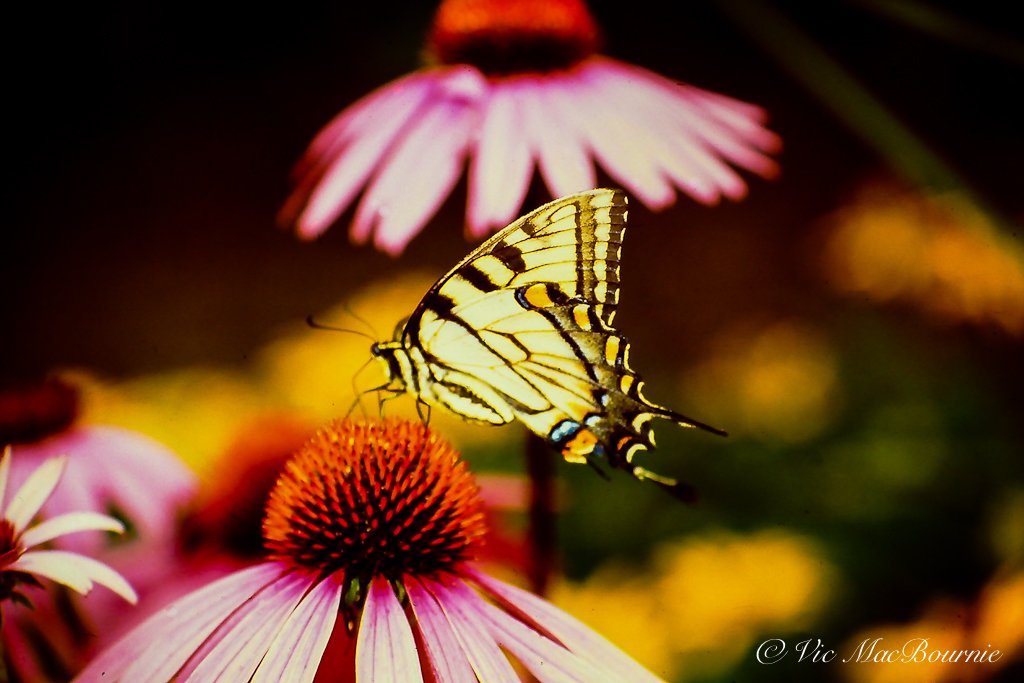
How to attract Eastern Tiger Swallowtails to your garden
Although Swallowtails are primarily woodland butterflies, other common habitats include open fields, rivers, creek beds, roadsides and, of course, our gardens.
Attracting the giant butterflies to your garden is not difficult providing you ensure at least some of the contributing habitat factors – food for all stages of the butterfly from larvae through to adulthood, a source of shallow water or puddle, and some form of shelter such as a woodpile, tall grasses or bushes where they can disappear to at night.
Food for Swallowtail larvae
Both the caterpillars and the butterflies of both the Eastern variety and the Western variety of Tiger swallowtails can be considered generalists, feeding on a wide variety of plants.
Common host plants used are those of the families Magnoliaceae and Rosaceae, with species like the tulip tree (Liriodendron tulipifera), sweet bay magnolia (Magnolia viginiana) and wild black cherry (prunus serotina). Aspens, Alders, birches, cottonwoods and willows are also host plants in more northern regions.

The Spicebush swallowtail is very similar to the black Eastern Tiger Swallowtail, although it is actually mimicking a poisonous Piper Swallowtail.
But, plant a nice sweep of parsley in a quiet corner of your yard and you are instantly on the right track to attract black Swallowtail caterpillars. Parsley is one of the key host plants for the caterpillars that are also happy to dine on fennel, dill, Queen Anne’s lace and other members of the carrot family.
The butterflies themselves are not overly selective on what flower they will land on to get nectar.
Here are a few good choices that will give you bloom throughout the summer. Adult butterflies use a wide range of food sources, most preferring to nectar on plants with red or pink flowers. As mentioned earlier, purple coneflower Salvias and Black-Eyed Susans provide ideal landing areas for the large butterflies to enjoy a meal, but other nectar sources include:
Bee Balm (Monarda)
Blazing Star (Liatris spicata)
Butterfly Weed (Asclepias tuberosa)
Blanket flower (Gaillardia)
Joe-Pye Weed (Eupatorium purpureum)
Penta (Pentas lanceolata)
Garden Phlox (Phlox paniculata)
Why do Swallowtails use puddles?
It is mostly males that gather at puddles either singularly or in numbers. These puddles can be formed in mud or damp gravel and are used by the butterflies to extract sodium ions and amino acids to aid in reproduction.
Females only occasionally puddle and most often are seen alone at the puddle.
In our garden, I like to use a very shallow hanging birdbath as a puddler for butterflies, but you can purchase commercial puddlers to accommodate the butterflies.
You can add some slices of fruit (bananas, oranges) to the shallow puddle to attract even more varieties of butterflies.

Three Ornamental grasses for the shade or woodland garden
Grasses for shade gardening are not always easy to find. Most grasses want full or at least part sun to be their best, but here are three that perform their best in shade.

This lovely little Carex holds its green foliage into the fall and through the winter in our back woodland garden where it grows among the birches in the birch grove.
Ornamental grasses have become an important element in most landscapes, but what do you do if your woodland garden is primarily a shade garden?
Finding grasses that do well in the shade is not easy. Most of today’s popular ornamental grasses – elegant Miscanthus, Pennisetums, Little Bluestem (Schizachyrium Scoparium) – all want and need full sun to look their best. Others want at least part sun to flourish in a landscape design. Bottlebrush Rye grass, Japanese Forest Grass and a variety of sedges are exceptions to this rule and actually prefer a shady landscape to perform their best.
Best shade-loving ornamental grasses
Let’s take a closer look at these three shade-loving grasses for the woodland garden.

The impressive inflorescenceof the Bottlebrush Rye grass is just one of its many attributes that make in a standout in the woodland or shade garden.
Bottlebrush Rye grass: A trusted woodland performer
Probably the best and most recommended native grass for the shade or woodland garden is Bottlebrush Rye (Elymus hystrix).
Although these large, native to parts of the Northeastern United States and Ontario, grasses can survive in full sun, they prefer to grow in shade or part shade where they can grow up to 3-feet-tall. The attractive grasses are hardy from zones 4-7.
Bottlebrush grass is easy to distinguish from other ornamental grasses because of its widely-spaced, open, spreading, long spikelets. As the seeds mature throughout the summer, the spikelets develop a lovely straw colour making it a strong fall performer.
Some of the stems can reach heights of more than 3-feet tall. The grass has a fibrous root system and spreads primarily by reseeding.
We are planning to use this grass in planters this summer to form a privacy-type hedge for native grass. I will report back on our success with this project over the summer months.
The arching –up to 12-inch leaves – are linear, smooth, with a grayish to dark green colouring.
Bottlebrush likes dry to medium soil and will grow in a variety of soil types from clay loam to a sandy loam.
This is one of the most shade-tolerant tall native grasses you’ll find that is a strong performer in most woodland situations whether it’s dry shade, or full sun with enough moisture. The long green inflorescences emerge on three feet all stems where they perform their best in part shade with moist, well drained soil.
The inflorescences that emerge in mid to late summer resemble bottle brushes, hence the common name “Bottlebrush.”
Bottlebrush Rye is classified as a cool season perennial, which means it will put on growth in spring rather than waiting until the hotter summer temperatures take root.
It is particularly suitable to a woodland garden and is perfect as a great low-maintenance accent or border plant.
You can find the grasses growing naturally in average to high quality woodlands and habitats adjacent to these woodlands. But they can also be found in many other less favourable woodland areas including rocky upland woodlands, woodland borders and along woodland paths as well as small meadows in wooded areas, and along shaded riverbanks.
Does Bottlebrush grass attract butterflies and pollinators?
Although grasses may not be the first plant that comes to mind when you think of butterflies and other pollinators, they can be important host plants and provide habitat for overwintering insects and other larvae.
Bottlebrush grass is actually the host plant for the caterpillars of a the attractive Northern Pearly Eye butterfly, Enodia anthedon. Don’t be surprised to see the caterpillars feeding on the plants foliage. It is also a host for the larvae of several leaf-mining and other moths as well as aphids and leafhoppers.
Several birds species are also attracted to the grasses seeds in the fall and early winter.
For more specific information on what fauna is attracted to the grasses, go to Illinois Wildflowers.
You might also like to read my post on Why we should leave our ornamental grasses standing all winter.
Another post of interest is Three of the best ornamental grasses for sun or shade.

Japanese Forest Grass (Hakonechloa) in fall colour in our Japanese-inspired front farden
Japanese Forest Grass is a real show stopper in the shade garden
Although not a native grass to the United States or Canada, Hakonechloa (Japanese Forest Grass) is a highly ornamental, warm season grass and a standout in any woodland or shady garden landscape.
We have it growing in multiple areas within our woodland, including in the front yard where it provides structure for the Japanese-inspired garden as well as along the path leading to our porch and front door.
Hakonechloa is the perfect addition to a shady area when you want to adds a real hit of glorious chartreuse colour to a full-shade area of the garden, where its graceful arching form lends a softness and elegance to the landscape and its yellow and green leaves are given the opportunity to really shine. It can handle part shade but will struggle to show its best colours in full sun.
This grass, native to eastern Asia, is extremely well behaved and one of the few grasses that prefers full shade. It never gets too high so it also works well in the front or middle of a large border.
It’s available both as a form as well as the even more beautiful all-gold variety. The yellow and green leaves turn red and purple shades in the fall before turning to the familiar winter tan colour where they continue to provide interest throughout the winter.
For more on Japanese Forest Grass and other stalwart grasses for your woodland, be sure to check out my post featuring Three of the Best Ornamental Grasses for the garden.

These small sedge grasses grow beneath birch trees and alongside the native grass Northern Sea Oats.
Pennsylvania Sedge: There’s a Carex to suit every need
Although still not widely known and certainly not used in great abundances in most landscapes, sedges offer the shade or woodland gardener the perfect opportunity to add grass-like foliage to your garden design.
In our garden, I’ve planted a number of variegated sedges around our birch grove to add interest in the space between the trees.
The sedge family of plants is quite large and needs further exploration, if you are looking to solve a specific problem.
One Sedge that needs highlighting when it comes to woodland gardening is Pennsylvania Sedge.
Pennsylvania Sedge sports fine textured leaves, that reach about six inches in height. It’s creeping habit make this sedge the perfect lawn alternative for dry soils in a woodland garden.
Given the right conditions, this solid green sedge that requires a well-drained soil, in light to full shade, will fill in to form a dense low-growing, maintenance free groundcover.
Other shade loving sedges include:
Appalachian Sedge – Carex appalachica: Forms a nice clump with narrow leaves only getting 6-8 inches tall. It is an appealing, all-green, shade to part sun-loving sedge that is quite appealing.
Bristle-Leaf Sedge – Carex eburnea: A fine-leaved sedge ideal as both a ground cover or lawn replacement in a shady area. Dark green, fountain-like clumps that reach between 6-12 inches are lovely additions to any landscape and they are soft to the touch making them family friendly. The individual tufts eventually grow together forming a thick carpet that turns a lovely tan colour in fall.
One of the best sources for information on native sedges is The Native Plant Herald from Prairie Nursery in Wisconsin. You can check out their informative site here.
The Hidden Kingdom of Fungi opens a secret world into our forests and homes
The Hidden World of Fungi is a book for those who want to dig deep into the fascinating world of fungi in the forests, in our homes, industry and even our bodies.

A detailed, scientific approach to the study of Fungi in our forests and our homes.
The Hidden Kingdom of Fungi takes readers into a secret world and traces the intricate connections between fungi and life on earth.
Along the way, author Keith Seifert, describes how these remarkable microbes enrich our lives: from releasing carbon in plants, to transmitting information between trees in the form of mycorrhizal fungi.
This book, from Canadian publishers Greystone, takes readers of Entangled Life and The Hidden Life of Trees into the world of Fungi in its more than 200 pages backed by scientific research and the incredible knowledge of author and fellow Canadian Keith Seifert, who has spent more than 40 years studying fungi on five continents. The Ottawa, Canada resident has researched microscopic fungi from farms, forests, food and the built environment, to reduce toxins and diseases affecting plants and animals.
In the book, The Hidden Life of Trees, the authors clearly connected the communication between our forest and backyard trees with the communication highway created by the mycorrhizal fungi buried beneath the soil.
In the Hidden Kingdom of Fungi, mycologist and author Keith Seifert takes the concept to a whole other level, describing in detail the process and the interdependency.
This book is for anyone who wants to explore deeply into the world of fungi, whether it’s the obvious forms that we see growing in the forests and in our gardens to the more hidden ones that live in our homes, bodies and farms.
Mushrooms and fungi in our forests
The importance of fungi in our forests and backyard woodlands can’t be underestimated.
In fact, the author points out that fungi are critical partners in the eventual success or failure of all forests. No matter how anemic the woodlot, in the autumn you will find mushrooms growing and throwing their spores into the wind. They are most obvious in fall, but no matter what time of year you are in a forest, you are surrounded by fungi that are hidden in plain sight.
As the author points out, fungi covers the outside of leaves and bark, hide inside leaf tissue or wind their hyphae around the roots of trees. They are always at work decomposing dead pockets of wood, in the soil breaking down plants.
Are fungi part of our lives?
From our forests, to industry and into our homes, fungi play a major role in our lives and our existence.
Readers will gain knowledge into where these fungi came from and how yeast, lichens, slimes and molds evolved and adapted over millions of years. Toward the end of the book, the author explores how fungi are being used to clean up oil spills and break down plastics.
The book even touches on the role fungi is playing a role in nuclear disasters such as the Chernobyl disaster in Ukraine.
The use of fungi to clean up or detoxify spills from mining disasters, accidents or simply heavily polluted areas is call mychoremediation, and it is being used by scientists around the world. Fungal mycelium absorption capabilities have been tested to be used to clean up after forest fires, nerve gas attacks and fuel spills in land and sea.
The author points to an oil spill in 2007 in San Francisco that used a combination of human hair and oyster mushrooms to mop up the spill.
Through research into fears that Ukrainians eating wild mushrooms in and around the Chernobyl fallout zone, researchers found that many mushrooms accumulated heavy metals (such as cesium 137) in their mycelium. The research showed that mushrooms could be cultivated to extract isotopes from the soil then harvested and incinerated for disposal.
It’s just one of many fascinating ways fungi could be used to change our world into the future.

Proven Winners 2022 Gardener’s Idea Book is another winner
Proven Winners has done it again with their free 2022 Garden Ideas booklet and download. The 42-page booklet is full of great garden tips and ideas to help you get the most out of your garden this year.
You can download your free copy directly from Proven Winners’ website
Proven Winners’ 2022 Gardener’s Idea Book takes a page or two from last year’s informative booklet and adds some interesting extras that are sure to pique your interest.
If you have not ordered your free printed copy, you can download the 42-page booklet just by logging in to the Proven Winners’ web site and going to the Gardener’s Idea Book download. There are a total of 14 excellent downloads on this web page, including this year’s Idea Book and last year’s outstanding Gardener’s Idea Book.
Other downloads include: A new Vision for Hydrangeas, PW perennials, Landscape Solutions for the South, and a new vision for Native shrubs. Some of the downloads are even available in French and Latin.
If you love the Proven Winner’s Idea Book, Check out my link to the 2023 Idea Book here.
Here is a link to the 2021 Proven Winners’ Gardener’s Idea Book.

Proven Winner’s 2022 Gardener’s Idea Book cover.
Like last year’s booklet that included a series of planted containers featuring outstanding combinations of Proven Winners’ plants, this year’s booklet follows up with 4 pages offering up tips on choosing container companion plants. Proven Winners provides valuable information on creating containers of plants that prefer similar growing conditions and plants with similar growth rates. Both features are important to get the most out of your containers. Not only do they provide a list of the plants along with images of what you can expect, Proven Winners’ experts also provide planting maps on how best to create the look.
If you are like me and depend on containers to add colour and interest to your garden, you will appreciate the ease of following these guidelines to create stunning containers for both sunny and shady areas.
The booklet also explores five tips for creating outstanding window boxes for shaded areas, and a separate feature about using window boxes around living areas such as decks and patios to create more cozy living areas.
It’s important to note that, although Proven Winners has outstanding plants and shrubs that can be real standouts in the garden, they are cultivated plants and therefore not native. As a result, these cultivated plants, while performing admirably when it comes to flowering or growth habits, are unlikely to provide wildlife with the same benefits as the species or native plants that the fauna has evolved with over centuries.
See my article on why we should use native plants in our gardens.

Proven Winners’ Gardener’s Idea book offers plans on installing a rain garden complete with planting suggestions.
Focus on Rain Gardens
Proven Winners explores one of the growing trends in natural gardens with a focus on building and planting a small rain garden. The rain garden plan provided in the booklet focuses on a shaded area along a driveway. How many of us have that exact problem, where water runs down between the houses in the long narrow strip separating the driveways?
Proven Winners’ booklet helps to provide a solution for the problem with this two-page feature that provides a simple construction plan along with a planting scheme and, of course, excellent photographs to illustrate the final look.
Tips on creating a DIY planter table
Other articles in the booklet include creating a planter table that centres around creating a living centre piece of flowers, herbs and vegetables. The large table with living plants running down the middle is an impressive creation and would provide a topic of lively discussion around the dinner table with friends.
A smaller, DIY planter table on a budget is a great project for either a smaller garden or a great option to introduce children to garden dining, as well as maintaining a small herb and vegetable garden.
There are other pages devoted to Proven Winners’ favourite social media gardeners including Laura LeBoutillier from @GardenAnswer and Jenny Simpson @gardeningwithcreekside.
Plenty of garden plans and illustrations
Several pages are devoted to creating new garden areas designed for specific results. All of the designs include complete planting guides as well as photos to illustrate the final result. Of course, they all feature Proven Winners product, but gardeners could easily swap out some of the Proven Winners suggestions for some of their own favourites native plants.
The individual gardens include a “summer sunglow” garden centered around a small shed or children’s playhouse that include plantings of coleus, verbena and Lemon Coral Sedum with grasses forming the backdrop.
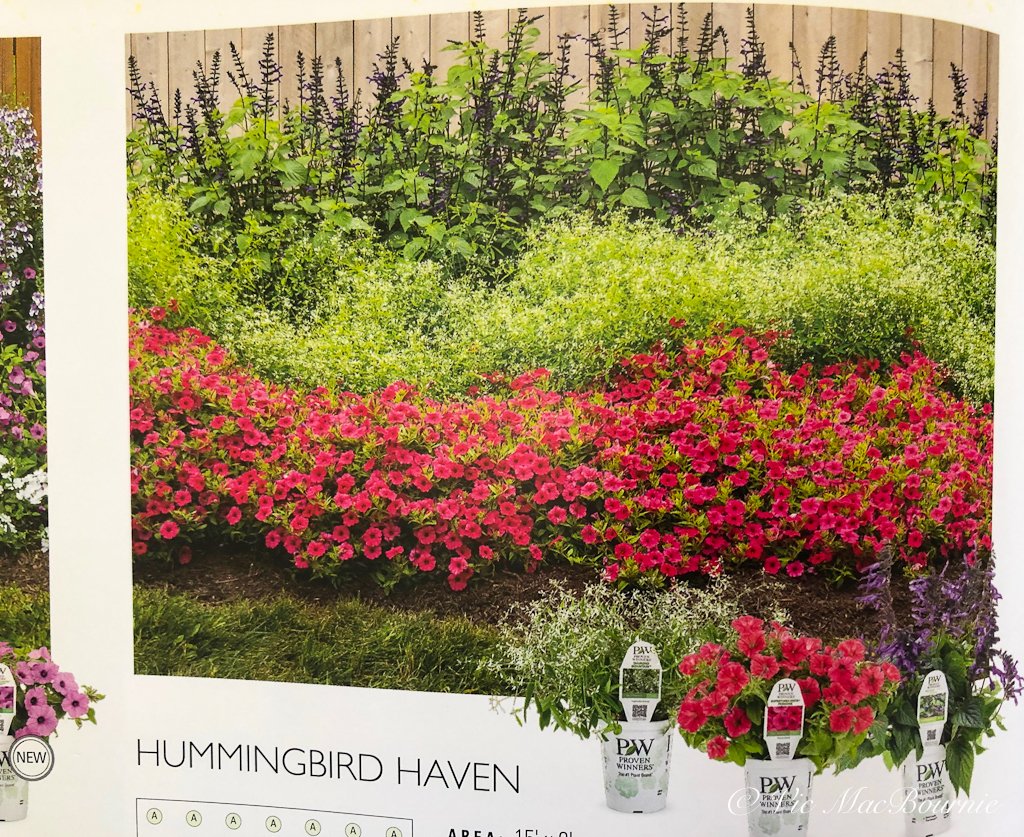
A hummingbird garden design is provided in the Gardener’s Idea booklet.
A garden to attract hummingbirds
Other garden designs include a sun worshippers design, a garden for hummingbirds, a lush bold border and a border designed as a deer-friendly border for those of us who struggle with deer in our yards.
That’s already a lot of value packed in to the booklet, but it’s really only the beginning of the information provided to readers.
Tips to create your own Moonlit Garden
The four pages dedicated to a moonlight garden using primarily white and cream plants and night blooming flowers is full of great ideas. The impressive garden featured in the booklet is large, but downsizing the plan to include a smaller area of the garden, let’s say a corner or even just the area around your patio, is entirely possible and more likely a realistic goal for most homeowners.
Not only does a moonlight garden look great in the evening and is perfect for those who like to entertain, for wildlife gardeners the moonlight garden is ideal for attracting moths and bats to the garden.
To wrap it up, the booklet offers ideas and tips on using plants as a screen for unsightly views or privacy from your neighbours.
There are also pages focusing on gardening in arid spaces, and extending the life of your outdoor plants by bringing them indoors during the winter, and finally, an overview of Proven Winners’ newest introductions both perennials and shrubs.
In Conclusion: Proven Winners comes through again
Granted, the entire Idea Book is an advertisment for the company’s many plants and garden shrubs. Also, it should not be dismissed that none of their plants are natives, and the proliferation of cultivated garden plants is threatening the very existence of many of our native plants. Nevertheless, there still is a place in our gardens for these plants, especially the annuals that provide outstanding colour to our mostly-green woodland gardens. And, it’s not to say that just because these plants are non-native cultivars, they are of no value to wildlife such as pollinators, insects, etc. Many of these plants continue to attract hummingbirds and pollinators and quite possibly can be host plants for larvae. They just don’t usually do it as well as native plants.
So, by all means, use native plants whenever possible, but don’t be afraid to take advantage of the suggestions provided in the Proven Winners Idea Book and go with them.
I can almost guarantee that you will be impressed with the results.