
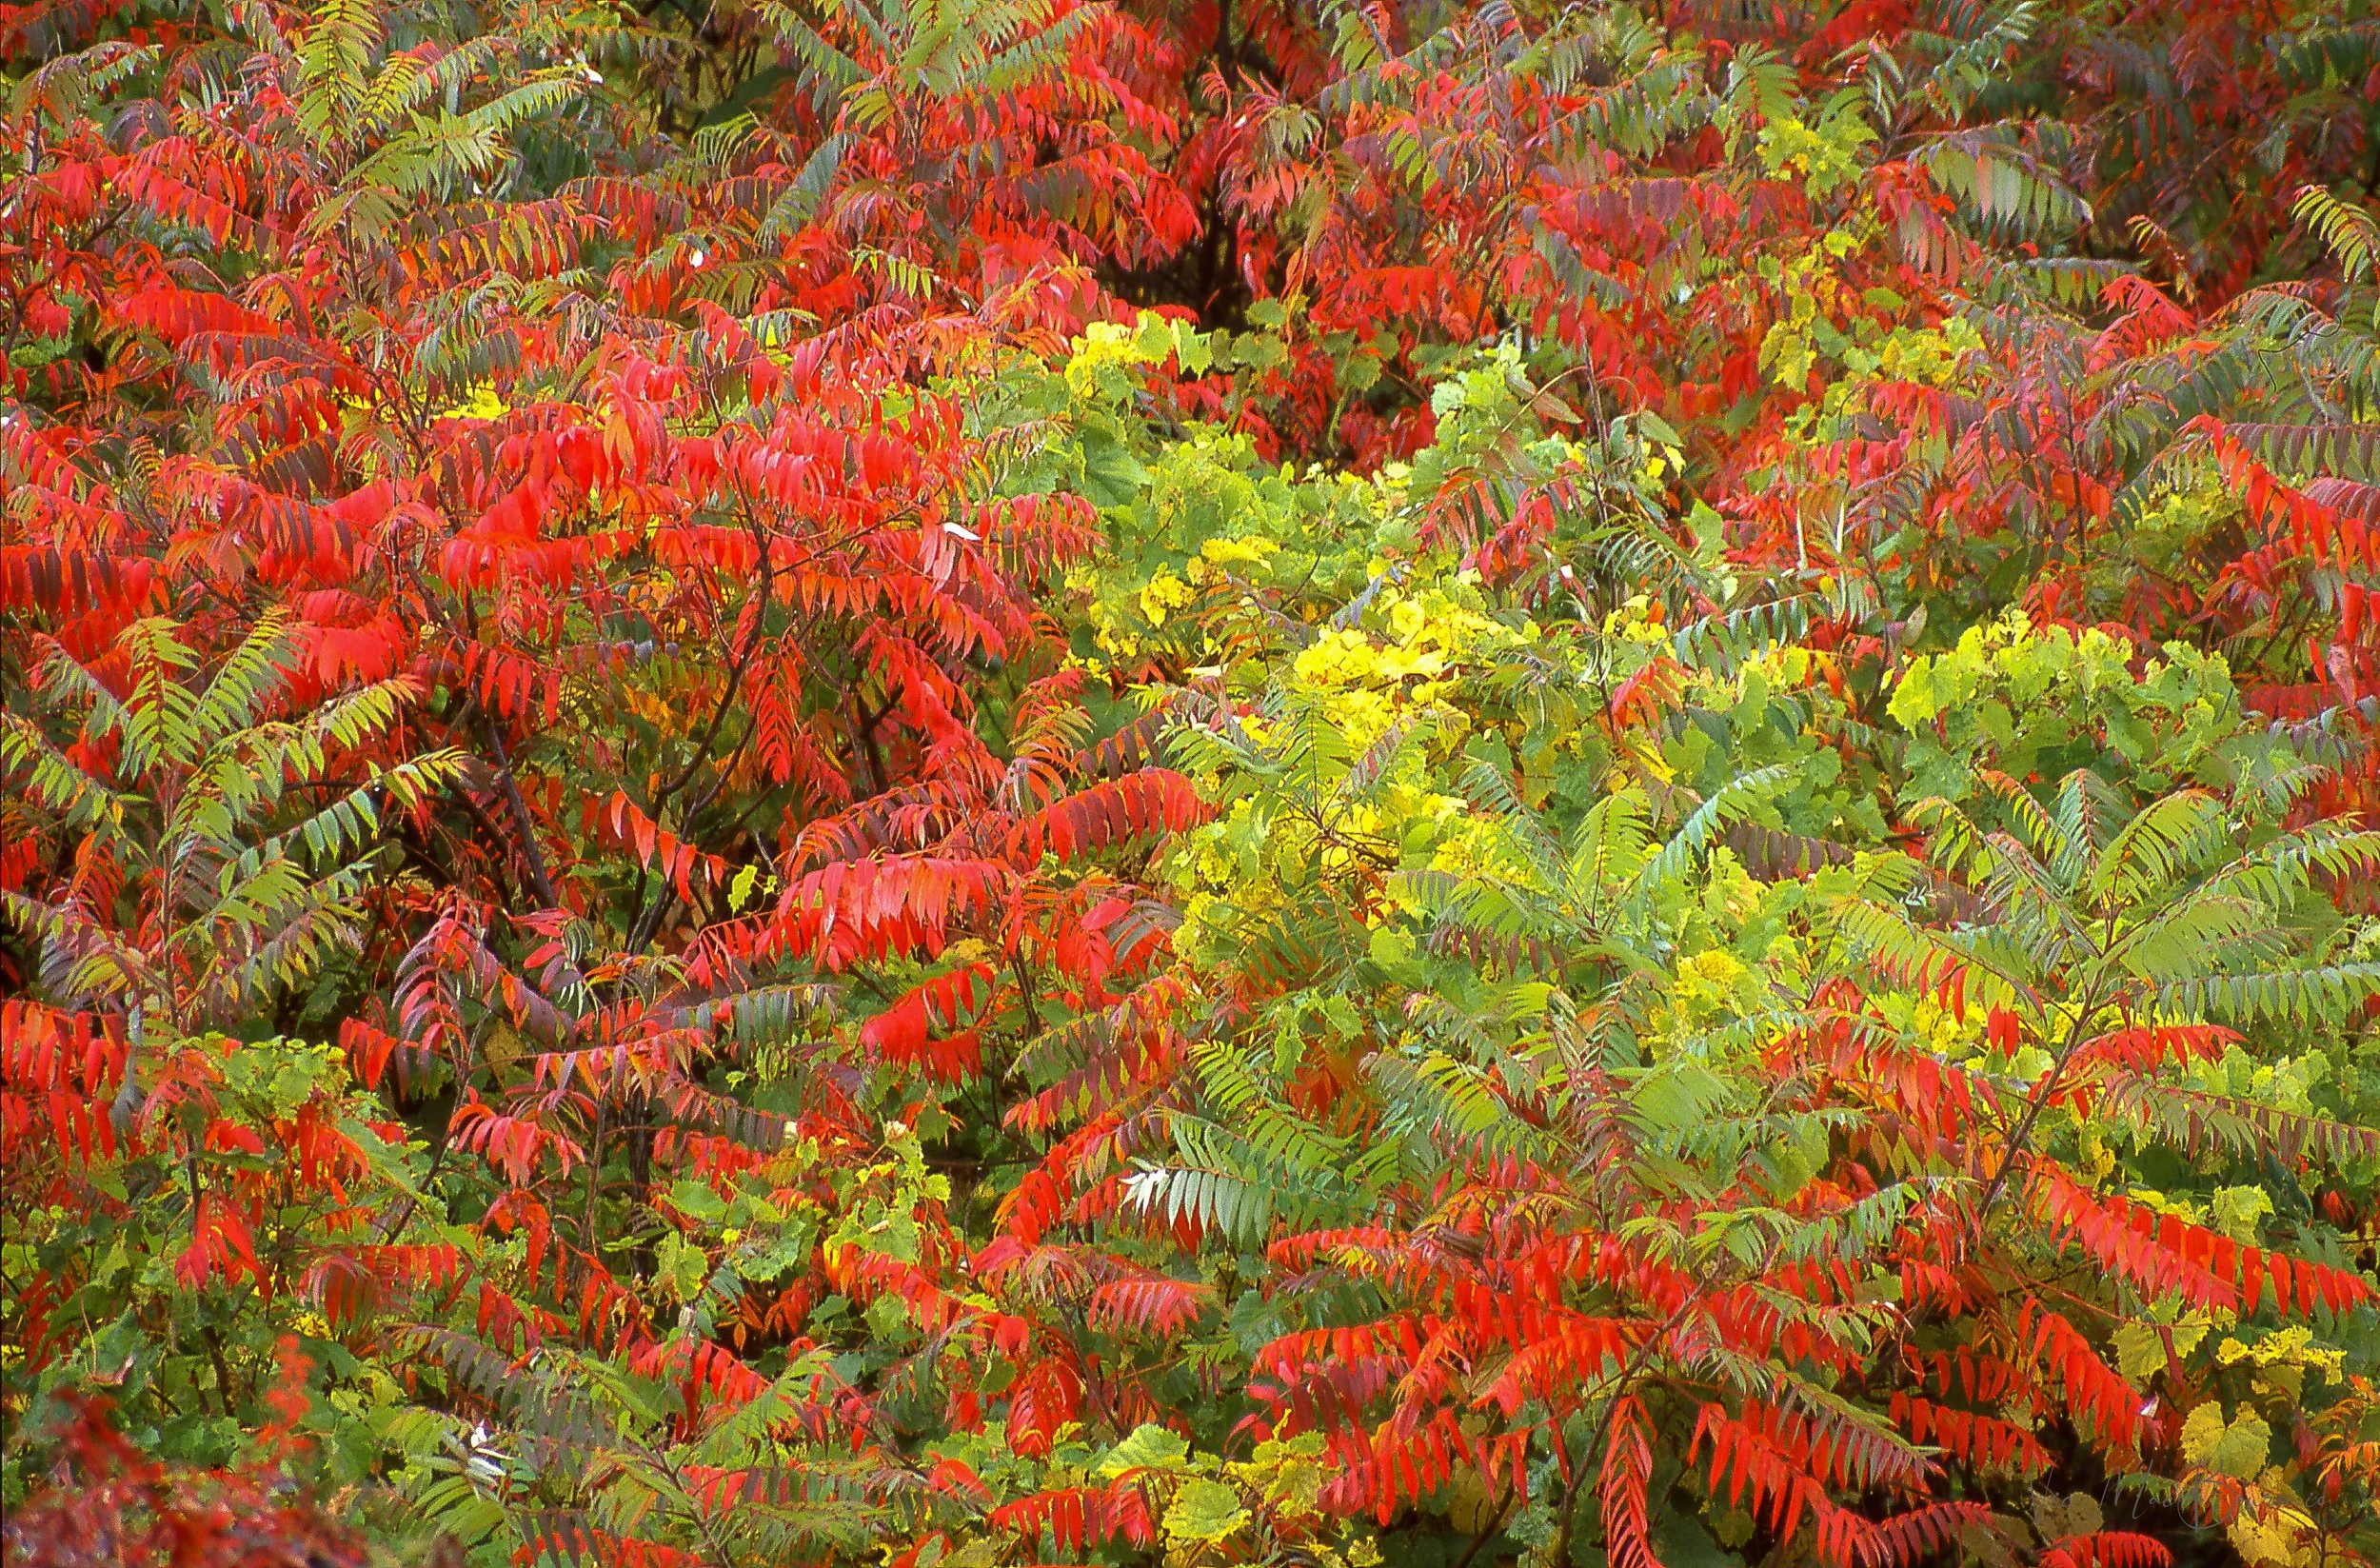
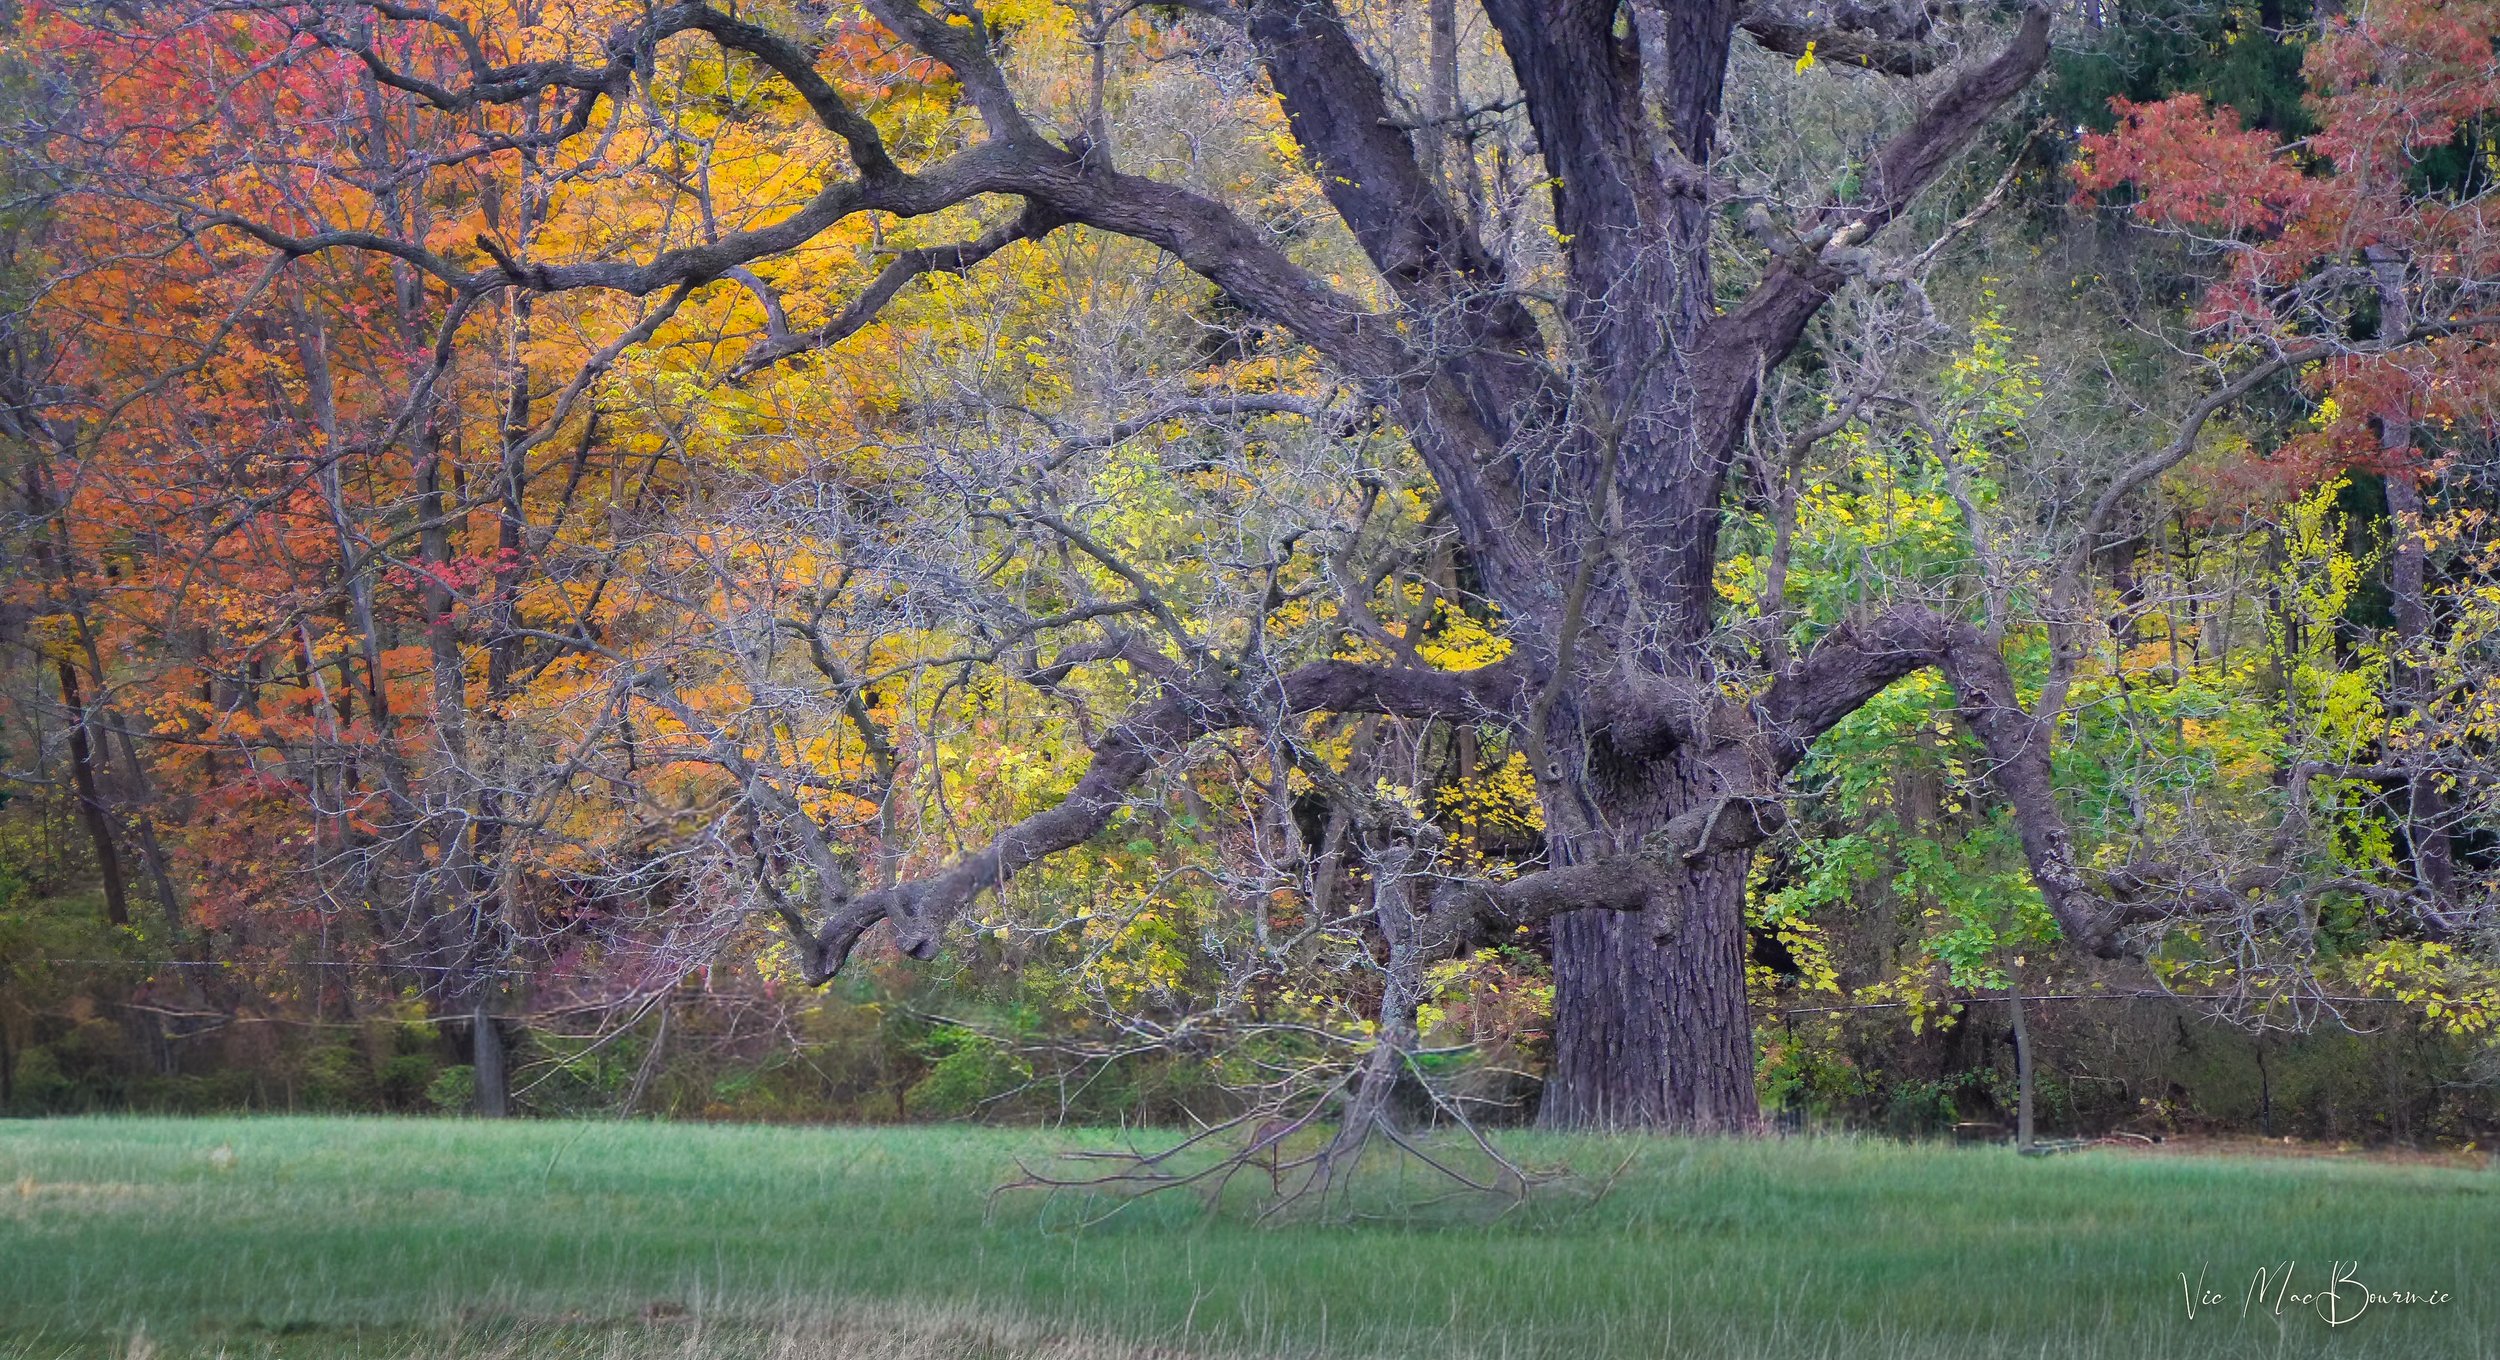
Sumac: First signs of fall in the garden
Staghorn Sumac is an excellent addition to the garden both to add architectural interest and provide a food source for birds and animals.

Important food source for birds and other wildlife
It’s early October and the native Sumac is already lighting up the roadsides and welcoming the first signs of fall in the woodland garden.
Along roadsides and escarpments, where this fast-growing native shrub or small tree (grows to about 30-feet high) gets plenty of sun, Sumac lights up with brilliant oranges, yellows and reds.
It’s often the first plant nature photographers focus on when in search of early colour in the fall landscape, and it’s a perfect addition to the woodland garden. Sumac has compound, serrated leaves that are a bright green in summer before taking on its fall cloak.

This small sumach in beautiful fall colours takes on the look of a Japanese Maple in the front garden of this home.
How did Sumac get its name?
There is no missing the velvety bark on the branches that cover Staghorn Sumac. This velvet resembles the velvet that covers the antlers of male deer (stags) throughout the summer, earning Sumac the name “Staghorn”.
There are more than 30 varieties of Sumac in North America with more native varieties in Europe, Africa and Asia.

Sumac showing early signs of fall colour. If you are looking to add fall colour to your garden as well as a good source of food in late summer/early fall, you could do worse than leaving a corner of your yard for some Sumac.
Is Sumac a food source for birds and other wildlife?
Not only is Staghorn Sumac (Rhus typhina) an incredibly colourful addition to the woodland, its fall berries, that grow in large clusters atop the shrub’s branches, are also a very important source of high-value food for birds especially migrating birds.
Staghorn Sumac puts out small greenish-yellow flowers that attract pollinators. They grow in the shape of a cone in spring and become the reddish-haired fruit clusters as summer turns to fall.
These hearty fruit clusters, that often remain on the plant well into winter, are vital resources for hundreds of bird species including our backyard favourites like Cardinals, Gray Catbird and a host of woodpeckers ranging from the impressive Pileated to the small Downy and larger Hairy woodpeckers. Add to that list the American Robin together with other thrush species. In a more wooded natural area, don’t be surprised if it attracts Ruffed Grouse and wild Turkeys.
As an added bonus these plants are deer resistant.
Staghorn sumac is dioecious, meaning that it has individually male and female plants.
These shrubs/small trees are extremely hardy, and are both drought and salt tolerant. They prefer a sunny location and dry to moist soil and will not tolerate shade or wet soil. Use these fast growers as an erosion control plant if you have problematic areas.

A grouping of Sumac in full fall colour.
Where I live, The Niagara Escarpment is the dominant geological feature that cuts through the landscape. The Staghorn Sumac lights up the many cuts through the escarpment and turns the roadsides into sparkling jewels at certain times of day.
Staghorn Sumac is native to the more southern half of Ontario, and eastward to the Maritimes.
Sumac species include both evergreen and deciduous types. They generally spread by suckering, which allows them to quickly form small thickets, but can also make the plants overly aggressive in some circumstances.
There are usually several varieties available at nurseries, but this attractive native is probably all you will need.
Other forms of Sumac
At one of my local nurseries there are three Sumacs listed including the Staghorn Sumac. The others are Fragrant Sumac, and a dwarf variety of fragrant sumac called fragrant gro low Sumac as well as Cutleaf Smooth Sumac.
Cutleaf Smooth Sumac (Rhus glabra Laciniata) is a smaller hardy shrub (hardiness zone: 2B) with finely cut tropical-looking leaves that add texture to the garden. Grown primarily for its ornamental fruit, and its open multi-stemmed upright spreading habit. It lends an extremely fine and delicate texture to the landscape and can be used as a effective accent feature. Click on the link for more information on the Cutleaf Smooth Sumac.
Gro Low Sumac is described as low growing and compact shrub with interesting foliage turning brilliant colors in fall and bright yellow flowers in spring. Makes an excellent ground cover as it tends to sucker, filling in areas quickly. Does well in shade. Click on the link for images and more information on the Gro Low Sumac.
Fragrant Sumac is described as a rugged and durable medium-sized shrub with interesting foliage turning brilliant colors in fall and bright yellow flowers in spring. Tends to sucker, forming a dense spreading mass, attractive for a garden background or for naturalizing, good in shade.
Carolina wren: How to attract this spunky little insectivore
Attracting Carolina Wrens begins with creating a habitat to attract insects to your yard. Insects account for close to 95 percent of their diet, but they will come to bird feeders in winter, especially those with suet and peanuts.
Rewild your yard to attract Carolina Wrens
The Carolina wren is a noisey, spunky little bird that is, at least from a distance, easily mistaken for a sparrow.
But up close, there is no mistaking these little guys.
If you are looking to attract Carolina Wrens to your yard, you will have to create habitat that encourages an abundance of insects in your yard. If your backyard is a typical neat and tidy suburban yard with few native flowers, shrubs and trees, you will need to get to work rewilding the space.
It goes without saying that pesticides have no place in the garden. Native trees, shrubs and plants are vital to attract insects along with brush piles and more natural areas in the garden that will be attractive to insects. A pond is also an attractive place for all types of birds and wildlife including insect life.

The Carolina wren is a small, sometimes elusive bird that makes its presence known, especially in spring when its song fills woodlands and backyards.
In our yard, the Carolina wrens are often seen on the ground checking out the leaf litter in search of insects. In spring they are busy checking out trees and shrubs for caterpillars and small insects.
Although Carolina Wrens are primary insectivores, they will readily come to backyard feeders, especially in winter where they will feed on suet, peanuts and sunflower seeds.
How large are Carolina wrens?
Although it is the second largest wren in the United States – just behind the cactus wren – it measures only about five and a half-inches (12.5 to 14 cm) in length, with an 11-inch (29 cm) wing span.
They can be quite shy and difficult to see in the woodlands and forests where they are common in the southeastern United States and up into southern parts of Canada. Once on the nest, however, they become quite active and vocal little visitors.
If you are trying to identify the sexes, all the chattering is coming from the females while the male likes to sing.

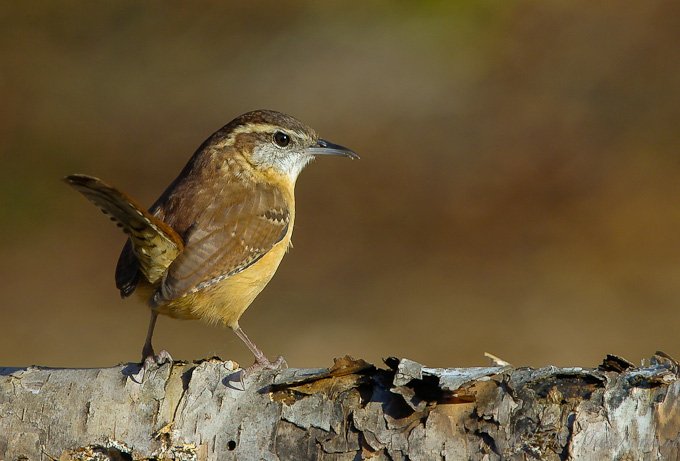
A Carolina Wren searches through debris for food in early fall.
Carolina Wrens (Thryothorus ludovicianus) make their living in open woodlands and are regulars in naturalized yards where they can be seen working brush piles and tangles looking for their primary food source – insects.
For more on using native plants to attract birds and other wildlife, be sure to check out my article on Using native plants to attract birds. If you are using feeders, take a moment to check out my article on using recycled resin feeders rather than wood ones.
Other birds, such as American Robins and Indigo Buntings are primarily insect-eating birds and can be difficult to attract to your yard with just bird feeders.
For years, we’ve had these fiesty birds nesting outside our bedroom window in spring. A word of caution, if you don’t like getting up early in the morning, don’t hang a nesting box outside your window. These little guys are a lot noisier than you my think given their size. To hear their song check out the CornellLab audio recording.
How can you identify Carolina Wrens?
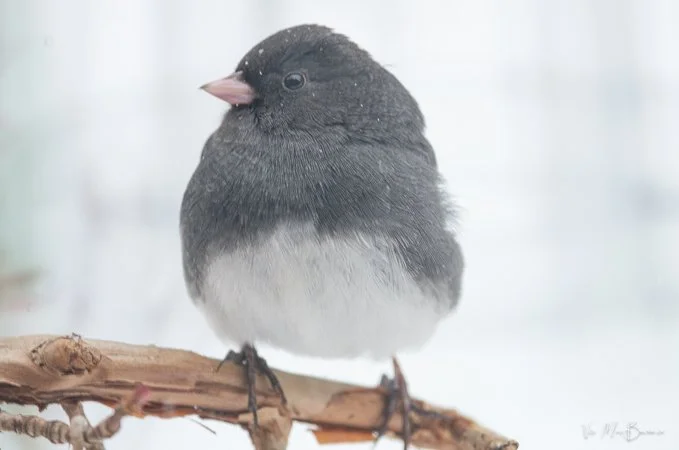
Carolina Wrens have reddish/cinnamon plumage on their backs and buff-coloured undersides. They weigh in at only 18 to 23 g (0.63 to 0.81 oz), and are easy to identify with their white throats and eyebrow stripe, and long, upward-cocked tail.
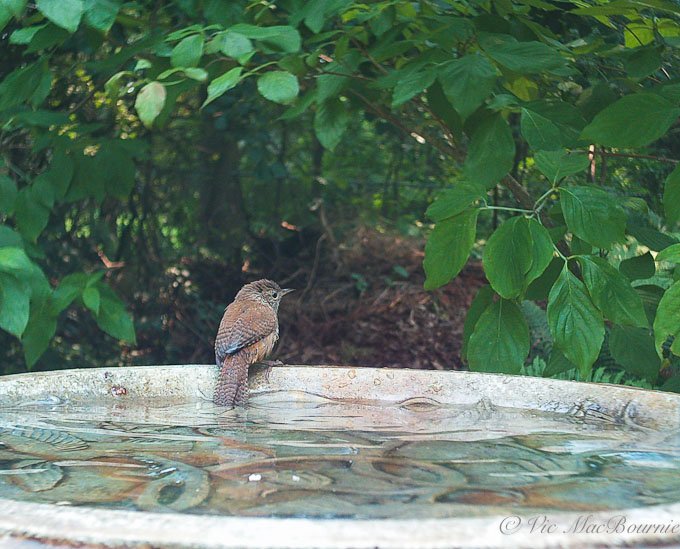
This image helps to show the diminutive size of the Carolina Wren while it dries off after a good soaking in the birdbath.
Climate plays a major factor in this wren’s range
Although the Carolina wren is common enough throughout the southeastern United States up through southern Ontario, the birds’ northern range varies depending on the severity of the winter.
Climate change is likely playing a role in this bird making its way farther north and remaining in more northern areas throughout the winter.
The birds’ numbers expand into more northern ranges in mild winters, only to shrink back during more severe winters.
Bird feeders can play important role in Carolina Wren survival
According to a 2011 study in Michigan, bird feeders with suet and peanuts play an important role in survival rates of these birds during harsh winter months.
The CornellLab posted an interesting article stemming from Project FeederWatch that focused on Carolina Wrens and bird feeders during winter months. Carolina Wrens’ diets, is known to be only about five per cent seeds and other vegetable matter with the remaining 95 per cent being insects.
Using a recycled plastic suet feeder like the one below, is a good way to provide a food source for woodpeckers, Carolina Wrens and other insect-eating birds. The benefits of using the recycled plastic feeders vs wood feeders is spelled out in one of my earlier posts.
Wild Birds Unlimited sells a number of the recycled plastic suet feeders that are worth checking out.
In winter, they struggle to survive during periods of high snow cover where insects are difficult to find.
In the Michigan study, three different habitats were monitored from city parks, residential areas as well as rural areas. The study showed that the wrens abandoned these sites when there were no feeders available.
The conclusion: When Carolina Wrens’ food supply is limited by heavy snow and cold temperatures, bird feeders play a critical role to their survival.
Their study also concluded that Carolina Wrens prefer suet and peanuts and that “one peanut alone can provide more than a third of their daily metabolic need!”
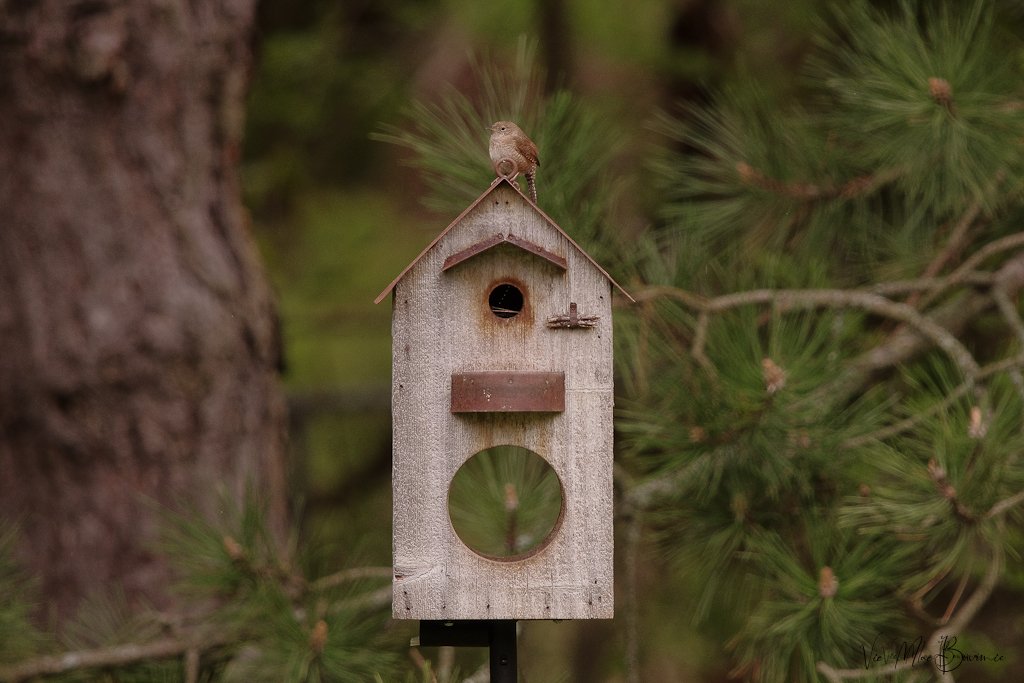
Carolina Wren surveying the area and considering its potential new home in this rustic bird house.
In Conclusion: Carolina Wrens need our help
It’s easy to think our bird feeders are vital to keeping backyard birds healthy. Just look out the window after a snowstorm and you’ll wonder how these birds could survive without us. But they do. And what many of us fail to realize is that many of the birds in our neighbourhood don’t even, or rarely, eat seeds.
In fact, most birds, even those that appear at our feeders, depend on insects for their survival and the survival of their offspring.
Attracting these birds requires more than putting out feeders. Creating habitat for both the birds and, more importantly, insects is the key to these birds’ survival.
Let parts of your yard go a little wild. Build a brush pile and include some form of water in your yard and chances are you will begin to see more insect-eating birds like the Carolina Wren.

How to grow and care for native Asters
Three native asters for the natural garden that provide late-season resources for pollinators and add a beautiful textural feel into the fall.
Three native asters: Ideal plants for our natural gardens
Our native asters are stealing the show in the meadows and open woodlands around our home reminding us that, if we are not already growing them in our gardens, its time to plant them for next fall.
In our garden the wood asters have made an appearance along with the Woodland Sunflowers, goldenrod and Black-eyed Susans across the back area of our garden.
Do Wood Asters attract pollinators?
The White Wood Asters (Eurybia divaricata), also known as Heart-Leaved Aster, are delicate whitish-blue flowers that add an airy feel to the garden and the perfect excuse for the small pollinators – native sweat bees and small butterflies as well as other insects – to stop by and enjoy a late summer harvest.

New England Asters growing in a naturalistic setting. What some people may think of as a weed, are actually beautiful native wildflowers that are vital to native bees and wildlife.
Embrace these plants and the somewhat messy look they sometimes bring to your garden and focus on the wildlife that find your garden aesthetics just perfect – because it is perfect – for them.
These perennial plants grow between 30 to 90 centimetres (12-35 inches) tall, with heart shaped leaves on the lower parts of the plant and changing to more elongated and deeply serrated on the upper reaches of the plant.
For more information on native plants, check out my earlier articles: 35 native wildflowers and Why we need to grow native plants.
If you are thinking about growing your own meadow garden, be sure to check out garden designer Angela den Hoed’s meadow garden and her five favourite plants for the meadow garden.

White wood asters, New England asters combine beautifully with goldenrod.
How to grow Wood Asters
These are a form of shade-loving asters that can be found growing naturally in dry, organic-rich woodlands and on the edges of forest areas in part shade.
Ours are growing happily on the edge of our ancient crabapple trees, where conditions seem almost ideal for them.
Although these asters will tolerate full shade or sun, they are happiest in part shade. Their beautiful, yet delicate branching clusters of pale blue flowers give a nice airy feel to the garden as well as providing a good source of nectar and pollination for both bees and butterflies.
Hardiness Zone: 3-7
Light: Part shade to full sun
Moisture: Tolerates dry soil, shade to part shade neutral to slightly acidic conditions.
Soil: clay loam to sandy loam, organic
Mature Height: 3-feet-high
Growth: Vigorous or aggressive, even in dry shade.
Propagation: Can be started from seed (seeds mature in late fall), by dividing clumps in early spring or allowed to spread entirely on its own.

This informative infographic designed by Justin Lewis shows the value of the New England Aster.
Are Wood Asters a threatened species?
The Wood Asters’ range is quite broad despite its extremely limited range in Canada where it is confined to a small number of sites in the Niagara region and in more southern areas as well as a few woodlots in southwestern Quebec.
In the United States the Wood Aster ranges from New England south into Georgia and Alabama.
In Ontario, according to the government’s website, the Wood Aster has been considered a threatened species since before 2008, meaning that the plants are not yet endangered but are on that path if action is not taken.
All the more reason to plant some of these delicate little flowers in your garden.
The government website adds these quick facts about the Wood Aster:
White wood aster seeds are dispersed by the wind but are generally not carried for long distances; this may account for its low colonization rate and restricted range
White wood aster is also known as the Heart-leaved aster because of the shape of its lower leaves
The flowers of White wood aster are attractive to butterflies and it is the host plant for Pearly crescents, a common North American butterfly
Right on cue our plants began to flower in mid September with their yellow and purple florets surrounded by the white petals.
The White Wood Aster likes to grow in colonies where it spreads via underground roots.
The plant’s decline in Ontario and Quebec is attributed to a number of factors, including habitat loss as well as competition from increased recreational activities ie: trampling by hikers, bikers and ATVs. Deer grazing and competition from invasive garlic mustard are also putting stresses on the plant in natural settings.

New England Asters in a naturalized setting growing among native grasses.
New England Aster: Dominant flower along roadsides and open fields
New England Asters are happy growing in part shade to full sun in our gardens and naturalized areas along our roadside and open meadows.
Plant them in sandy loam and these late summer/fall bloomers will reach heights of 5 feet with impressive, purple blooms sporting orange centres.
By cutting back the plant in mid-summer (Chelsea Chop: Link to Fine Gardening article), it’s possible to keep the plant a little more manageable throughout the fall.
New England Aster, like all late-blooming perennials, is a critical source of late-season nourishment for pollinators. If you have ever observed the plant in late summer, its attraction to native bees, butterflies and other insects is noteworthy.
New England Aster is distinguished from Smooth Blue Aster by its hairy stem.
Good companions plantings for New England Aster
If you have a meadow garden, consider pairing this aster with Goldenrod, Oxeye daisy, Woodland sunflower and late-season grasses.
!
Large Leaved Aster is another winner in the woodland
Large Leaved Aster (Eurybia macrophylla) grows in part shade to full sun in zones 3 to 9. It prefers a sandy loam with medium moisture and will grow to about 4 feet tall.
This is another shade-tolerant aster that can work in a woodland-style garden. Consider planting them on the edges or in small clearings where they can benefit from some sunny periods.
The plant’s pale blue blooms are secondary to the 4-8 inch heart-shaped basal leaves that form almost a ground-cover-like carpet.
In conclusion: Asters are important in our landscapes and natural areas
It’s easy to disregard the importance of Asters in our landscapes. Many gardeners focused on aesthetic, non-native gardens would consider the plants weeds and eliminate them as soon as they seem these perennials encroaching on their gardens.
This approach is one of the main reasons asters are disappearing in gardens and open meadows throughout North America and Europe.
In turn, our native bees, butterflies, caterpillars and other insect numbers are falling and threatening the health of our birds that depend on these insects to survive and feed their young.
As woodland or naturalistic gardeners, it is rewarding to know that we are doing our small part to restore the ecosystem and protect plants that are either threatened or spiralling downward.
Embrace these plants and the somewhat messy look they sometimes bring to your garden and focus on the wildlife that find your garden aesthetics just perfect – because they are perfect.

Plant Native Sunflowers for the bees, butterflies and the birds
Our native woodland sunflowers are not only beautiful but important plants for native bees, birds, butterflies and other insects.

A grouping of Woodland sunflowers in their prime light up the edge of a forested area. The sunflowers are a magnet for native bees and butterflies and their hollow stems provide winter nesting habitat for native bees.
Woodland sunflowers are native to Ontario and parts of the United States
It’s not just good looks that make our native sunflowers a must for the woodland garden. Their popularity among butterflies, native bees, birds and other insects makes these tall shrubby plants a popular choice for wildlife gardeners.
In our garden, the multi-flowering, bright yellow Woodland sunflowers (Helianthus divaricatus) grow at the back of the property alongside other meadow-style plants such as Black-eyed susans, New England and Wood Asters. They seem happy to grow beneath our crabapples where they receive mostly dappled afternoon and late afternoon sun.
If you are looking for more information on growing native flowers, you might be interested in reading my comprehensive article: Why we should use native plants in our gardens.
The Woodland sunflower is native to the eastern United States and Canada and can be found along roadsides and on the edge of woodlands and forested areas.

A large grouping of Woodland Sunflowers looking their best backlit against a dark background.
Hardy in zones 3 to 7, they work beautifully planted along woodland edges together with Black-Eyed Susan, Scarlett and Spotted Bee-Balms, and goldenrods. They will thrive and spread quickly in full sun but also do well in partial shade.
Generally these prolific bloomers, that can grow up to 6-feet tall, can be found growing naturally in dry, open woodlands, making them perfect for our woodland gardens.
The tall stems support the 2-inch (5cm) yellow flowers that sport 8-15 petals and a darker yellow centre disk. The flowers bloom from early summer to fall. The self-seeding sunflowers spread by rhizomes accounting for the large colonies often seen growing along forest edges and roadsides.
Besides dividing the clumps every 3-4 years to control spread and maintain the plants’ vigour, these Sunflowers are generally low-maintenance with no pest or disease issues.

A single woodland sunflower growing in our garden. You can see the buds of more sunflowers preparing to bloom.
Our deer have no interest in the woodland sunflowers probably because of the plant’s tough stems and rough leaves that make them less desirable.
Even Walnut trees are no match for the woodland sunflowers.
Without a doubt, they are a favourite of bees and butterflies where they act as a host plant for more than 73 varieties of butterflies and moths as well as a number of other insects that depend on the plant.
In turn, the caterpillars and insects that use the sunflowers as host plants, attract birds that depend on the insects as a source of food.
The Painted Lady, silvery Checkerspot and Gorgone Checkerspot are just three butterflies that use native sunflowers as a host plant for their larvae.
Birds and small mammals can often be seen eating the seeds right off the fading flowers.
Our native sunflowers are also an important plant for native bees that use the plants’ hollow stems for nesting. It’s important not to cut down the plants after flowering to give native cavity nesting bees a safe, warm place to overwinter their larvae. Leave the long stems in place at least until late into spring.
More native sunflowers
• Pale-leaved Sunflower (Helianthus Stromosus) grows to just 4 feet, in sun to part sun conditions in average to dry sandy loam.
• Other native sunflowers include Giant Sunflower (Helianthus giganteus) that grows up to 10 feet in sun to partioal shade in sandy loam.
If you are on the lookout for high quality, non-GMO seed for the Pacific North West consider West Coast Seeds. The company, based in Vancouver BC says that “part of our mission to help repair the world, we place a high priority on education and community outreach. Our intent is to encourage sustainable, organic growing practices through knowledge and support. We believe in the principles of eating locally produced food whenever possible, sharing gardening wisdom, and teaching people how to grow from seed.”

Native Goldenrod: Fall’s golden gift to wildlife gardeners and photographers
Goldenrod blooming in our gardens and along roadsides is a sure sign that fall is not far off. These are important native plants for a host of bees and butterflies that depend on the plants for late summer, early fall food sources.
Goldenrod might be the best addition to your fall garden
It might be common in your area along highways and open fields, but don’t underestimate the benefits of goldenrod in your garden.
This structural plant is not for the weak of heart. Mine stands more than six feet high, stretching up to the sky and, like a neon sign along a deserted highway, announces to every monarch, swallowtail, bee and butterfly in the area to come on over for some good eats. And they are happy to oblige.
In fact, the National Wildlife Federation, pointing to the work of author and biologist Doug Tallamy states: “Tallamy’s studies show that goldenrods provide food and shelter for 115 butterfly and moth species in the U.S. Mid-Atlantic alone. More than 11 native bee species feed specifically on the plants, and in fall, monarch butterflies depend on them for nectar to fuel their long migrations. Even in winter, songbirds find nourishment from goldenrod seed heads long after the blossoms have faded.”
If you are looking for more information on growing native flowers, you might be interested in going to my comprehensive article: Why we should use native plants in our gardens.

Goldenrod growing along the edge of a field bringing its fall early fall colour to the landscape and garden.
Does Goldenrod cause hay fever?
Let’s get this straight right off the bat – goldenrod does not cause hay fever – that would be ragweed. Goldenrod’s pollen is too heavy to be blown in the wind, while ragweed pollen takes to the air at the mere hint of a slight breeze.
It’s also important to note that not all Goldenrod is aggressive in the garden. It’s also probably a good time to note that Goldenrod is available in many forms – all beneficial to local pollinators.
We’ll get into all the different types and which ones might be good for your garden later, for now let’s just admire this native plant for what it is – a pretty, yellow magnet for bees, butterflies and other insects.
I just let it grow in my front and back gardens, not really worrying too much about its aggressive tendencies. But that’s just me.
Flower photographers love Goldenrod in the garden
I find it perfect for photography because, not only do the yellow masses of flowers form a great backdrop for the butterflies, the plants are so tall that I really don’t even have to bend over to get shots of the butterflies, insects and birds. Now, that’s a real bonus.
For more on photographing flowers in your garden, please check out my comprehensive post on Photographing flowers in your garden.

A native bumblebee works the goldenrod in our backyard as it comes into bloom.
Let’s take a closer look at this fall performer.
Goldenrod is actually a common name for a number of plants in the sunflower family within the genus Solidago. In fact, there are around 120 species of goldenrods native to the Americas, northern Africa, Europe and Asia.
In North America, about eight of these species are used as garden plants where they happily set roots in full sun to partial sunny areas in almost any average to below-average, well-drained soil. These herbaceous perennials, that are pretty much pest free, can grow from about 1.5-6 feet tall with a spread of 1-3 feet.
In very fertile soil, you may have to stake them to stop them from falling over when their heavily flowering tops get too heavy to stand on their own.
Although there are a number of hybrids that have a more compact size or flower more heavily, don’t bother with them. Stick to the native varieties and you will likely have fewer problems, help native wildlife more and sleep easier at night knowing you’re not introducing some weird, aggressive new plant to our already compromised natural environment struggling to fend off all the cultivars we have introduced over the years.

Goldenrod fills many roadsides in late summer and fall creating a tapestry of subtle fall colours.
Some native varieties to consider include:
Blue-stemmed goldenrod (Solidago caesia) is one of the more rare Goldenrod species and sports the common latesummer and fall bright yellow flowers. The plant gets its name from its arching purplish stems. This particular Goldenrod is noted because it not an aggressive spreader and produces good cut flowers. Plant it along with Smooth Blue Aster and New England Aster for some spectacular fall colour and pollinator action. Blue Stemmed Goldenrod is hardy from zone 4 through 7.
Autumn Goldenrod (Solidago sphecelata), is the native plant that horticulturalists like to use to make various cultivars from primarily because of its compact size. Autumn Goldenrod tends to stay to within a foot or two with its arching stems and plumes of yellow flowers.
Showy Goldenrod (Solidago speciosa) lives up to its name with its dense clusters of small yellow flowers that grow in a pyramidal- or club-shaped column, sitting atop the 1-5-foot tall reddish stems. It is considered one of the showiest of Goldenrods.
Sweet Goldenrod (Solidago odora) This is a more compact native variety that reaches two- to four-feet. You’ll find it growing naturally in dry, sandy, open wooded areas thickets and ravines. It’s distinguishing feature is its anise-scented leaves and the fact that it is another goldenrod that is considered less aggressive in a garden environment. It is a clump-forming, easy to grow, low maintenance plant that reaches up to 4-feet high and attracts birds, bees butterflies and hummingbirds. It’s found growing naturally in meadows or open woodlands.
White Goldenrod (Solidago bicolor) you guessed it, rather than sporting the typical yellow flowers, this goldenrod likes to show off white blooms.
Wrinklelfeaf or Rough Goldenrod (Solidago rugosa) if you have a moist area in the garden, this three- to five-foot goldenrod is the one to use. It’s distinctive narrow, toothed, rough-surfaced leaves and rough, hairy stems earned the plant its name.

Even as cut flowers the Goldenrod looks great in the garden but be careful, they’ll still be attracting the bees.
It’s time for a little gold in the garden
Just about the time the Black-eyed Susans get into full swing, the Goldenrods come along and add even more gold to our landscapes. They ride that gold right into late fall and are still adding to the beauty of the garden when the snow falls and forms a little blanket atop the browning flower clusters.
Throughout fall, the goldenrod and asters form a perfect combination of warm golds and cool blues along our roads and in meadows creating incredibly textured landscapes throughout Ontario and into the north-eastern parts of the United States.

Goldenrod gone to seed in my garden in late fall.
The activity these plants create among the remaining bees, butterflies, hummingbirds and other backyard wildlife is reason enough to grow our own patches of these lovely native plants. We let ours grow wild where the seeds land, but these plants can be tamed and grown in the back of gardens with great success.
If you don’t already have them in your woodland/meadow garden, put them on your list for next year.
You won’t be disappointed.

Get the most out of your compact camera: Ten tips to better photos
Getting the most out of your compact camera involves getting acquainted with the camera’s features, many of which can be hidden in menus.
Beginners should focus on scene modes for best results
Getting the most out of your compact camera is the first step to creating your best photographic images.
Hidden in the depths of many compact cameras are a host of creative filters, scene modes and special effects that most photographers either never explore in any meaningful way, or don’t even know their little camera offers these capabilities. Beginning photographers will benefit from learning how to take advantage of these filters and scene modes to get the most out of the camera.
Reconsider leaving your camera on automatic and explore the scene modes to maximize your results.
For more on Photographing your garden, be sure to check out my comprehensive post on Flower Photography in your Garden.

In this image, I used a in-camera filter available in most digital cameras that takes a B&W photo of the image but lets the user choose a colour or two colours that are displayed. In this case, the dark purple salvia flower was highlighted.
The best advice I can give is to:
Place your camera manual on the table beside your favourite couch and read it – several times. If it’s a digital manual, download it to your computer and keep your computer nearby. Keep it handy for the first two or three months until you believe you know every part of the camera and its features. (I like to flip through the manual while watching television.)
Leave the camera in the same spot beside the couch. Pick it up regularly and go through the menus learning the features and how to quickly access them.
Now go out regularly with the intent of using these features, filters and scene modes. Get comfortable with them to the point that you can access them quickly and efficiently even if they are buried deep in the menus.
Don’t believe what you read that you have to use manual modes like aperture and shutter priority. There is a time to use these modes, but often the scene modes will serve you better, especially if you understand what is happening to your camera when you use these specialized modes. Many camera manuals will actually provide a brief explanation of what settings are used on the camera in the various modes.

The macro mode in the Fujifilm X10 was used to capture this image of the forest floor. Photographing images like this is a great way to experiment with using the various features and modes in the camera.
Eleven tips to improved photography with compact cameras
Know your compact camera and how to quickly access menus and features.
Keep the ISO as low as possible. You are dealing with a small sensor that will get noisy (grainy) quickly in high-ISO settings
Use in-camera stabilization to help keep ISO levels low and images sharp.
Treat the camera like a DSLR and put it on a tripod if you are shooting landscapes to get the sharpest images possible with low ISO and a high aperture. Use the self-timer feature to set the shutter without touching the camera.
If you are using a tripod, turn off in-camera stabilization.
If you are using in-camera stabilization, use proven traditional methods to hold the camera steady, including bracing yourself against a wall or tree, pushing the viewfinder up to your eye to help brace the camera or using a monopod, say at a sporting event. No need to turn off the in-camera stabilization if you are using a monopod.
Gently press the shutter button rather than jamming at it to take the picture. Pressing the shutter quickly and with force may cause camera shake and make the photo look out of focus.
Use the burst feature to shoot multiple images of a scene to ensure one of the images is sharp. Use side-by-side comparisons in post processing to pick the sharpest image.
Consider setting the in-camera bracketing feature to ensure you obtain the best exposure. Obtaining perfect exposure is more important on a compact camera than it is on a larger sensored camera, because the smaller files cannot handle as much post processing.
Shoot in RAW whenever possible and if you are comfortable doing post processing in programs like Lightroom or Photoshop. If you don’t like processing RAW images, consider using the Raw plus jpeg setting to ensure you have the opportunity to post process an important image if necessary but still retain the more convenient jpeg image.
Take advantage of the scene modes provided by most compact cameras, but also take the time to learn what the camera is doing in these scene modes so you can make adjustments if necessary.

Here, a combination of macro mode and B&W mode is used to capture this image of the forest floor. Fujifilm’s X10 enables the photographer to experiment with B&W digital film including the use of B&W filters that darken skies or lighten foliage. Experimenting with these features helps to prepare you for the time when you need them.
What compact camera features should I focus on?
Focus on the camera features you use the most and get totally comfortable using them.
Garden photographers, for example, might want to get acquainted with, macro mode, sports /action mode, portrait mode, and pet mode. These are obvious features that come to mind but night-shooting mode including night portraits are shooting modes that you might want to get familiar with before you are forced to use them.
Macro mode is obviously a feature for garden photographers to get comfortable using. Just set the camera on the macro mode and go out into the garden to experiment getting up close to flowers and insects. Don’t wait until you come across a beautiful butterfly to learn how macro mode works. By experimenting with the macro feature, you will get comfortable, for example, with how close you can get to the subject.
You’ll also learn how far away you can be while using the zoom feature to get in as close as possible. This is particularly useful to get images of butterflies from a distance.
Don’t be afraid to experiment. There is no cost to this exercise accept your time.
Try shooting with and without flash to see how the results change and how your camera handles flash up close.
The macro feature is just one of many camera features to focus on.
If, for example, you are going to watch your childs’ ball game, take the camera and use the opportunity to experiment with the action or sports mode. Set the camera on “action mode” and fire away.
Feel free to use the manual modes to capture game action, but unless you are very comfortable setting the aperture and shutter speeds setting the ISO and turning on burst modes, let the camera’s technology do most of the work for you.
Afterall, camera manufacturers have put a lot of thought into coming up with the best camera settings for the various modes.
One of my favourite cameras for creative modes is the Pentax Q. For my comprehensive post on this tiny camera, check out my post on The Pentax Q, and why you need one in 2022.
What are the best compact and micro 4/3rd cameras for 2022?
If you are wondering what the best compact cameras for 2022 are, here is a short list of some of the top compact cameras Fuji, Sony, Lumix, Canon and Leica.
The Fujifilm X100V, boasts an APS-C sensor and 24.3 megapixels along with its 23mm, fast f2 lens. It’s got a hybrid optical electronic viewfinder and a 3-inch fixed LCD screen. This is for more serious photographers who are looking for fine craftmanship and are happy with using a prime lens rather than a more versatile zoom lens. I’ve included a few links from various locations if you are interested in purchasing the camera.
Fuji X100V (Adorama)
Fuji X100V (B&H)
Fuji X100V (Amazon)
Sony ZV1 boasts 20.1 megapixels in in 1-inch sensor. It sports a fast 24-70mm zoom lens and a 3-inch screen. This enthusiast camera has very fast auto focus and a screen that can be moved to multiple views. This camera lacks a viewfinder but is a very capable camera for video.
Sony ZV-1 (Adorama)
Sony ZV-1 (B&H)
Sony ZV-1 (Amazon)
Not quite a “compact” camera but the Panasonic Lumix G9 is a mirrorless, 20.3 megapixel camera with a 3-inch LCD and interchangeable lenses in the micro 4/3rds category. It is a professional photo and video camera that has class leading dual image stabilization and outstanding video.
The Panasonic DMC-ZS 100K is a compact point and shoot 20megapixel camera with a 10X optical zoom ranging from 25-250mm (35mm equivalent). Like your phone, it has a touch screen on the back and is fully equipped to handle any challenge you may face.
Panasonic DMC-ZS100K (Henry’s Cda)
Panasonic DMC-ZS100K (Adorama)
Panasonic Lumix G9 (B&H)
Panasonic Lumix G9 (Amazon)

Adding punch of colour to images can be done with in-camera filters. Here, “vivid film” was chosen to add a punch of colour to the photograph of the container pond along side containers of flowers.
How does “sports/action mode” work on a compact camera?
Let’s examine what happens to the camera when you set it on “sports/action mode.”
Most cameras, when set on “action mode” will make a series of alterations to your camera settings to best capture fast-moving subjects.
First, the ISO setting on the camera will set the ISO to a high number to give the camera it’s best chance of stopping any action.
Second, it will set the shutter speed to a higher level to reduce the blur caused by the action on the field.
Third, it will set the aperture to provide as much light as possible so that the shutter can fire at a rate fast enough to stop the action. As a result, the depth of field will be limited.
The camera will likely choose continuous-focus mode as well as burst mode or continuous shooting mode.
The camera may choose other features to enable your best action photos, such as turning off the flash and turning on anti-shake mode if it is not already in use.

This Panasonic Lumix camera’s mode dial shows the various modes available to the photographer including a custom mode (CUST), scene mode (SCN), two my scene modes (MS1-2), a movie mode, intelligent mode, program mode as well as aperture, shutter and full manual mode.
All of these actions are turned on in a fraction of a second and the camera is ready for capturing the big game.
Knowing what the camera is doing in sports mode, should also give you ideas of how to use this mode for other subjects.
If I see a fox trotting through the garden, “sports/action mode” is the first mode I go to to capture the scene. With only seconds to capture the fox as it trots through the garden, there is no time to make the changes necessary to capture the scene.
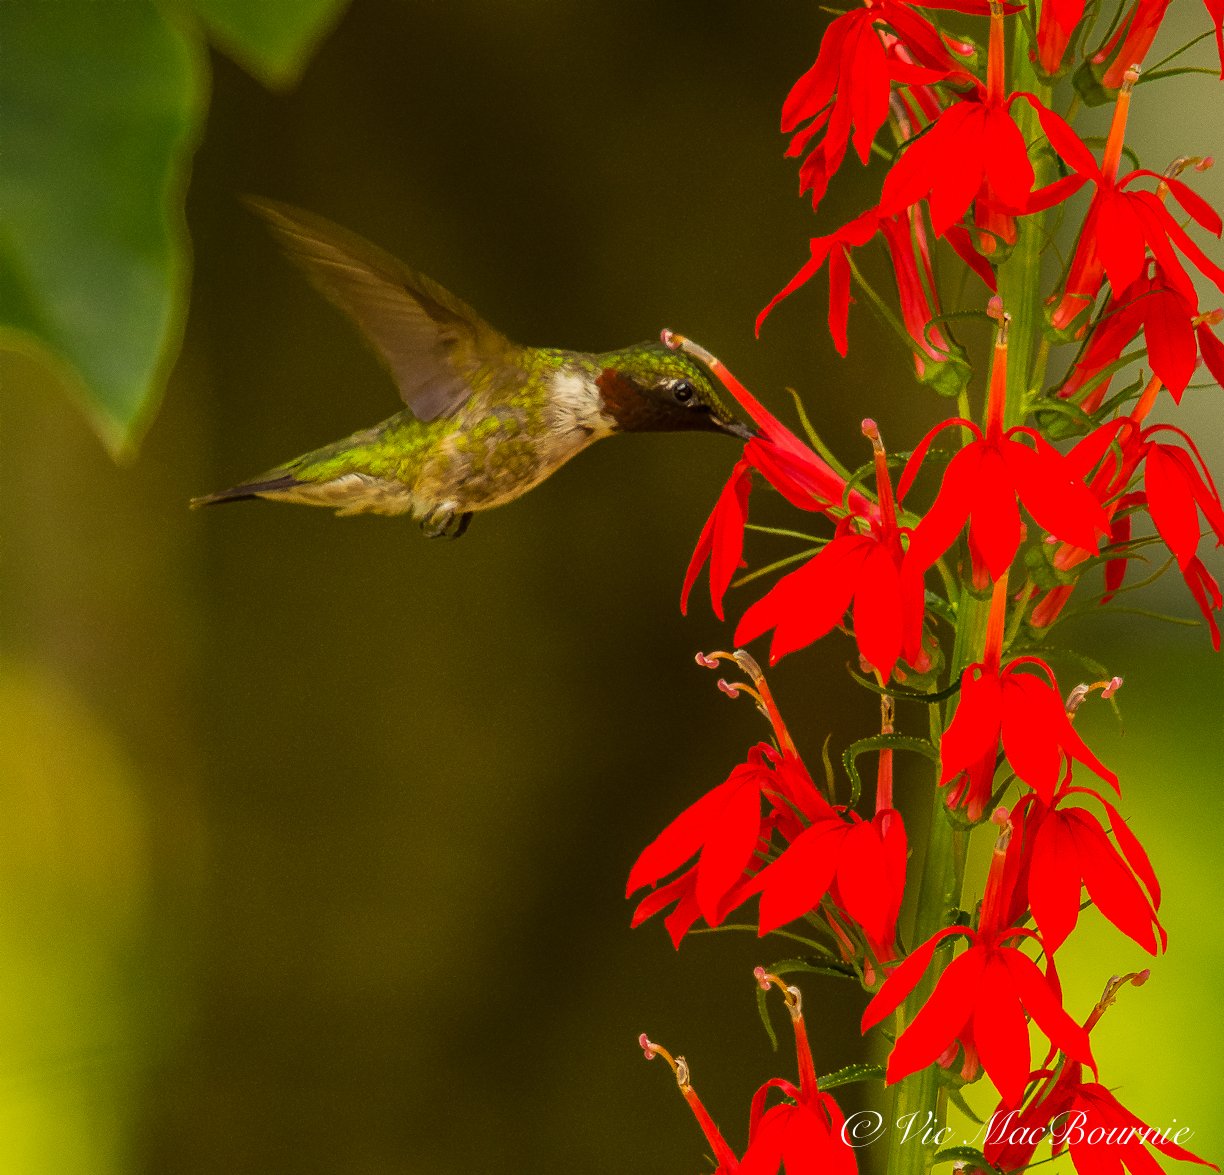
A fast shutter speed was used to help stop the motion of this hummingbird. Using action or sports mode will help you capture images of birds and animals in the garden. Using TV or time value will also help you capture the action if you choose a shutter speed of 500/sec or faster. Finding a compromise between a high shutter speed and setting a high ISO is key to capturing good, usable images.
The action mode is likely the one I would choose to capture kids playing at the park, or the dog having a great time in her pool or the hummingbird working the flowers while I sip my morning coffee.
Why use the custom features over scene modes?
Many high-end compact cameras also have custom modes that enable you to set the camera for your most-used situations such as portrait, B&W images or action photography.
Custom modes are excellent alternatives to using scene modes because they allow you to dial in all the settings you need to create the desired effects. For example, action mode may allow your camera to automatically pick an ISO setting higher than 1600, but you know that the resulting image is not very good. The custom setting would allow you to limit the ISO to say 800 or 1000 ISO.
How does portrait mode make better people photos?
We’ve discussed some of the camera settings in action mode, let’s look at what goes on in portrait mode. There is more to the portrait mode than you might think. Although each camera manufacturer will set their portrait mode differently, the number of changes might surprise you.
Consider the following possibilities:
Change the f-stop to wide open to create a pleasing background
Take several images at once in and out of focus to help create a lovely soft background
Change the colour calibrations to create a warmer, more pleasant skin tone for portraiture. Some camera manufacturers – including Fujifilm cameras – have included the colour parameters of their former portraiture films so that users can experience classic portrait film in digital form.
Add a softening filter or effect to create the illusion of softer, blemish-free skin.
Lower the ISO for a less grainy or noisy effect.
Turn the flash on or off. If the flash is on, add red-eye reduction. (My Fujifilm X10 even has a handy feature where the camera takes the portrait with and without flash. The photographer can then choose the image they like best.
I’m sure there are other changes depending on the camera manufacturer, but these changes to the camera settings should give you a good idea how much thought goes into creating the best settings for successful images using the scene modes and why you should consider using them.

These two images show how effective using the HDR mode can be. The above image shows the non-HDR image where the lighting between the hi-lights and shadows is extreme. By using the HDR mode, the PentaxQ took two fast images exposing for the hi-lights and shadows and then combining them into one image (see below).

The final HDR image finds a middle ground between the highlights and shadows. HDR can be used effectively in a number of situations where the lighting extremes call for it.
Other modes, such as HDR (see above), combine several photos taken in quick succession to remove the extreme highlights and shadows and give you a properly exposed image. (Useful when shooting a cityscape from inside your condo when you want to balance the indoor light with the outdoor light.
Other modes and what they do:
Scenic modes often enhance blue skies and add punch to green foliage.
Kid modes enhance skin tones while capturing fast-moving subjects.
Pet modes allow you to capture fast-moving subjects.
Food modes (popular for instagram) enhance colour to create more appetizing food.
Sunset modes enhance warm colours creating more dramatic sunrise and sunset effects.
Fireworks mode uses long exposures to capture the fireworks.
There are many more modes that are set up to help photographers get good images in unusual or difficult situations. Once again, experiment with the modes that you expect to use regularly.
When is the best time to use manual modes
So far, we have discussed the benefit of using scene modes rather than the manual modes such as aperture priority mode (AV), or shutter priority mode (TV) or full manual mode (M).
Once you become more comfortable with the camera, using manual modes gives you more control of the camera. The scene modes are very good most of the time, especially in difficult or unusual situations, but there are times when you want full control of the camera settings.
In these situations you can set your aperture and shutter speed and let the ISO change automatically to create the proper exposure. It’s a good idea to restrict the ISO to a specific range (depending on the camera) so that the ISO levels do not go so high that they degrade the image.
By controlling the aperture, you gain control over the depth of field in the image including the perceived sharpness of the subject and/or the softness of the background.
By controlling the shutter, you gain control over the ability to stop movement or create movement in the image. You would want to stop the motion of a flower getting blown in a gentle breeze, but show the movement of a stream cascading over rocks creating the effect of soft, moving water.
Although there are scene modes in many cameras that help you create the effect of flowing water, having complete control allows you to change the look of the water in greater detail.
Final thoughts on maximizing your compact camera
For most beginning photographers, the compact camera is often the first and the best camera to purchase. Becoming familiar with the features and getting comfortable with the camera menus helps to quickly access the features when you need to and takes much of the thinking out of using the camera whether in the garden or on vacation.
By making use of the scene modes and the various filters built-in to these cameras, you can take professional looking images that just might surprise you and your friends.
As you get more comfortable with the camera, learning when to use the scene modes and filters will probably be the most difficult part of getting great photos.
Finally, when you are comfortable with the camera and understand its inner workings, you can move to more manual control and take your pictures to another level.
Over time, getting great images and developing a good eye will become second nature and you will know you have discovered the joy of photography.

Our native Obedient plant (False Dragonhead) is important late-summer bloomer
Obedient plant is quick to find a home in the sandy soil in our garden. This native plant is a favourite for bees, butterflies and hummingbirds in the late summer when it begins to bloom.
Late summer is the time for our Obedient plant to go into full gear in the garden bringing in the bees, butterflies and hummingbirds with its soft lavender spikes of flowers on three-four-foot stalks.
Some people are quick to call these fall performers aggressive and invasive, I prefer to call them what they are – great plants that are happy to fill in any open spaces in the garden but are super easy to remove if they get into areas where you really don’t want them. They can be important late-summer bloomers for bees, butterflies and hummingbirds looking for the last sources of nectar before the cold weather hits.
If you are looking for more information on growing native flowers, you might be interested in going to my comprehensive article: Why we should use native plants in our gardens.
For more on photographing flowers in your garden, check out my comprehensive post on Flower Photography in Your Garden.

A bumble bee works the Obedient plant in late summer.
Why are they called Obedient Plant?
With what we already know about this plant’s behaviours, “obedient” seems the perfect description of this native plant.
However, the plants earned that name, not for any of the reasons described above, but for the uncanny ability the blossoms have of remaining in place after being turned in any direction. Great fun for kids but of little value in the garden accept maybe to turn them in the direction of the light to photograph them.
The plant (Physostegia virginiana), is actually a member of the Lamiaceae (Mint Family) and goes by a number of given names including: False Dragonhead and Virginia Lions-heart. Obedient plant, being a member of the mint family, sports the square stems common to the plant family.

Obedient plant can be attractive to both pollinators and humans in our gardens with its showy purple flowers in late summer early fall.
Is Obedient plant easy to get established?
Like many native plants, this perennial is easy to establish and maintain.
In our garden, Obedient plant grows with abandon in a sunny area beside our patio. Although it spreads aggressively by stolons, it’s important to remember that it is also easy to keep in check. Its shallow roots are especially easy to pull out by hand in our sandy soil.
I tend to let plants find their own way and compete for their own space, not unlike the ground covers in our garden. Needless to say, Obedient plant often wins out, growing right up through the ground covers.

For most of the summer they go unnoticed, but by mid-August the 4-6 in. terminal spikes of lavender, tubular flowers – similar to snap dragons – begin showing the first signs of flowers. By the end of August they are in bloom and being visited by a host of native bees, butterflies and hummingbirds.
Light Requirement: Sun, Part Shade, Shade
Soil Moisture: Moist
Soil Description: Moist, humus-rich soils.
When does Obedient plant bloom?
Depending on where they are growing, they bloom in August, September, October and, in warmer climates, through to November.
Our flowers are lavender, but white and pink varieties are also available.
Where does Obedient plant grow?
These plants are found throughout the United States and parts of Canada growing naturally from Quebec to Minnesota and south to Florida and Texas into northern Mexico.
In the wild, they can be found growing along river banks, in lowland wet thickets and swamps. These tough perennials will grow in sand, clay and limestone and are at home in areas of poor drainage.

Are Obedient plants easy to propogate?
These plants are easy to propopagate by division of roots or by seed. If you already have plants growing, I would definitely use the division method to increase your numbers and spread the clump forming plants around the sunny areas or your garden.
If you choose to plant seeds, you can sow them in fall or spring after a period of damp stratification (3 months at 40 degrees).

Pentax F* 300mm f4.5 ED IF: My favourite wildlife lens
Capturing memorable backyard wildlife and birds often depends on getting close. The Pentax F*300mmF4.5 has long been the lens I reach for to achieve my best results when it comes to wildlife photography.
A 300mm lens is the perfect wildlife lens

This Barred Owl was captured in the nearby woods with the Pentax K5 and a 1.4 converter on the 300 f4.5. The image is heavily cropped but still retains sufficient image quality.
The Pentax F* 300mm f4.5 ED IF full frame lens is the only lens I reach for when it comes to serious bird or wildlife photography.
My best images time and time again are shot with this 35-year-old lens, with its exquisite glass, outstanding build quality, handsome looks and the most beautiful bokeh I have ever seen. What more can a person hope for?
I’ve shot with this lens for years, but it wasn’t until I began focusing on backyard wildlife that the lens came into its own capturing impressive digital images and proving to me once and for all that there is no reason to upgrade to a more modern lens.

Coyote in winter coat
This loan coyote was captured with the 300mm f4.5 in a woodlot near our home. It was photographed at ISO 3200 on my Pentax K5 at 1/2000 sec, at f6.3. The image was cropped and post processing applied via Lightroom.
It’s not perfect, but nothing is really.
It came into its own recently when, while out looking for snowy owls in the woodland and farmlands around our home.Although the light was failing and the owl was at some distance, the combination of the 300mm, a 1.4 converter and some judicial cropping allowed me to get close enough to capture useable images of the owl.

A cardinal takes a drink from the bird bath. The creamy background is almost as beautiful as the cardinal.
The Pentax 300mm F4.5* lens is neither the fastest at f4.5, nor is it the best auto focusing lens with its ancient screw-drive system, but when it comes to bokeh – that soft milky background we all strive for in our images – I think it’s pretty tough to beat this lens.
Be sure to check out my F* 300mmF4.5 photo gallery to see more images taken with this superb lens.

The Pentax F*300mm F4.5 ED IF is an exceptional, compact 300mm lens with beautiful bokeh that gives me 450mm on a cropped sensor.
A great lens is one that you can shoot wide open and still get sharp images. This compact, all-metal lens, with a heft that tells you it was built when quality of build was at least as important as image quality, is sharp wide open. Stop it down to F8 and it’s tack sharp with even better contrast and colours that will leave you almost speechless – grasping for descriptive words that do it justice. The cropped sensor on my K5 and ist-D cameras gives me the equivalent of a 450mm lens.

A Red Wing Blackbird calls out for a mate in spring.
Imagine a Pentax 300mm mounted on the miniature Pentax Q line of cameras. You can do that but you would end up with a 1500mm F4.5 lens.
For my comprehensive post on the Pentax Q cameras and lenses, check out the Pentax Q, why you need one in 2022.
Even in low light, the Pentax 300mm F4.5 is able to capture the moment, and with a cropped sensor it becomes the equivalent of a 450mm.
If this sounds a little too good to be true, then, by all means, don’t take my word for it.
“Great Image quality and small size really impressed me. Exceptional build quality. Similar image quality to the 77 limited. Love it! This lens alone would keep me with Pentax for ever.”

Consider these comments from the folks on Pentax Forums:
“I can’t add much to the glowing praise of this lens posted by almost every single reviewer on this forum. The 300mm f4.5 F* is sharp enough wide open, becoming razor sharp by f6.7 to f11. Color rendition is outstanding. Chromatic aberration is extremely well controlled. Autofocus performance is as good as any older screw drive lens …”

This white egret was captured in a nearby wetlands with the F* 300mmf4.5 lens.
And more from the Pentax Forums: “As for the quality of the glass, I feel humble and not up to showing it off to it’s full potential. The sharpness and resolution are to my eye amazing. The 300mm focal length gives plenty of reach and while only f4.5, with the low light abilities of modern cameras, I was able to take many shots in what I thought were very challenging low light conditions.”
“Great Image quality and small size really impressed me. Exceptional build quality. Similar image quality to the 77 limited. Love it! This lens alone would keep me with Pentax for ever.”
“This is the lens everyone should dream on.”

The red squirrel was photographed at the outdoor photo studio/reflection pond with the F* 300F4.5 lens.
In the world of Pentax, this lens has a cult following.
And why not?
Its compact size makes it easy to carry even on long hikes.
Its built-in tripod mount features a high mount that rotates to quickly allow for vertical images.
Its built-in lens hood can be left non-extended maintaining the lens’s compact size, or extended out to provide excellent coverage. An added bonus is the rubberized front that prevents damage both to the lens and the hood itself.
Its handsome looks, complete with the brand name stamped on its antique-white hood, announces that you are shooting with a premium product.
Its full-frame design means you are shooting with a 420mm on APS-C sensor cameras like the highly praised K5 (and my ancient *ist-d.
The gold emblem on the side of the lens screams classy, high-end lens.
The 67mm filter size is a common enough size that you either have in your collection of filters, or can find high-end B&W filters used on ebay or at your local camera store.
Manual focus is put into gear by a solid shift of the collar on the barrel of the lens. Shifting into manual focus is just the beginning of the satisfaction of using the lens in manual mode. Focusing is smooth with just enough resistance to make you think you are using a classic SMC manual focus M-series lens.
Add a 1.4 converter and not only is it still sharp, but it becomes a fast super telephoto lens in the 580mm range.

The bokeh of this lens takes centre stage in this image of a blue jay in our crabapple tree.
I could go on forever but what really matters is how this thing handles out in the field.
Similar modern 300mm lenses are available for Canon Amazon link ( Adorama link) Shop Canon direct; Sony Amazon Link (Adorama Link)(Keh Camera Used) (B&H Photo link); Nikon Amazon link (Adorama Link) (B&H Photo) and Fuji Amazon Link (Adorama link) and, of course, Pentax Amazon link (Adorama Link) so be sure to check them out.

A cottontail stops eating to have its picture taken.
How I like to use the F*300mm F4.5
I like to combine the 300mm focal length on a tripod attached to either my Pentax K5 or ist-d converting it into a 420mm F*4.5.
While this is often enough to capture many of the more friendly birds, chipmunks, red squirrels deer and fox that are regular visitors to the yard, adding a Tragopan photographic blind into the mix along with an outdoor, natural photo studio brings out the magic this lens has to offer.
Be sure to check out my full post on the Tragopan photographic blind.
The lens is exceptional but getting subjects in front of it is key to letting it shine.
The Tragopan blind, together with the home-made photo studio, is almost like bringing an endless line of beautiful models in front of your lens with the background of your choosing.

A red squirrel in winter at the outdoor photo studio where I included grass seed heads from native Northern Oat grass.
The blind gets me extremely close to the subjects. The reflection pond/photo studio puts the subjects in the perfect photographic environment, and one I can easily change for seasonal interest.
In the blind, I set the lens, which is on the heavy side at more than 1200 grams, on a tripod.
Add some well-hidden bird seeds behind a stone or lichen-covered tree branch and get ready for action.
The water itself is a great way to bring in birds and small mammals to a specific location. When I’m not inside the blind photographing the action at the photo studio, the reflection pond becomes a bird bath keeping the birds accustomed to the water feature.
Be sure to check out my post on building a DIY outdoor photographic blind.

A chipmunk appears to almost be praying as she looks into the lens. But look at that bokeh in the background.
The setup allows me to maximize the possibilities of the lens. Add an external flash, a polarizing filter; shoot wide open or stop it down to F8 or F16. Heck, I’ve even experimented with the camera’s built-in filters to create interesting effects.
I’ve also used the blind together with the F*300 F4.5 to capture images of our local fox. Although it is not particularly skittish, by using the blind and the 300mm, I’m able to capture the fox in a more intimate and natural environment.
If I’m out it the field or shooting birds in flight, I’ll often put the lens on a monopod to allow a little more flexibility.

Although I like to think of the lens as primarily a wildlife and birding lens, I will also pull it out to photograph flowers if I’m trying to create beautifully soft backgrounds. The lens has the ability to isolate flowers growing in a busy environment.
It also can be used for larger butterflies and other insects. Although its close-focusing abilities are good at 2 meters, with a maximum magnification at 0.17x, the addition of extension tubes can get you in close. The added magnification of the APS-C sensor enhances the ability to capture smaller insects and butterflies.

Skunk up close and personal with the F*300mm 4.5 lens.
Information below is from the Pentax Forums website
Image Format: Full-frame / 35mm film
Lens Mount: Pentax K
Aperture Ring: Yes (A setting)
Diaphragm: Automatic, 8 blades
Optics: 9 elements, 7 groups, (including 3 ED elements)
Mount Variant: KAF
Max. Aperture: F4.5 – Min. Aperture F32 Focusing
Auto Focus (screwdrive)Min. Focus: 200 cm Max. – Magnification 0.17x
Filter Size: 67 mm
Internal Focus: Yes
Field of View (Diag. / Horiz.) APS-C: 5.5 ° / 4.6 °
Full frame: 8.2 ° / 6.9 °Hood: Built-in, slide out
Weather Sealing: NoOther Features: Push-pull AF/MF Focusing Ring,
Tripod Mount Diam x Length
84 x 160 mm (3.3 x 6.3 in.)Weight
880 g (31 oz.) w/ Tripod Foot: +240gProduction Years: 1987 to 1991
Engraved Name: smc PENTAX-F* 1:4.5 300mm ED[IF]


Proven Winners’ Salvia gets our patio containers Rockin’
Proven Winners’ Rockin’ Deep Purple Salvia is the star of our patio container this year. It’s been attracting hummingbirds and Bumble Bees like groupies at a rock concert and it’s low-maintenance habits have really made a fan out of me too.
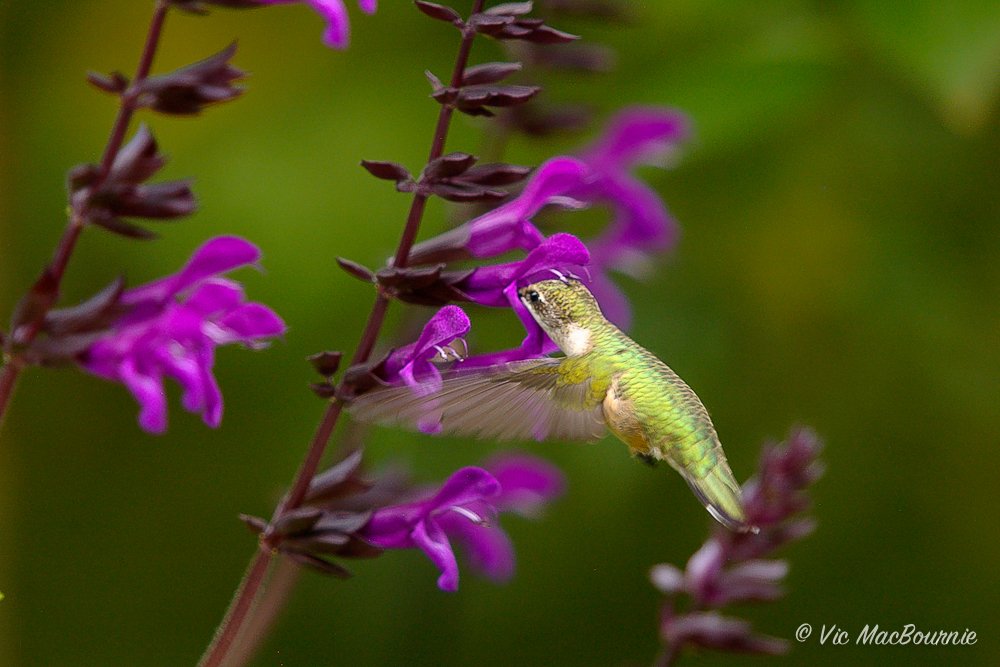
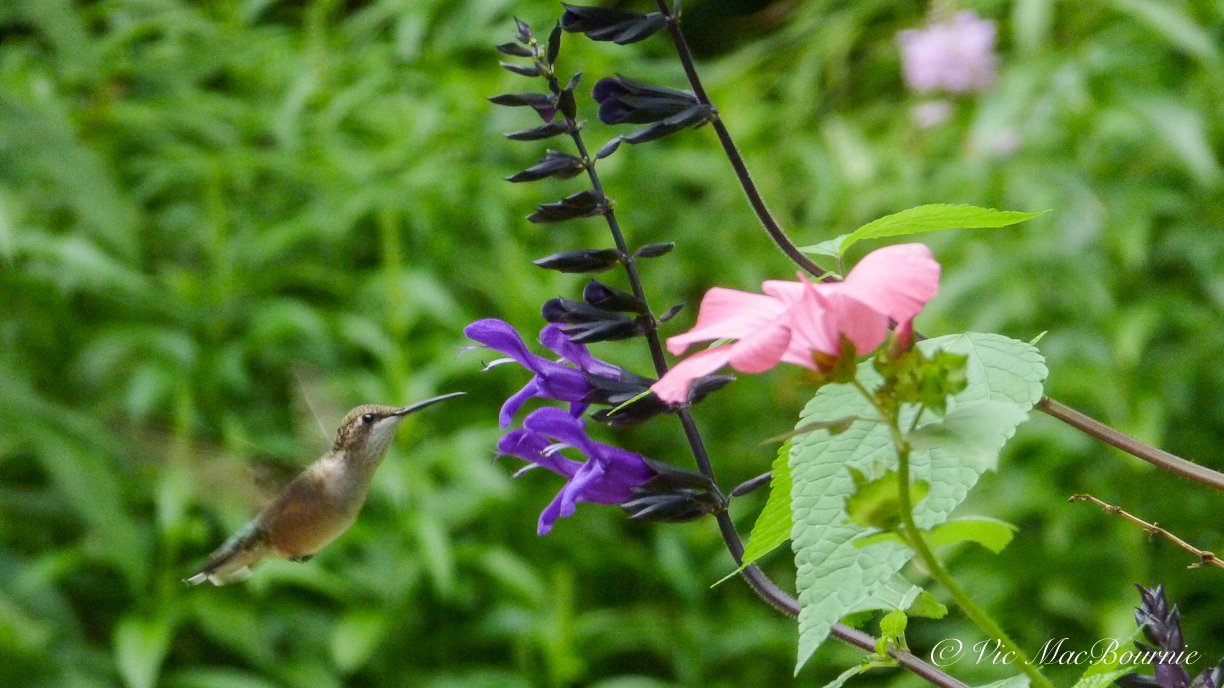
One of our hummingbirds pay Rockin’ Deep Purple salvia a visit. Notice the dark calyx surrounding the purple flowers that give the plant a cool look even when the flower has faded and fell to the ground.
One season of Deep Purple will make you a fan too
Proven Winners’ Rockin’ Deep Purple Salvia are the rock stars of our patio containers this summer.
All you need to do is spend an afternoon on the outdoor patio and there’s no denying Rockin Deep Purple salvia’s popularity. Like groupies at a rock concert the hummingbirds and bees just keep buzzing around the plants. It’s now September, and these plants have been performing since I planted them in spring.

This image catches the hummingbird’s beautiful green feathers against a dark backdrop.
It’s hard to imagine what they have in mind for an encore this fall.
Last year I planted another Proven Winners’ salvia – Rockin’ The Blues salvia – out in the landscape and missed most of the hummingbird action.
This year, however, I decided to put the plants in large black containers on the patio where I could keep a closer eye on its fans.
Our native Bumble bees are in love with the Deep Purple salvias in the garden. If you are interested, check out my post on the importance of our native bumble bees.

The aerial acrobatics is great fun to watch as the hummingbirds battle over the plants.
Oh man, I was not disappointed. The bees and hummingbirds have been visiting the dark purple flowers almost since the day I planted them in spring.
Besides the attractiveness of these plants to pollinators and hummingbirds, their extremely low-maintenance growth habits have made a real fan out of me too.
These hybrid salvias from Proven Winners are not new. They’ve been around since about 2017, but they’re new to me. And they are new to the hummingbirds in our garden who have put these tough, upright plants on their regular hourly feeding rounds for the summer
In fact, as the end of summer approaches, the hummingbirds are actually beginning their aerial acrobatics over and around these Rockin’ salvias in a show of dominance to keep competitors away.

A female hummingbird works the Rockin’ Deep Purple salvia.
When the dark purple flowers are finished blooming, the calyx, which holds the flower petals, remains a really dark purple almost black and gives the effect that the plant is still in bloom, when it’s actually not. Traditional salvias’ calyx’s turn brown and lessen the appearance of the plants. Not these Rockin’ ones.
The light green foliage on the plants looks good throughout the summer too and there is no need for pruning these neatly-growing upright plants or even deadheading.

A dragonfly takes a quick break on the Deep Purple salvia calyx topping off the plant in fine form.
The only chore is to clean up the fallen petals left lying on the ground. I like to leave the purple flower petals on the patio for a while because they look so good just laying there.
Rockin’ Deep Purple salvia is joined by a lighter blue version named Rockin’ Playing the Blues. The entire Rockin’ series features fragrant foliage, a long blooming time, a tolerance for extreme heat and, most important, are very attractive to pollinators.

The Salvias have been alive with Bumble bees from spring through summer.
In addition there is the Rockin’ Golden Delicious with striking yellow-green foliage and Rockin’ Fuchsia with its unique fuchsia coloured flowers.

This hummer eyes its next flower as it makes its rounds in the garden. I love that the flower is in focus here but the hummingbird is just out of the camera’s focus range as it prepares to move in for a meal.
What to expect in the garden
You can expect a height of between 24 - 36 inches on these upright plants in the garden with a comparable spread.
Keep them well watered and fertilize about once a week for best blooms.
Ours are in sun for most of the day and are doing well. Proven Winners says the plants perform at their best in part sun to sun.
The good news is that the plants will bloom from spring right to the first hard frost.
They are hardy in zones 9a, 9b, 10a, 10b, 11a, 11b. In colder zones, you can just treat them like an annual.
Plant them in the garden beds and use them as thrillers in large containers. I guarantee, you won’t be disappointed.
For those who worry about using a cultivar in their garden, Proven Winners say the plant is “sterile so it will not set seed and that means it will just bloom, and bloom and bloom all season without stopping.”
The company also says the salvias “can easily trim to keep the shape or size where you want it, and it will branch out and become even thicker and more full of flowers.
Proven Winners states that: “Regular watering and fertilizing will keep the plant at maximum colour and growth but it is amazingly tough and once established in a pot it will tolerate lower levels of food and water. However, severe drought will cause lower leaves to drop and if this happens give it a quick haircut removing the upper 1/3 of growth and once it’s back to normal watering it will fill back in.”

I could not resist putting in this B&W photo of the lone salvia flower on the leaf. For more garden B&W photography, you can check out my earlier post A woodland garden: Study in B&W.
Just keep on rockin’
Salvias are a great addition to any wildlife garden and a plant that you’ll want to feature in several areas of your garden. Look for spots that you know will get plenty of sun and plug them into the landscape in groupings of three to maximize their benefits.
I like the drama of Rockin’ Deep Purple, but Rocking Playing the Blues added a nice soft blue to the garden last year. Next year I’ll look for Rockin’ Fuschia to add a pop of colour to a sunny spot. I’m thinking they would be showstoppers in our black containers.

Review: Panasonic’s Lumix DMC-ZS8 in the garden and on the road
The Lumix DMC-FZ8 travel camera gets the job done whether you are photographing your garden or taking the handsome little camera on vacation.
Kolari adapter opens a world of creative opportunity
Is a $10 camera all you need to capture great garden photography while at home or travelling the world? The short answer is yes, absolutely.
For just about the price of a Big Mac extra value meal, I was able to score a Lumix DMC-ZS8 compact travel camera complete with a Leica 24 to 384mm lens in excellent condition. Admittedly, it was a very good purchase, but these “great buys” are out there if you are willing to take the time to search them out.
The Lumix ZS8 is categorized as a travel camera, meaning it is the perfect single camera to take on vacations because it can technically handle almost anything you can throw at it while still being small enough to fit into your pocket or purse. The ZS8 fits all those requirements and more.
Getting the most out of your compact, point-and-shoot camera is key to successful photography. Take some time to check out my comprehensive post on Getting the Most Out Of Your Point-and-Shoot Camera.
Check out my earlier post on using the travel camera in the garden and my comprehensive post on Garden flower photography. If you want to see more images from the Lumix ZS8, please check out my Lumix ZS8 Gallery of images.
This little Lumix packs a solid macro feature along with its long reach at the telephoto end.
Kolari adapter is perfect addition
One of the major problems with the ZS8 and many other point and shoot travel cameras is the difficulty of adding filters such as polarizers and neutral density filters to the front of the lenses.

The Kolari adapter on the Lumix opens a world of creative possibilities.
Kolari has changed all that. By adding a simple, inexpensive adapter to the front of the camera, Kolari takes the Lumix ZS8 and other point-and-shoot cameras to a whole new level by allowing users to add filters like a polarizing filter and neutral density filters to the front of the camera.
And, by using Kolari’s magnetic rings and filters, slipping the filters on and off at a moment’s notice could not be easier.

Monarch caterpillar captured with Kolari adapter and polarizing filters on Lumix DMC ZS8
Reducing glare off foliage, darkening blue skies and removing reflections in glass and water are just three great reasons to use a polarizing filter. Here, for example, I used a polarizing filter to capture this monarch butterfly caterpillar on one of our milkweed plants. Without the filter, the leaf would have given off a distracting reflection.
Although the polarizing filter is probably the most useful filter you will use – especially in the garden – neutral density filters can also be used to create stunning results. The Kolari three-filter magnetic neutral density filter set proved to be indispensable to capture the look of soft, gentle water cascading over rocks in a nearby stream. The neutral density set I use comes in a 3-stop, 6-stop and 10-stop kit that delivers a wide range of possibilities.

The Kolari 6-stop neutral density filter was used to create this dreamy look in the water of the small waterfalls.
Intentional camera movement in the garden
The Kolari neutral density filters are also the perfect companion for anyone looking to turn their garden photography into works of art by experimenting with Intentional Camera Movement (ICM).
The abilty to slow the shutter speeds down to a second or even several seconds using the neutral density filters makes ICM photography possible even in bright sunny conditions. The image below of bee balm in our garden is just one illustration of the potential the filters offer photographers looking to take their point-and shoot cameras to a whole new level.

This image of bee balm takes advantage of a slow shutter provided by the Kolari neutral density filters to use intentional camera movement as a creative effect.
The Kolari adapter for the ZS8 uses sticky two sided adhesive to attach the adapter to the front of the camera. Be especially careful mounting the adapter to ensure the sticky adhesive does not attach itself to the camera. (follow instructions provided.) In my case, the adhesive stuck to the lens as well as the exterior of the camera, but I was able to cut the adhesive away from the camera using a simple exacto knife.

Kolari adapters are also available for other camera including the Canon G-line.
The adapter comes with a 52mm thread and I got a 58mm magnetic adapter with the Kolari neutral density filters to use with my other cameras and lenses. Go to the Kolari site to see the wide range of filters and adapter sizes available for other cameras and lenses.
Check out Kolari’s offerings for other point and shoot cameras.
So many excellent compact cameras that were put away in drawers following the release of the iphone and other smart phones are sitting collecting dust and deserve to get a second chance at life. If you have one or two in a drawer or sitting on a shelf, why not give them a good workout in the garden where these cameras can really show off their stuff? You might be surprised how capable they are and how fun they can be to use.
Click on the link to see a complete list of Panasonic’s Point and Shoot cameras.
If you are looking to upgrade your camera equipment or simply add a few of your favourite lenses, consider checking out the used equipment deals and KEH Camera Exchange. If you are looking to trade in your older equipment, KEH is also an excellent place to consider your trade-ins.

The very handsome black and chrome Lumix FZ8 is a design found in several earlier Lumix travel cameras.
In my reviews of classic, older digital cameras, I like to use real world images from my garden and on the road to provide readers with the type of images they can expect from the camera if they own one or choose to track one down on the used market. For those of us who enjoy playing with older, digital cameras, I hope these reviews will pique your interest in high-end compact, DSLRs and other mirrorless cameras.
If you want more information on using your compact camera to photograph flowers in your garden, be sure to check out my comprehensive article on Garden Flower Photography.
If you are interested in older digital cameras, check out my reviews of the extremely popular Fujifilm X10, Canon’s PowerShot Elph 500 and the Casio EXILIM Pro EX-P505.

While not easy, capturing fast-moving wildlife is possible with the Lumix ZS8.
When was the Lumix ZS8 released?
Back in 2011, when the Lumix ZS8 travel camera was released with a suggested retail price of just under $300 U.S., it was considered one of the leaders in its class competing with the likes of the Canon Powershot SX230 HS, the Nikon Coolpix S9100, Pentax RZ10, Samsung WB210, Sony Cyber-shot HX9V, including the Lumix flagship Panasonic Lumix DMC-ZS10 which came with GPS and a different sensor and better video, but is essentially the same camera.

A pollen-laden Bumble Bee on a native Obedient plant is a little easier to capture than a frenetic hummingbird.
The Panasonic Lumix DMC-ZS8 has a high resolution 14.1megapixel CCD sensor, with a 16X super zoom (ultra wide-angle 24-384mm (35mm equivalent) Leica lens and 1280 x 720 high definition (HD) video. All this wrapped in a high-build-quality, all-metal camera with a 3-inch TFT, LCD Display with 230K-Dot Resolution.
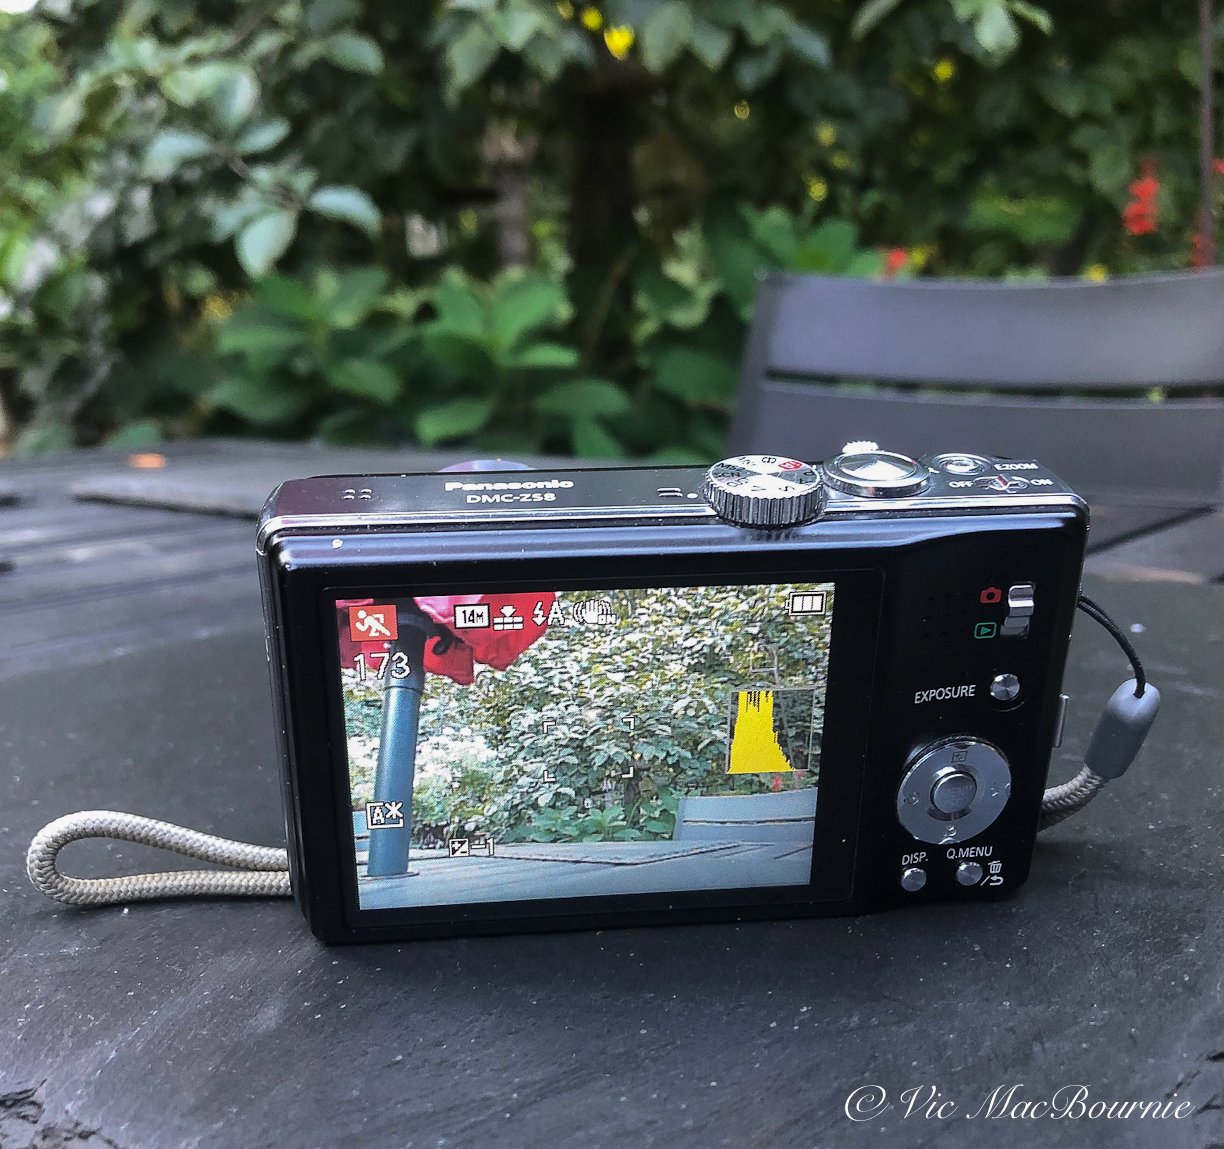
The rear LCD panel in the Lumix FZ8 and back buttons.
What’s all this jibberish mean?
It means the Lumix DMC-ZS8 was very good when it was released in the hey day of high-end compact digital cameras, and, if these results are any indication, this sweet little Lumix is still a very good camera today.

The camera particularly shines when you can slow down and handle subjects carefully whether you are in the garden or out for a road trip. This scene was captured while out for a drive in the nearby farm country.
Is the Lumix DSC-ZS8 still good in 2024
How does the Lumix ZS8 measure up to today’s modern cameras?
Let’s not fool ourselves. Technology is constantly evolving, especially in the world of digital photography. Today’s cameras can be incredibly good. In fact, for many of us, the evolution of digital cameras including compact, high-end point and shoots have evolved well beyond many of our needs and wants.
That’s where these classic digital cameras fit in.

The top view of the Panasonic Lumix DMC-ZS8 showing the impressive Leica lens 24-384 (35mm equivalent).
Older cameras suffer from smaller sensors, and slower focusing capabilities which might make getting a prized shot more difficult or the quality of the image substandard to today’s cameras if you like to compare images pixel by pixel. Shooting in less than desirable conditions will push the capabilities of these older cameras.
Bump the ISO up to 1600 to get a handheld photograph in the poor light of early morning or late evening and you might be disappointed.
By disappointed, I mean the image may not seem sharp as a result of digital noise – a grainy look that is not necessarily obvious until you move in close to the image on your computer. Today’s larger sensors can better handle low light and produce less grain. The result are images that look sharper.
If that really matters to you, than older cameras like the ZS8 may not be worth using.
For most of us who primarily use our images for social media or make prints no larger than 8X10” or 11X14”, the FZ8 and other compact cameras are more than sufficient to get the job done. Even if you are planning to create your own garden photo book (highly recommended by the way) these cameras, with proper techniques, will give you beautiful results.
Consider using a tripod and setting the ISO to 100 or 200 when lighting is not at its best and chances are you’ll be more than pleased with the results.
In fact, some fans of classic cameras will tell you that the CCD sensor on the Lumix ZS8 will give you better results than you are likely to get on more modern CMOS sensors. I have to admit the files coming out of this camera are very impressive when lower ISO settings are used and/or there is enough light to properly handhold the camera.
The camera does boast an impressive anti-shake feature that can give you up to two stops of light-saving stability.
What does getting two stops of light mean?
It basically means that you can hand hold the camera and still get sharp photos even if the light is low. It’s in reference to the shutter speed. A low shutter speed means getting sharp images in low light is difficult because of camera shake when taking the picture. You gain the ability to take sharp images in low light by anti-shake features built into the camera as well as “fast lenses” that allow more light to hit the sensor.
Okay, so we know that the Lumix ZS8 is capable of taking good photos, but there are so many other factors that play a role in whether you fall in love with a camera or put it back in the drawer.
This camera is not going back in the drawer any time soon.

A grab shot on the road shows the camera’s ability to capture great images with lots of colour in good light.
What are the pros of the Lumix ZS8
Quite frankly this camera is easy to love. From its impressive build quality, including the camera’s feel in your hand and the solid, tactile feel of the control buttons, to the simple yet effective menus that allow users to easily set up the camera to their liking. It all comes together in this sophisticated-looking little camera that has full manual controls.
Add to that:
• Two macro settings will get you in close to flowers, butterflies and other garden creepy crawlers.
• The quick menu button alone will set most of us free from having to search through menus looking for basic commands to get the shots we want. The Quick menu button in the bottom right on the back of the camera allows you to easily set burst mode, autofocus mode, white balance, ISO settings, file size and the camera’s back LCD mode.
• As already mentioned, the camera’s 24 to 384mm F3.4-6.4 Leica lens is reason enough to search out one of these cameras at a great price. It’s not a super fast lens, especially at the long end at F6.4, but, again, using a tripod or a monopod will go a long way toward achieving memorable images.

A city scene in fall shot with the Lumix ZS8.
• The 13-year-old camera uses easy-to-obtain SD cards for memory and has a series of mode scenes (29 to be exact) that makes getting photographs in specific situations, whether portraits, shots of your children, pets, snow scenes and night scenes, or landscapes extremely easy.
• The flash on the camera is also a good performer and puts out plenty of light to use as a fill-in flash or a regular flash if you are working in a close distance.
• In addition to the 29 scene modes, the camera’s top function wheel boast two “my scene modes” that allows you to quickly go to your favourite scene modes whether that’s portrait mode, landscape mode… pet mode…
• The camera has Panasonic’s IA mode (intelligent auto) that looks at the scene and sets the proper scene mode to ensure proper exposure etc. This is excellent for quick shots on the move and beginner photographers who don’t want to get involved in learning the technical details of the camera.
• In addition, the camera has three custom modes that allow you to set camera settings that you can access easily. I have set up a high-quality custom feature where the settings are optimized for the highest quality image for landscape photography, a black and white custom feature, and a high-speed custom feature.
• A solid tripod mount right square in the middle of the camera’s bottom plate ensures a balanced mount.

Lumix DMC-FZ8 is a smart looking camera that is small enough to fit in your pocket or purse but with enough features to be the only camera you will need on vacation.
… and some cons
• The small sensor (like all compact cameras) makes getting good images difficult in low light situations. Trying to photograph fast-moving hummingbirds was an exercise in frustration between the slow focus and movement caused by using lower ISO settings. You will never match the speed of high-end DSLRs or mirrorless 4/3rds sensors, but it is possible if you are patient.
• The camera does not have a RAW setting so everything is in jpeg format. RAW would have been nice to pull the most out of the camera’s impressive CCD sensor but the jpegs right out of the camera are very nice.
• No hot shoe for external flash.
• The camera feels comfortable enough in my hand, but it’s tiny size may not feel ergonomically correct for everyone. Always use the wrist strap in case you drop the camera.
Is a Lumix camera a brand to search out on the used market?
Although this review is for the 14.1 megapixel, DMC-ZS8, there are a number of Lumix cameras that were released using the same or a similar design. As the camera design evolved, Panasonic added larger sensors with more pixels and features, but generally kept the same impressive design.
I think it’s safe to say that all these Lumix cameras with this design are worth purchasing today. They are high quality cameras that feel substantial in your hand and are fitted with high quality Leica lenses.
Panasonic built compact cameras for Leica, while Leica provided lenses for Panasonic. The result is that the companies put out almost identical cameras and simply rebranded them for their buyers. In some cases, Leica released almost identical cameras to the Lumix brand for considerably more money.
The original buyers of these Lumix cameras saved a considerable amount of money by purchasing the almost identical Panasonic camera over the equivalent Leica model. Over the years, the Leica cameras have maintained their high prices based on the prestigious brand. The Panasonics have not fared as well even though they have held up extremely well. Now, the difference in prices between the Leica version and the Lumix has widened ever farther making now the perfect time to purchase one.
You know the old saying – buy low. It’s hard to imagine these cameras going much lower.

Blue Lobelia: A native plant perfect for late summer colour
Great Blue Lobelia is a native plant that is at home in both full sun or part shade in the woodland garden. Grow them with Black-Eyed-Susan and Bee Balm for a terrific tapestry in the garden.
What plant combinations work well with Blue Lobelia?

The tapestry created by Black-Eyed-Susans, Blue Lobelia and Bee Balm is beautiful to look at but even better for the bees, butterflies and hummingbirds.
The combination of our native Great Blue Lobelia (Lobelia siphilitica L.), Black-Eyed-Susans and Monarda is a match made in heaven in my garden.
I love the natural look the plant combination creates, but no matter how much I enjoy looking at this combination, it’s the native bees (especially bumblebees), butterflies and hummingbirds that really reap the rewards of this trio of native wildflowers growing together and creating the most lovely tapestry.

Create a pollinator paradise with Blue Lobelia
Add to this trio, four or five Cardinal flower stems shooting up just a foot or two away and you have a perfect pollinator paradise.
And, keeping the entire group happy and thriving is not too difficult.
Our native Blue Lobelia is a low maintenance, moisture-loving plant that does well in shade or full sun. It flowers late in summer into the early fall along with the tough, hard-working Black-Eyed-Susans that are happy in most situations including part-sun to full sun.
It’s not hard to fall in love with the Blue Lobelia. I planted it for the first time in our woodland this year and without a doubt, it has become one of the stalwarts of our garden in just its first year.

This bumble bee was caught climbing into the lobelia to feed.
The Blue Lobelia’s stems produce lavender-blue, tubular flowers that grow close together on the upper parts of the stems. The showy, bright blue flowers grow in the axils of the plant’s leafy bracts forming an elongated cluster on each stem. The flowers have two lips – an upper lip sporting two segments and the lower lip, three.
If you are looking for more information on growing native flowers, you might be interested in going to my comprehensive article: Why we should use native plants in our gardens.
Blue Lobelia’s love of moisture also makes them a nice companion with the Cardinal flower. I have them growing in a part-sun, part-shade area beside our patio where I can keep them well watered along with Cardinal flower and native Bee Balm.
For more on photographing flowers in your garden, check out my comprehensive post on Flower Photography.

Great Blue Lobelia is a tough perennial for the woodland
Let’s take a closer look at this often-overlooked native perennial wildflower that’s at home in hardiness zones 3-7.
The Blue Lobelia is part of the Campanulaceae (Bellflower Family), and is a highly desirable plant for woodland gardens.
It grows from 1-3 feet tall and blooms from July through to October depending on where it is planted. In nature, you are likely to find it growing wild in open, wet woods where sun is able to penetrate to the forest floor. It also grows along stream banks, marshes and open meadows.
Lobelia growing conditions
Light Requirement: Sun , Part Shade , Shade
Soil Moisture: Moist , Wet
Drought Tolerance: Low
Soil Description: Clay, Loam, Sand
Conditions Comments: Keep the soil moist around it by watering it regularly if necessary.
How to propagate Blue Lobelia
The best way to propagate this attractive plant is to divide the clumps in the spring. It’s also possible to plant the stratified seed lightly on the soil surface. Seeds need to be cold stratified (less than 40 degrees) in a moist environment for about two months. A cold winter in Ontario or north-eastern U.S. would get the job done.
Great blue plants for your garden
Blue plants are not easy to find. In fact, only about 10 per cent of the flowering plants worldwide are blue. So finding one that is native to our area and brings with it so much value to native wildlife makes this plant a real bonus and one that needs to find a place in all our gardens.
Five blue flowers to add to your garden
If you are looking for a few more blue flowers to add to your landscape, consider the following:
Delphiniums: a popular wildflower that grow tall on hardy spikes and add a lovely soft blue to the landscape.
Love-in-a-Mist: A spring bloomer that will be at home in a variety of soil types is a generally sunny location.
New England Aster: Another native plant that is a favourite for butterflies, native bees and birds.
Forget Me Not: These charming, little early spring wildflowers are at home in damp, shady areas of your woodland garden. Easy to grow and quick to spread when they are happy.
Blue Columbine: Native columbine tend to be red-yellow combination but the blue columbines are exquisite and still a favourite of hummingbirds.
Something old, something new, something borrowed, something Blue
It’s not hard to fall in love with the Blue Lobelia. I planted it for the first time in our woodland this year and without a doubt, it has become one of the stalwarts of our garden in just its first year.
The tall spikes of blue flowers are not only a beautiful addition to the garden, they are also a favourite plant of our native bumble bees.
Teamed up with an older drift of Black-Eyed-Susans, these new blue flowers cool down the colours and create a lovely tapestry along with the reds of the bee balm.
If you know someone with a clump of these native flowers, be sure to borrow some either by asking for a clump via division or getting some seed.
You too will soon be wedded to these native blues.

Focus on Casio’s EXILIM Pro EX-P505
The Casio EXILIM Pro EX-P505 is a 20-year-old, 5 megapixel camera that continues to perform in the garden and as an everyday camera.
From Springsteen to the garden, this little Casio continues to rock
The Casio EXILIM Pro EX-P505 – now that’s a mouthful – spent most of its life in a drawer in my basement after using it as a pocketable snapshooter for the first year or two. Its greatest achievement was taking it to a Springsteen concert in Buffalo N.Y. where it actually performed admirably in the low lights of the concert venue.
But overall, I wasn’t happy with the early results and really didn’t have a lot of use for the camera in those days when carrying a massive DSLR and complete lens system seemed a whole lot easier than it does today.
But the tiny, odd-shaped Casio EXILIM Pro EX-P505, 5 megapixel camera is looking a whole lot better these days after spending some time with it in the garden. Sure, it’s dated, but it’s also packed with features, has a decent lens, makes the most out of its size and even has a fully tilting viewfinder. And did I say it’s a lot of fun to try to squeeze out some impressive images from its tiny 5 megapixel sensor.

Casio’s Exilim Pro EX P505 with its reticulating screen makes taking pictures from a low angle a whole lot easier.
This review is actually part three of my multi-part feature on using older digital cameras in the garden and on the road. You can check out these links to my reviews of the Fujifilm X10 and Canon’s PowerShot Elph 500.
For tips on maximizing your compact, point-and-shoot cameras, be sure to check out my comprehensive post on Getting The Most Out of Your Compact Camera.
Here are a few more links you might want to check out on Photographing flowers in your garden, Best camera for garden photography and Ten tips for great garden photography.

The Casio EXILIM Pro EX-P505 caught this Lavatera flower in full bloom handling the bright pink colour and texture of the flower nicely.
Okay back to this weird looking Casio camera. The P505 was considered quite a departure for Casio complete with its SLR-like appearance, large lens barrel and five times optical zoom. If I recall, I bought the camera for its movie-making capabilities back in early 2006 when using a camera to make movies seemed revolutionary. The camera was unveiled in March of 2005 and YouTube had just been unleashed on the public in February of 2005.
You could say this camera was cutting edge.
This Casio camera was actually the first Casio digital camera to use the MPEG-4 codec for encoding video and can record full VGA (640x480) video at 30 fps with stereo audio –yes you read that right folks – at 4.2 or 2.2 MBit/sec (approx. 30 / 60 mins on a 1 GB card).

The screen can be neatly stored away on the back of the camera for compact shooting.
Cool, but what about the pictures? Can this thing take decent pictures with its tiny 1/2.5-inch, 5.0 megapixels CCD sensor and 5x optical zoom lens, with a macro mode that allows us garden photographers to get a flower photo as close as 1 cm. away?
Quick answer: “Yup, it sure can.” And, guess what, it’s pretty darn fun to use with its 2-inch TFT colour rotating screen that tilts and makes taking angled shots simple.
The lens is just okay for today’s standards, giving you a 5 X optical zoom with a 35mm equivalent 38 - 190 mm starting at F3.3 at the wide end and going to F3.6 at the telephoto end. For anyone who cares, that’s delivered with 10 elements in 8 groups, including aspherical Focus distance.
The screen is small in today’s standard and the resolution is nothing to write home about. I think it was the relatively poor quality of the screen that made me think the actual files were not going to be good. Don’t make that mistake. It should come as no surprise that the files are much better than what you see on the back of the camera.
All that said, let’s take a look at a couple of those images taken recently in my garden.

The 20-year-old Casio EXILIM Pro EX-P505 captured the reds of the Cardinal flower against the greens of the foliage.

The Casio caught the tapestry of colours in the native flowers from the reds of Monarda to the yellows of the Rudbeckias.

The front garden captured nicely here by the Casio showing the drift of Black-eyed-susans and fine texture of the grasses.
Not bad for a compact camera now pushing almost 20 years old. My battery is still going strong and the camera takes a regular SD card.
One look at the photos above show that the camera can still perform. Colours are good, not great, but totally acceptable for quick hits to social media and the odd print at maybe 11X14 inches. Post processing with Lightroom, Photoshop and a host of denoising programs such as ????????, can make a significant difference when it comes to using these older cameras.
Although the Casio is approaching old age (I notice a few of the pixels have died), it still boasts a host of modes that make getting good shots of difficult scenes just that much easier for photographers who prefer to let the camera do the work. That said, this Casio includes complete manual settings from shutter and aperture priorities to fully manual.

Casio EXILIM Pro EX-P505’s macro feature captured this water hyacinth in the pond.
But let’s take a look at some of the modes this camera offers. Casio calls the modes “BESTSHOT” and incorporates 22 different predefined scenarios plus the capacity for user defined scenarios. There is a flower mode, pet mode, portrait modes, sand, snow, night scenery, fireworks, greenery and fall colour modes just to name a few.
The menus may seem confusing at first, but it didn’t take long to feel comfortable with the camera’s menu system. An EX button on the side of the lens means calling up a quick menu is quick and easy allowing various manual settings to be accessed and set from a single screen. Key functions include ISO, focus modes, exposure compensation… There is also a separate macro button on the lens that puts the camera in macro mode – perfect for flower photography or capturing a butterfly feeding on a flower.
The EX-P505 was, at the time of release, the third camera in the award winning EXILIM PRO range. It incorporated CASIO’s unique ‘EXILIM Engine’, a compact image processing module, that delivered high quality images and high-speed operation, all within extremely compact dimensions.

Looking down on the Casio EXILIM Pro EX-P505 shows the camera’s controls including the pop up flash, and the macro and EX buttons on the side of the lens.
Why did Casio stop making digital cameras?
Since 1995 Casio stopped making digital cameras. Their website explains that they “decided that, after 23 years of developing the visual communication tools which have been highly supported and loved by our users, we will be halting production of our existing compact digital cameras.
The company went on to say: “In the future, Casio will be pursuing product development in entirely new genres, and will leverage the video and image technologies and various unique technologies that we have cultivated over many years. At some later time, we would like to present products that have the potential to become new favorites and the capability to surprise and move our customers.”
Casio points out some of the products it developed that “created a new culture of communication, such as the EX-S1, an ultrathin camera…; the EX-F1, which incorporated a unique, high-speed technology that could capture subjects invisible to the naked eye; and the TR series, which allowed users to enjoy taking beautiful selfies in a variety of free photography styles.”
My Casio EXILIM Pro EX-P505 was not one of their ground breaking releases, but for me anyhow, it continues to make images and movies. I have even used it to create images for this website and although it is not my first choice, it will continue to see service.
A quick look on Ebay and Kijiji shows that the Casio line of cameras continues to bring a smile to the faces of photographers willing to cash in on a brand that is being forgotten in the world of photography. If you are looking for a quality compact camera to have fun in the garden buying a high-end Casio compact camera just might be the ticket. Ebay.com has several pages of Casio cameras available running from under $25 to more than $400 and Kijiji has a great selection at good prices as well.
Grab one and put it to use. You might be surprised how much more fun it is than using your smart phone.
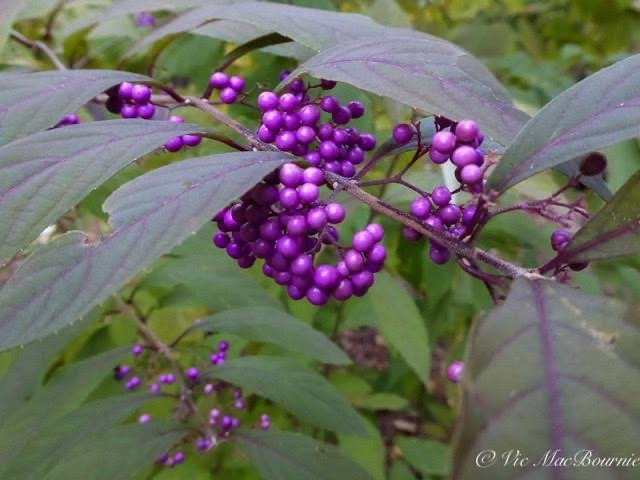
Purple pearl-like berries make Beautyberry a showstopper in native gardens
The American Beautyberry is a fall standout in the woodland garden with it pearl-like magenta berries. The native plant attracts bees and butterflies with its late summer bloom of delicate pink and white flowers, followed by spectacular late summer fruit that persists through winter.
The bright berries that look more like clusters of elegant purple pearls are the prize at the end of summer that makes the American beautyberry bush a must for native gardeners.
The fact that these stunning, glossy, iridescent-magenta fruit, which hug the branches at leaf axils throughout fall and winter, are favourite food sources for migrating birds makes these shrubs among the most prized of plants for gardeners looking for a native plant that turns the sad end of summer into a celebration.
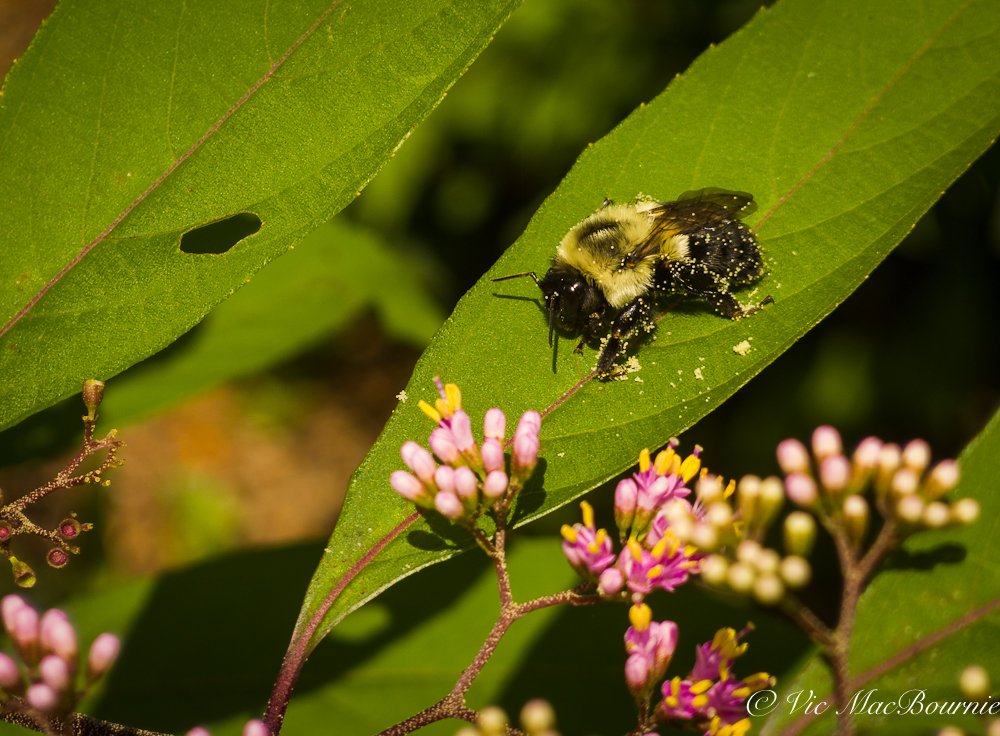
This bumblebee became covered in pollen after working the beautyberry flowers. The flowers will eventually turn into the beautful pearl-like purple berries.
Beautyberries attract bees and butterflies
In mid summer, when the flowers are in bloom, the shrubs also attract native bees and butterflies.
What more can a native gardener ask for?
How about an attractive, arching shrub at home in a woodland understory or at the edge of a forest where it gets full sun to part sun,
Where can you grow Beautyberries?
American beautyberries (Callicarpa americana) are found in warmer parts of Canada and throughout the United States from Virginia to Arkansas and south to Florida and into Texas. They are generally hardy from Zones 6-1.
If you are looking for it growing naturally, look in woodlands, moist thickets and other wet areas including low rich bottomlands, swamp edges and pine woods.
If you are looking for more information on growing native flowers, you might be interested in going to my comprehensive article: Why we should use native plants in our gardens.
Other shrubs known for their berry production include a long list of viburnums. If you are looking to add more berry producers to your garden, check out my comprehensive post on Seven Viburnums that attract birds to your garden. In addition to Viburnums there are many plants, shrubs and small trees to consider. My post Best plants and shrubs to feed birds naturally and save money will help get you thinking about using plants and shrubs as natural bird feeders.
Are Beautyberries low maintenance?
If you are growing Beautyberry in your garden, you’ll be happy to know it is a low-maintenance shrub that is happy enough in moderately moist soil in part shade. Beautyberries grow in moist, rich soils as well as sandy soils, sandy loam and even clay-based soil.

Beautyberries boast spectacular, magenta fruit born in clusters on arching branches that can remain on the shrub into winter.
Is my Beautyberry dead?
Don’t be surprised in late spring if there is no sign of life in your Beautyberry. These shrubs are slow to bud out in the spring, but the American beautyberry can reach an average of 3-5 feet tall and often about the same width. In good soil, don’t be surprised if it reaches up to 9 feet high with a similar width. it can be cut down regularly to keep it in check if necessary.
During the summer, the shrub with its arching branches and ovate to elliptic, leaves. that grow in pairs or in threes up to nine inches long, are fairly inconspicuous blending in with other shrubs in the garden border or filling in under larger mid-canopy trees.
If used as a specimen, it can be an elegant understory shrub with a naturally loose and graceful arching form.
Plant it as a mid-size understory shrub at the edge of the landscape where it can get partial sunlight during the day, preferably in morning or late afternoon.
In late summer – mid august in our area – small, pink flowers appear in dense clusters at the base of the leaves. These delicate clusters of flowers are easily overlooked.
Gardeners familiar with the shrub know however, that the more flowers they have on their beautyberries the more berries they can look forward to in late summer into fall.

Flower buds on a Beautyberry bush getting set to emerge and eventually turn into the purple pearl-like fruit that is attractive to a variety of birds including robins, cardinals and mockingbirds.
The fruit or berries can be rose pink or lavender pink and about 1/4 inch long. The extremely showy clusters cling to the branches through the fall and into winter if the birds and garden mammals don’t get to them first.
Do Beautyberries have good fall colour?
Fall is really the time the shrub comes into its own as the leaves slowly turn yellow revealing the incredibly showy clusters of glossy fruit. The combination of the yellow leaves and magenta fruit is a combination that you will want to ensure is front and centre in the garden.
What birds eat the fruit of Beautyberry?
You can count on American robins, cardinals, finches, towhees and even mockingbirds visiting your shrub in search of the pearlescent, purple fruit. Foxes, raccoons, chipmunks and squirrels will also be lining up for the fruit.
Unfortunately, if you live in deer country, don’t be surprised if deer have a little nibble on the shrubs. Our deer have more or less left the plants alone, although there is so much more in the garden they obviously seem to prefer.
Although American Beautyberry shrubs are commercially available, (you may have to look for Callicarpa americana on the tag ) they are relatively easy to propagate from seeds, root cuttings and softwood tip cuttings. If you have a friend with one, take a cutting and get a couple for your garden.
Sophisticated elegance makes Beautyberry a late summer standout
The American Beautyberry shrub is another example of a native plant that is often overlooked by gardeners focusing on massive, showy blooms that dominate the landscape but often fall short once the blooms are spent.
This is not what the Beautyberry is all about. Although these understory shrubs have a certain elegance in the woodland garden with their arching stems, don’t expect them to steal the show during the spring and summer months.
But that’s okay.
There are plenty of flowers, shrubs and flowering trees that can do the heavy lifting in May and June. Gardens need colour and interest in late summer into fall and that’s when the American Beautyberry really delivers. As already discussed, the berries/fruit are the showstoppers, but don’t underestimate the fall foliage. The green and almost lemon-yellow foliage of the Beauty-berry is the perfect contrast to all the reds and burnt orange that tends to dominate the landscape at this time of year.
Not only do Beautyberry carry their weight in fall, but they add much needed winter interest to the landscape with their purple berries popping out of the drab landscape. Imagine watching a cardinal feeding on the colourful fruit and you will know why native woodland gardeners have a special place in their hearts for Callicarpa americana.

How to capture great sunflower photos: Including ten top tips
Sunflowers are excellent plants to put in your garden. Not only are they visited by pollinators such as bees and butterflies, they eventually provide food for backyard birds. More importantly, they look great while in bloom and make excellent photography subjects in all their phases.

A Lumix DSC-LS50 compact travel camera was used to move in close and capture the vibrant colours of the small sunflower from a low angle that shows off the details of the plant’s fine hairs.
Flower photography with the Lumix DSC-ZS50 /TZ70 compact camera
Everyone need to plant flowers, especially sunflowers in their gardens for the butterflies, bees and birds. But don’t stop there. Sunflowers’ magnificent blooms will bring a smile to your face and brighten any corner of the garden where you choose to grow them. More importantly, however, are the images these flowers offer to creative garden photographers who are willing to spend a little time exploring details and creating memorable images of these great plants.
All flowers, but especially Sunflowers have long been a favourite of photographers, but capturing memorable images can be a challenge.
For more on photographing flowers in your garden, check out my comprehensive post on Flower Photography.
Whether it’s a single bloom in your garden, a small grove of sunflowers in a corner of the yard or a massive field stretching as far as the eye can see, doing these cheery colourful flowers justice involves different approaches, techniques and a creative eye.

This grouping of sunflowers were photographed growing in a small field. The red barn adds a nice touch of colour to the image.
Give your lenses a workout shooting sunflowers
Sunflowers offer the opportunity to give all your lenses a workout, from wide angles to capture an expansive field of flowers, to short telephotos capturing a selective group of flowers. Longer telephotos will bring the flowers in close if you are shooting from a distance, but also compress the field, stacking the flowers so they appear almost on top of themselves. And finally, that macro or close focusing lens will get you in close to capture the interesting colours and details sometimes overlooked by the sheer beauty of the flowers.
Be sure to check out my post on how to grow your own sunflowers in your garden.

This field of sunflowers was taken with a telephoto lens that helped to compress the image.
What’s the best time to photograph Sunflowers?
If you have not planted your own sunflowers, (and you really should) late summer is the best time to look for patches of these growing in private gardens.
Remember that trespassing on private property to get the ultimate selfy is never a good idea. Use your longer lenses to photograph from the road, or ask the landowner if it would be possible to get some images of the flowers while they are in bloom. Possibly, offering to share some of your images with the landowner would open the door to allow you a closer approach.
If you are considering upgrading your camera gear, consider checking out the offerings at KEH Camera Exchange. You can also trade in your older gear for some new gear that better gets the job done.
Depending on where you love and how early the sunflower seeds were sown, expect to start seeing them bloom as early as July, and reaching their peak in mid- to late-August, and ending in September, when you can explore the photographic possibilities of capturing the dying foliage.
Be sure to check out my post Fields of Gold: Sunflowers and Goldfinches.
Once the flower bloom is out in full, you can expect up to about 20 days of bloom from a single large specimen. For the smaller multiple flower varities, the bloom time can be much shorter, so take advantage of them once they begin. One of the benefits of the multi-flowered varieties, is that you will have new flowers coming into bloom at the same time as you have flowers in decline. It’s a great time to attack the plant from multiple angles, filters and creative approaches.
Sunflowers offer endless potential for great photographs
Here are ten tips to inspire you to get out with your camera and capture images of these magnificent blooms

This image taken with a Lumix DSC-ZS50 uses backlighting that makes the flower petals and leaves translucent, and adds drama to the photo.
1) Look for the right light: Just because the subject is exciting and colourful, does not mean you should ignore the basic principals of good photography. Look for dramatic lighting to take your images to another level. Backlighting at sunset or sunrise offers photographers an opportunity to capture the petals with a translucent glow and a beautiful rim light. Don’t forget to also use backlighting to catch the fine hairs that cover the plant.
Sidelighting can also be used to bring out texture in the individual flower heads or even an entire field of sunflowers. A little underexposure will enhance the effect and a polarizing filter will help to make the colours pop by removing any glare on the plants.

Using filters on the Lumix DSC ZS50 adds a little creativity and fun to the photo shoot.
2) Get in close: Don’t be afraid to move in close with your macro or close focusing zoom lens. These flowers are so large that there is no need to move in that close to capture the finer details of the flower petals. Most compact cameras or close-focusing lenses are able to capture interesting images up close. Try including portions of the flower’s inner circle of seeds with several petals for a very graphic effect.
3) Get down low: By shooting up at the plant with a wide angle lens, you will emphasize the sheer size of the plant and make the viewer think the plant is even bigger than it actually is. The view from below is also the one most people (especially children) get when they look at the larger plants. Wait for a clear blue sky and darken it even more by using the polarizing filter for best results. If you have a Cokin Yellow/blue polarizer in your arsenal, this is the time to pull out and get it on your camera. The Blue/Yellow polarizer is an interesting effect filter that works like any polarizer accepts it enhances, depending how it is positioned, the blues and yellows in your image.

A reverse processing filter on the Lumix gives this image some interesting colours, especially in the sky.
4) Look for a blue sky background: A solid blue background isn’t usually an ideal backdrop for most images but it works well for sunflowers, especially when a polarizer makes the yellow flowers pop out against the deep blue sky. Of course, if you are not including the sky in the image, a good overcast sky will give you a soft, even lighting that will work for more intimate images of the flowers, either in small groupings or in close-up mode.

Again, the Lumix filters were used to create this dramatic B&W image.
5) Shoot in B&W: Sunflowers shot in black and white have a timelessness to them that can result in excellent art images that you will want to frame and hang in your home. Most cameras whether they are DSLRs, mirrorless or compact point-and-shoots include black and white settings. Some, like the Fujifilm X10 (Link to my separate article on this popular camera) and other Fujifilm cameras include red, green and yellow filters to enhance tones in B&W images. Use the red filter for dramatic skies and the green filter to lighten the sunflower plant but not the flower itself.
6) Look for interesting angles: Get down low, shoot up. Get high and look down. Shoot the flower from the back, the side, in silhouette. This is your chance to “milk” every angle out of the plant. It’s important to take advantage of the opportunity when you have it.

Moving in close with the Lumix DSC LS50 showing its macro capibilities.
7) Watch for birds, bees or butterflies: Sunflowers are not just flowers with a pretty face. These things attract everything from butterflies to birds and you would be wise to spend some time being ready for garden wildlife to pay a visit to the flower in search of pollen or the prized sunflower seeds. If you know one of your prized sunflowers are coming into seed, pull up a chair, grab a coffee or glass of wine, set up your camera on a tripod and wait it out. You may not be waiting too long before you have a visitor and a memorable image.
8) Photograph them as they emerge: Don’t just wait until the flower has a emerged to begin photography. Consider capturing the flower in all it’s stages to create a little photo essay.

Don’t forget to photograph the flower in all phases of its life.
9) Beautiful in death: Don’t pack up the camera when the flower fades, a dead or dying sunflower can be simply beautiful especially in B&W. Besides the symbolic value of capturing these flowers as they fade away, there is something touching about an image of a sunflwer in severe decline. Maybe it’s a reminder that the end of summer is upon us and the cooler temperatures of Fall are about to begin. Late fall can be especially great for capturing sunflowers. Get up early on a cold morning to capture a coating of frost on the dead flower head, maybe you’ll be lucky to capture a little hoarfrost on one of your flowers.
10) Fun with filters: There is something about a magnificent sunflower that just lends itself a multiple approaches. I’m not a huge fan of the built-in filers available on today’s cameras. Some are just silly, others are overused, but sometimes the situation calls for a full-fledged filter attack on the subject. The flower is not going anywhere, milk it for everything its worth.

The filters in the Lumix offer a huge range of possibilities. This was shot using the “impressive art” filter which creates a dramatic low key image.
Lumix DMC-ZS50 filters exposed
I recently did just that with a multi-flowered sunflower planted in a container in our front yard. My camera of choice was the Panasonic Lumix DMC-ZS50 (ZS70 in Europe). See my earlier post on the Lumix travel camera in the garden.
This full featured 12-megapixel compact travel camera complete with a 30X Leica super zoom lens (24-720 mm on a full-frame 35 mm camera) is packed with built-in filters.
The number of “creative exposure modes” on this camera seem endless: Panorama Shot, Scene (Portrait, Soft Skin, Scenery, Sports, Night Portrait, Night Scenery, Handheld Night Shot, Food, Baby1, Baby2, Pet, Sunset, High Sensitivity, Glass Through, HDR, Starry Sky, High Speed Video, 3D Photo), Creative Control (Expressive, Retro, Old Days, High Key, Low Key, Sepia, Dynamic Monochrome, Impressive Art, High Dynamic, Cross Process, Toy Effect, Miniature Effect, Soft Focus, Star Filter, One Point Color (15 filters).
Above are just a few images of the sunflowers, taken with the filters built into the Lumix DMC-ZS50.
Most compact camera, DSLRs and mirrorless cameras sold over the past 10-15 years including the Canon Powershot elph series of camera’s and Fujifilm series including the X10, offer a host of interesting and creative modes or filters that enable the photographer to experiment with to create memorable images.
Of course, these modes have their place and are probably best left to specific situations where they are appropriate. I consider sunflowers the perfect opportunity to give them a try. These flowers have an air of fun about them, so why not take advantage of it and get creative.
Filters are a convenient way to add a little creativity to your images, but don’t forget to consider your sunflower photography as potential images to create beautiful painterly images using post processing software. Check out the link for a closer look at how I have used Photoshop and Painter to turn many of my photographs into painterly works of art.
Collecting a series of great sunflower images might even create a perfect opportunity to put them all together in your own photography book. Their are many companies the now make that process simple and inexpensive, and the results can be incredible. Rather than printing the images into 4X6 pictures and stuffing them into plastic sleeves, having them printed and put into book form allows you to leave them out as coffee table books or give them to friends as Christmas gifts. Check out my earlier post on creating your own photographic book.
In Conclusion
What may have begun as a gardening project to grow a few sunflowers could very well become an exciting photographic project to document everything from the emergence of the seedlings in early spring, to the rapid growth throughout early summer, and finally leading to the incredible blooms of these magnificent flowers. Then there are the visitors, birds, bees and butterflies that love the flowers and the seeds they offer.
The photographic possibilities are endless and the images themselves can become more than just a collection of digital files to share with friends on your social media accounts.
This may be the year to create a lasting memory of your summer in love with sunflowers with your own photographic book, or a print on your wall that you turned into a painterly masterpiece.
All it takes is a couple of seeds to get going and your imagination.

Why is the tree in my front yard stressed and losing its leaves?
We are not the only ones stressed out about climate change. Our suburban forests are feeling the heat too and many homeowners are not doing enough to ease that stress. The result, trees that probably won’t make it past adolesence before a lack of water kills them.
Why is the tree in our front yard dying?
It’s a question that is asked on gardening groups daily especially in the heat of summer.
The simple answer is almost always a lack of water getting to the roots of the tree, but that is an oversimplification of a series of complex problems many inner city and suburban homeowners are facing and most are, unfortunately, choosing to ignore.
Chances are good that the tree is not dying, but under stress. Chances are also pretty good that, if action is not taken, the tree will begin to show more serious signs of decline. Over time, a lack of action will result in such decline that the tree will eventually die or have to be cut down or left as a snag for birds and other wildlife. It may take several years for the tree to finally give up and give itself over to the borers and woodpeckers.
But that tragic ending is not inevitable.
For more on dealing with trees showing stress, check out these posts:
• Why Birch Tree leaves turn yellow and fall off prematurely
• Birch clumps at home in the woodland
• Do not cut down that dead or dying tree
Don’t give up on your stressed tree too early
In a recent Facebook post a homeowner showed a picture of a maple tree in her front yard. She had already concluded that it was dying, and it appeared nothing anyone was going to say would change her mind. Despite assurances from others that the tree was just under stress and needed help, she maintained it was too late. The helpful posts from other gardeners were simply ignored because "other maple trees in the suburban neighbourhood,” according to the poster, “had already died or were in the process of dying.”
I don’t doubt that most of the neighbourhood trees were dying out.
One look at the picture, and it was clear the tree was a good example of a “street kid tree,: an orphaned tree, if you like.
Chances are, most of the trees in the neighbourhood were suffering from the same problem and dying off one by one. Their deaths certainly pointed to a major problem, but it most likely wasn’t what the homeowners all believed – that a disease was running through the neighbourhood.
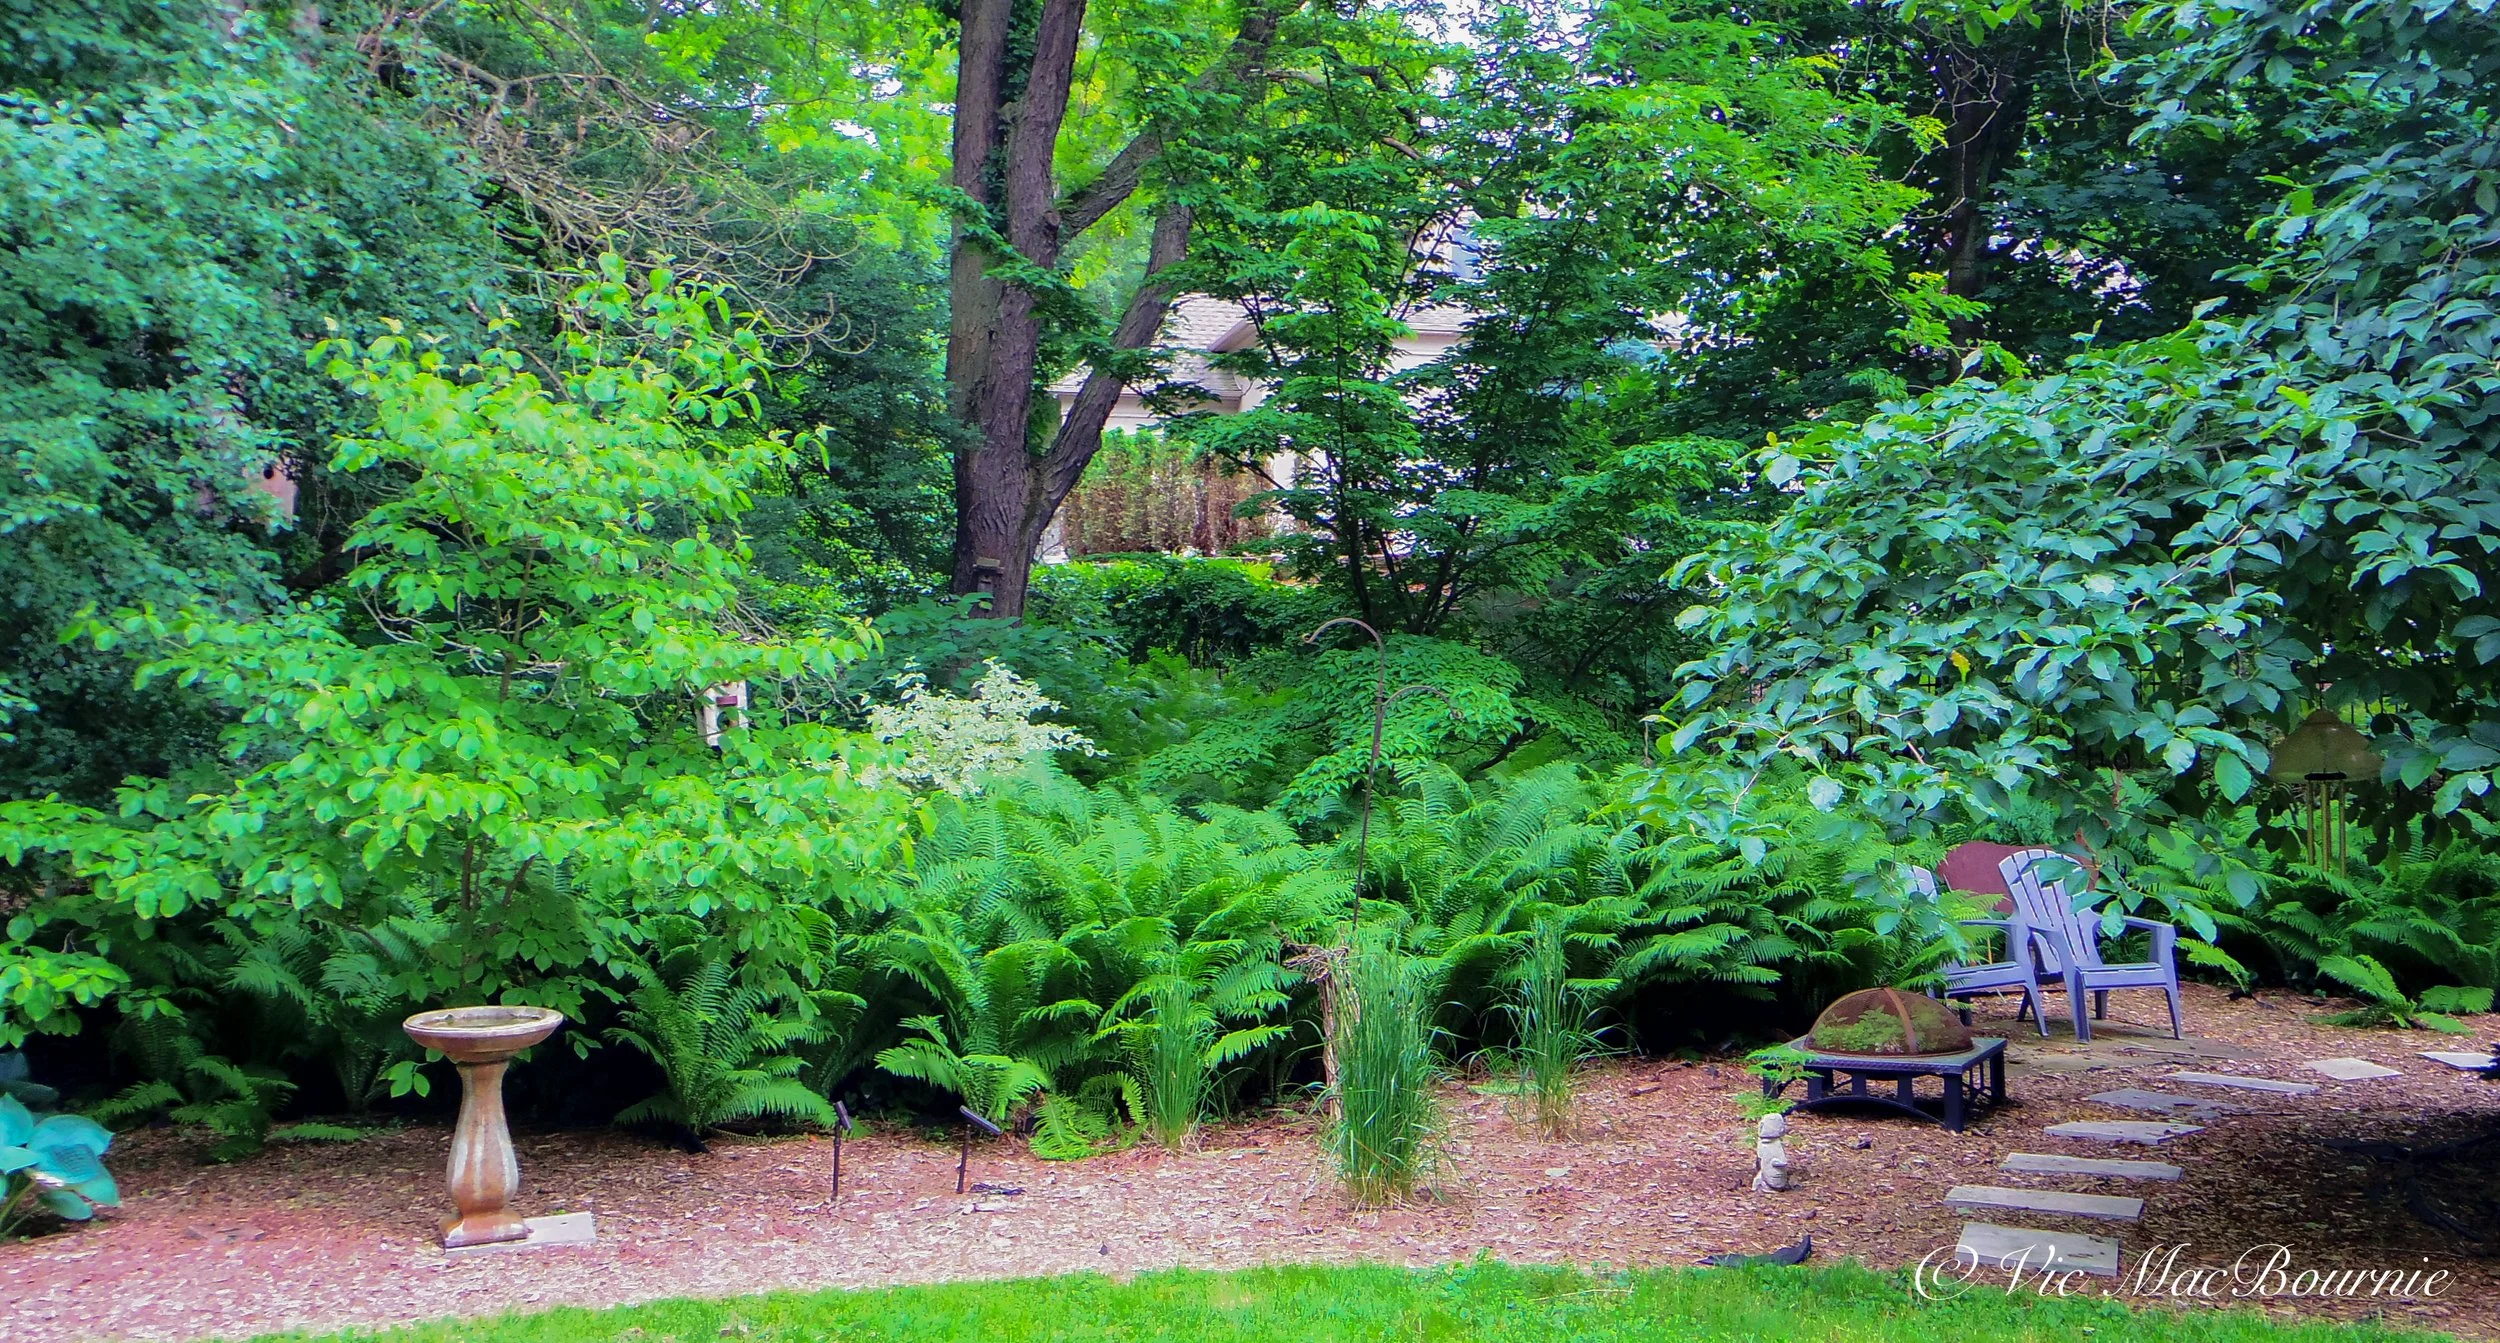
In a woodland garden, there are more trees to cast shade. Here a large shade tree casts a delicate shade on smaller, understory trees and help them get through times of less rainfall. In addition, the ground is covered with a mulch to hold the moisture in the ground and ferns grow around the larger shade tree to help hold the moisture in the ground.
Now, there are many factors that could cause the trees to die off – including a disease spreading among them – but judging from the picture and what I could see on neighbouring properties, I’m pretty confident that the problem was water.
To be more specific, a lack of water getting to where it needed to go.
I’m also confident that the neighbourhood residents would tell you that they water diligently and assure anyone who asked that “there was no way watering was the problem.”
Make no excuse, the real problem is water and the role it plays on our suburban and inner city “Street trees.”
Watering the grass is not the same as watering a tree.
Five reasons suburban trees may not make it to adulthood:
• Most of the trees being pushed at local nurseries are meant as understory trees, meaning growing under the shade of larger trees like maples, oaks and other shade trees. Growing alone in the middle of a lawn means full sun. These trees are not prepared to deal with that much sun, especially these days when temperatures are soaring to new heights and staying there for weeks instead of just a few days. If the trees survive it’s likely because they benefitted from the two-storey home that might shade them for a period during the day.
• In most of today’s new neighbourhoods, water is diverted from the roofs of homes to underground pipes and shipped directly to the waste water plant where the already clean water is “cleaned” and fed back into lakes and rivers offering nothing of value to the plants and trees it was originally meant for. Again, it points back to a lack of water. In addition, these same trees are often planted close to a paved driveway that blocks any water from seeping through to roots that may have travelled under the pavement.
• The tree is often planted in the middle of a sea of grass that also sucks up what little water makes it to the ground, leaving little to no water for the tree. And, because it is planted in grass, it is susceptible to the gas-powered whipper snapper that trims the grass around the tree while it carves out the tender bark of the young tree and leaves it unable to send water and nutrients up its trunk if it could even find any.
• The volcano effect where homeowners pile up mulch around the trunk of a young tree sentencing it to a slow death.
• Finally, our little tree is an orphan in a sea of well fertilized and pest-free turf grass. Unlike its cousins in the forests that have a mother tree, siblings, cousins and a whole community to support it, our little guy is on its own to face the weather, harsh conditions and a lack of shade all on its own.
“Not only is turf grass a non-native species offering little to nothing of value to wildlife, pollinators and other insects that feed our birds, it’s sucking the life out of our suburban trees by stealing most of the water meant to give them life.”
Are suburban trees in trouble?
What’s a “street” tree you ask?
The term is explored in great detail in Peter Wohlleben’s best selling book, The Hidden Life of Trees, where the author uses it to explain the complex association and communication that a healthy woodland or forest exhibits and compares it to the everyday struggle inner city and suburban trees face.
The Hidden Life of Trees was clear about the benefits of forests over singular trees planted on a front yard surrounded by non-native grass and facing the world – the beating sun, the cold winds, freezing temperatures – on their own. He compares the “street trees” that are found in most urban environments, to “street kids.” These lone trees face difficult and almost always shortened lives compared to trees that share resources as a family group in a proper forest or woodland setting.
(You can read all about this excellent book in my earlier post The Hidden Life of Trees, and more here on Dr. Nadina Galle and her revealing work at her website “The Internet of Nature.”)
Dr. Galle, a Canadian living and working in the Netherlands, is focused on how we protect the urban forest into the future and she wants technology to be leading the way.
“Roughly 50-70 per cent of the urban forest in any given city is on private/homeowner land, which means only 30-50 per cent is actually in the maintenance area of the city,” Dr. Galle tells Ferns & Feathers from her home in the Netherlands.
“This is crucial because it shows the massive role homeowners can have in the development and longevity of the urban forest,” she explained via email.
That “role homeowners play” begins with taking care of the “street trees” on our properties that are part of the urban forests.
The importance of “community” in the natural world is brought home by the work of a group of women in Ireland who have taken the term micro or “pocket forest”to new heights.
By planting intensive miniature forests on tiny lots, some as small as a single shopping mall parking space, the team are proving that a full grown native forest does not have to take hundreds of years to grow into maturity, but can be done in as little as 20 years. For more on their work, check out my earlier post here.
City trees just need a little help
To better explain the concept of “street trees,” think about a teenager trying to grow up in the inner city without parents, a real safe place to call home and no friends or support to help them get through difficult times. Chances are that “street kid” is not going to make it to adulthood, but that doesn’t mean that without a little help that the same kid can’t become a successful adult.
The same can be said for our “street trees.”
Street trees under stress need our help to survive more than ever.
Our lonely trees are struggling
Let’s get back to the tree under discussion.
The picture showed a well-established maple tree surrounded by a sea of grass and a tiny garden around the base of the tree trunk edged with larger river rocks.
It’s a recipe for disaster that, unfortunately, is not that uncommon in many subdivisions.
(Just for some background, Street Trees in the inner city have a life span of as little as nine years. In human terms, that’s not much older than a toddler.)
The homeowner assured readers that the little garden around the tree was not the problem because other maple trees in the neighbourhood had died and had not had a garden around the trunk.
Wrong. The little garden wrapped tightly around the trunk may not have caused the tree’s decline, but is certainly another part of the bigger problem. The garden was climbing up the trunk suffocating the tree and possibly bringing disease to its trunk.
Removing the grass around a tree is an excellent idea that should be encouraged, but make it large. If you can spread it out beyond the drip line of the tree’s canopy. Every few years make it larger as your tree continues to grow and the drip line spreads out. This will allow water to travel to the roots much easier than having to penetrate the fibrous, thirsty roots of turf grass.
Remember that street kid. Let’s compare the garden to taking a winter coat away from the street kid in the middle of winter. Probably not the only reason the teenager is going to struggle during the winter, but a significant contributing factor. If the teenager gets sick, has no support structure and the temperatures continue to drop, there is a good chance the child will perish from the cold and sickness. The coat would certainly be considered a contributing factor, but death would likely be the result of pneumonia or hypothermia.
A little help with a warm coat and chances are the teen would have not gotten ill and survived winter just fine.
The right amount of water for our struggling tree will result in the same life-saving result.
Many homeowners, think a quick watering of the front lawn is all that the tree needs.
In other words, if the grass looks good, we are good to go,
Nothing could be further from the truth.
A need for deep watering
Trees need water and the bigger they are, the more they need. So as a tree grows in your front yard you need to take this into consideration. This doesn’t necessarily mean you need to water more and more as the tree ages. It does mean, however, that the tree needs to be able to access water deeper in your soil. Tree roots will find that water, providing there is sufficient water to find.
A huge problem in suburbia is, you guessed it, those acres of turf grass so many homeowners like to worship from the sidewalk.
Not only is turf grass a non-native species offering little to nothing of value to wildlife, pollinators and other insects that feed our birds, it’s sucking the life out of our suburban trees by stealing most of the water meant to give them life.
Even a heavy rain is likely only going to water the grass and the first few inches of the soil.
That’s likely not enough.
We need a deep watering. The kind our suburban trees often get in spring when 3 feet of snow slowly melts and the water works itself slowly and deeply into the ground.
That’s a deep watering.
How do you deep water a tree?
In other words, pull out your garden hose, turn it on to a little more than a trickle (not full open,) put it at or around the drip line of the tree (approximately where the outer leaves of the tree are located) and let it run for three hours. Then move it about a quarter of the way around the tree and let it go for another three hours… and then do that at least two more times until you have watered around the entire circumference of the tree. Yes that’s up to 12 hours of watering, but not 12 hours of all-out watering.
You don’t need to do this on a weekly basis.
On a good year, where we get lots of rain, you may not have to do it at all.
If you have a woodland garden where the tree roots are shaded for most of the day and enjoy the company of other trees, you may not have to ever do it.
But if you are going to plant a tree, in the middle of your yard, in the blistering sun, with turf grass all around it sucking up what little moisture there is, plan on doing it several times over the summer.
That’s the reality.
If that’s too much to ask, be prepared to lose your priceless tree just when it is beginning to look good and add value and some shade to the property.
What other factors cause stress in trees
One look around a typical suburban neighbourhood these days and you would be hard-pressed to find a property with more than a single sad tree growing in the front yard.
Too often the properties are small and the thought of a large oak or maple tree growing in the front yard is too much for new homeowners to imagine. They worry about the roots heading straight for the foundation, or worse, the tree falling on the home and demolishing it in one full swoop. Needless to say the oak tree won’t reach anywhere near that size in the homeowner’s lifetime.
Instead, miniature trees (more properly named under story trees) guaranteed to grow no more than 10 or 12 feet, are purchased and proudly planted in the middle of the grass where they are exposed to 12 hours of searing sun day after day, are open to salt spray from the roads and freezing winds in winter.
They have no protection, are usually non-native trees so likely can’t deal with the harsh conditions we throw at them, and they are asked to do this all alone. But, and this is important, they have pretty double flowers that are infertile so they don’t bear fruit and make a mess (sorry for the sarcasm). Some, in fact many homeowners, would unfortunately call that a win-win. Not for wildlife it isn’t.
Unfortunately, the chances of that under story tree surviving are slim. If it does survive, it will most likely struggle its entire life and never perform the way it was originally meant.
And the more of them that are planted, the more our suburban forest is threatened. As our large native shade trees slowly give way to weeping whatevers, so too will the birds, insects and mammals that depend on the large native trees for the caterpillars and other insects they provide.
If you live in a typical new subdivision, take a drive to an older, nearby neighbourhood where the houses are older and lot sizes are also on the small size. Notice the large Maples and Oak trees growing and recognize the character the surviving trees provide to the neighbourhood. These trees were likely planted at a time when today’s miniature, weeping variety of trees were not yet available. Imagine, one of these in your front yard or towering over your patio in the backyard. Imagine the shade, the birds singing and the whisper of the leaves in the evening.
Now go out a plant one for the future. The under story tree can go in next year or the year after when the shade tree can protect it from the heat of our ever increasing mid-day sun.

Can Canon’s PowerShot Elph 500 hold its own in the garden with flower photography
Eleven years after its introduction the Canon PowerShot Elph 500 HS continues to shine when it comes to garden photography.
Garden Elph is great for flower photography a decade after introduction
It was 2011 and Canon released its PowerShot Elph 500 HS complete with a modern touch screen to help combat the popularity of the emerging smartphones equipped with some pretty decent built-in cameras. About two years earlier, Apple had unleashed its iphone and it was gaining popularity in the world of point-and-shoot cameras. Something had to be done.
It was also the year of uprisings in Egypt, Libya, Syria, a devastating tsunami in Japan and the death of Osama bin Laden. On a lighter note, The King’s Speech and Toy Story Three were big hits, the St. Louis Cardinals won the World Series and the Bruins won the Stanley Cup.
It was also the year we bought our daughter a Canon PowerShot Elph 500 HS. For the next couple of years, that camera would travel the world with her throughout Europe, the United States and Canada taking thousands and thousands of pictures of her synchronized skating adventures, concerts, vacations and who knows what else.
Be sure to go to the end of this article for links on Canon’s refurbished items as well as cameras that competed with the PowerShot 500 back in its day. Also, at the end of the article are new cameras you might want to consider purchasing if a used camera is not what you want or you cannot locate a good used camera.
It served her well during those first few years but eventually the iphone more or less made it obsolete. The camera wasn’t actually obsolete at all, but it was no longer cool for young people to carry a point-and-shoot camera around when a phone made sharing on social media so much easier.
Be sure to check out my comprehensive post on Getting the Most out of Your Compact Camera.
If you want to see more garden images taken with the Canon Powershot, please check out my Canon Elph 500 Gallery of images.
For more on photographing flowers, check out my post on Flower Photography in your Garden.

The impressive back screen of the Canon PowerShot Elph 500 HS showing its menu.

The Canon Elph with its simple yet elegant front face.

Looking down from above on the Canon Elph’s top plate.
So it was tucked away in a drawer and almost forgotten.
Camera is ideal for flower photography
Fast forward 11 years and this little point-and-shoot that cost my wife and I more than $400 from Costco way back then, is a high performing part of my garden camera arsenal and a stellar performer when it comes to flower photography.

The tiny Canon Powershot Elph 500 HS is more than capable of capturing exquisite images in the garden. It’s extremely wide 24mm equivalent lens is fast and sharp. Eperimenting with the filters including the vivid colours used here can make the images really pop, especially considering the camera is approaching 12 years of age.
Who said an 11-year-old, high quality point and shoot digital camera is no longer usable?
In fact, this little blue-grey and silver beauty with its 12.1 megapixel CMOS sensor and 4.4x optical zoom lens (equivalent of 24-105mm lens) is becoming the perfect companion for me on my morning strolls around the garden. The fact it takes a regular SD card and shoots HD movies means it continues to challenge even the most modern point and shoot cameras.

The Canon Elph’s 24-105mm lens has the pulling power to capture detailed garden vignettes in vivid colour.
Some Key Features in the Canon PowerShot Elph 500 HS
12.1MP CMOS Sensor
4.4x Optical Zoom 24-105mm Lens (35mm Equiv)
Optical Image Stabilizer
Good Low Light/High ISO capability for its age
Full 1080p HD Video complete with stereo sound
Hi-speed burst shooting that can take up to 8.2fps
Slow Motion Movie Mode – at 240fps
Effects Include Toy Camera, Monochrome, vivid, portrait and foliage settings
Smart AUTO Has 32 Scene Modes
Movie Digest Mode that automatically records a short video clip every time you shoot a still image. The camera will then combine the clips into a single video. Perfect for a day of shooting in the garden with your children or grand children.

The lens allows a close approach to fine garden details like this moss growing between stepping stones in the Japanese inspired garden.
Is this little Elph worth buying today?
A quick search on Ebay and used camera outlets puts this little gem of a camera at between $50.00 for a well used model to almost $300 for a new-in-the-box-model. Expect to pay about $100 for a good used one. You may be able to get one much cheaper if you keep your eye on Kijiji and other more local on-line marketplaces.

Capturing more intimate scenes in the garden is easy in the auto mode where you let the camera recognize the scene and provide the best settings to capture it.
That’s a lot of camera for under $100. Its performance in low light makes it great for everything from travel photography to, of course garden photography. Its multiple frame bursts and best-image-capture settings make the camera ideal for parents and grandparents to grab shots of children, pets and vacation images. Set it on auto and it’s good to go but if you want more control it’s there for the taking.
What features does the Canon Elph 500 boast?
The fast f2.0, 24mm lens is more than enough to take in long garden vistas, in early morning light, while the 105mm has enough pull to capture more intimate garden vignettes, and with a little effort some garden wildlife.
It all comes in a package so compact that it slips into my pocket so easily that I forget I have it with me at times.
But what about the pictures?

The Canon PowerShot Elph has the ability to capture garden images in fine detail.
These images should speak for themselves.
The Canon spits out sharp images, with punchy colours and features enough built-in filters to keep the creative juices going year round.
I particularly like the “vivid” setting which gives the images the look of Fuji’s Velvia film on steroids. Add to that, an impressive “foliage” setting that enhances greens and fall foliage colours, a B&W setting, Cyanotype setting (blue cast), sepia setting, colour accent and poster settings just to name a few.
It would be easy to think this camera is nothing more than a simple point and shoot with very little extras to offer.
Afterall, there are no knobs and wheels on the camera’s exterior, and very few buttons outside of the on switch and image review button. The smartphone may have made the camera obsolete in some ways, but it wasn’t because it lacked the latest touch screen technology. Hidden inside the large LCD screen on the back of the camera is a wealth of settings buried in the settings menu.

A foliage setting on the camera is perfect for capturing the subtle colours of green in the garden as well as the pop of fall colours in the woodland.
Once you get into the menus, this camera is loaded with all the settings; Program, AV aperture value, TV time value, a portrait setting, pets and children setting, a total of 32 scene settings… . It even has a smart setting where the camera automatically selects the best shooting settings for optimal quality based on subjects and environmental factors to provide point-and-shoot simplicity.
It also features optical image stabilization, hi-speed burst shooting at up to 8 frames per second and full 1080p HD video with stereo sound.
What’s not to like about the camera?
I like lots of exterior buttons and dials to control the primary functions of a camera. This camera has none of these.
In fact, there are only a total of three buttons on the exterior of the camera: one to turn the carmera on and off; the shutter button to take the picture and an auto switch that allows the user to put the camera in complete automatic mode. If you are happy letting the camera make most of the decisions, put the camera on auto and snap away.

The camera’s functions – and there are a lot of them packed into the camera – are all accessed through menus from the large screen on the back of the camera. If you are comfortable sorting through digital menus to find the settings you need, than this camera is for you. It only took me about a half hour of playing with the camera to get a good feel for where the various modes and features were hiding, but when I needed to find burst mode quickly, I struggled to find it buried in the menus.
Who should own the Canon Powershot 500 Elph?
Anyone looking for a high quality, pocketable point-and-shoot camera and are not put off by sorting through digital menus rather than using old-school dials, will enjoy this camera. If you are looking for a camera that pushes you to be more creative then you will love the camera’s extensive filter capabilities from Black & White images to vivid, toy camera effects, portrait and even a foliage feature that brings out the best in greens and fall colours.
What more could you ask for?

The vivid feature in the camera results in nice punchy colours reminiscent Fuji’s Velvia slide film.
Can’t find a good used Elph, here are some new and used alternatives
If you like what is possible with a good point-and-shoot camera, but can’t find a good used version of the Canon PowerShot Elph 500 HS, here are a few recommendations you might want to consider.
Around the same time as the Elph 500 was released, Canon released the Powershot S100. Almost instantly, the camera took on a cult following and was considered by many to be the pro photographer’s backup Point-and-shoot camera.
This was also released in 2011 and sported a 12.1 megapixel sensor, a slightly longer 5x telephoto lens ranging from 24mm up to 120mm, a better performing sensor similar to the one used in its EOS SLRs including an on-chip noise cancellation system, and microlenses that improve its light-gathering characteristics. At the time, Canon said the improved sensor results in reduced noise and increased dynamic range; improving the the maximum available ISO to 6400.
The camera is elegant wrapped in its black case and it relies much more on a host of buttons and wheels for photographers who like the old-school approach to photography. A lot of these cameras were sold so finding one used should not be that difficult. Expect to pay a premium for this fine photographic tool.
If you are looking for a good deal on a Canon camera, consider checking out the company’s refurbished models on their website.
Here is a complete review of the Canon S100, from dpreview.
Other cameras on the high end include the Fujifilm X10, (link to my earlier review) released around the same time and also sporting a 12 megapixel sensor.
In addition, here are links to earlier Photography articles you may be interested in reading
• Macro Photography in the garden
• Ten tips for great garden photography
New compact point-and-shoot cameras to consider
Fujifilm X100V (Amazon link) (Henry’s link) that looks much like the X10 and handles like a Leica rangefinder.
Olympus Tough TG-6 (Adorama Link)for those who want to take their camera underwater for some real cool shots. Known for its excellent macro capabilities. Amazon Link.
Sony Cyber-shot (Adorama link) DSC-RX100 Vll for those who like the Sony brand Amazon link.
Ricoh GR lllx (Adorama link)for those who like to shoot with a prime lens. Amazon link
Canon Powershot G7 X Mark lll (Adorama link) (Henry’s link)for those looking for a high-end point and shoot that both fits in your pocket but carries a large 1-inch sensor, a fast zoom lens and 4K video at a price under $1000. Amazon link

Saving our native Humble Bumble Bee
The Bumble Bee needs to be celebrated for the work it does quietly and without a lot of fanfare. You can thank this native bee for the spaghetti sauce on your pasta and the toasted tomato sandwich that you ate for lunch. Unfortunately many of the native bees face an unsure future.
What’s the big buzz about Bumble bees?
Could there be a better bee than our humble Bumble?
A tireless worker that really does not get the credit it deserves. While the non-native honey bee gets the spotlight in the media and just about anywhere climate change comes up, our native Bumble Bee just keeps going about its business and getting the job done.
And quite the job it does.

The Humble Bumble Bee deserves a lot more credit for the work it does in our gardens and agricultural fields.
In case you are not aware, the Bumble bee is the one that brings those juicy tomatoes to your table. In fact, without them, there’s a good chance you wouldn’t be chowing down on that spaghetti or toasted tomato sandwich.
It’s the Bumble bee that is the primary pollinator of tomatoes, not the honey bee.
Why? you may ask.
Bumble bees, unlike honey bees, are capable of buzz pollination. The problem with pollinating tomatoes is the fact that on most flowers the pollen is located out on the end of a stalk on the anthers and easily accessed by most pollinators.
However, explains Paige Embry in her informative book Our Native Bees, “some flowers, including those of tomatoes, hide their pollen inside the anthers so it has to be shaken out. A Bumble bee does this by grabbing the flower in its mouth, curling its body around the anthers and rapidly contracting muscles in its throax, causing vibrations that shake the pollen right out of the tiny holes in the anthers, like shaking salt from a shaker. This activity makes a buzzing noise, and so, buzz pollination.”
So the next time you pick a tomato from your garden, you can thank our humble Bumble Bee.
For more on how we can help save our native bees, check out my story on making a lawn for native bees.

But most tomatoes these days are grown in greenhouses throughout the year. The challenge that faced commercial growers was how to pollinate these tomato plants in a greenhouse, in the winter when there are no Bumble bees around to get the job done.
Going back to 1891, scientists tried to unlock the secret to pollinating tomato plants without the Bumble bee, to very limited success.
Then, according to Embry: “in 1985, Roland de Jonghe a Belgian vet and bee enthusiast put all the bee rearing information together with the fact that a colony of Bumble bees could pollinate a greenhouse full of tomatoes way better than a bunch of people with vibrators or blowers. Since Bumble bee nests only last a few months, people would need new nests every year, and de Jonghe saw the business potential of those Bumble bees. In 1987, he started the first business rearing Bumble bees for commercial use. … By 2004 close to a million colonies of Bumble bees pollinated nearly 100,000 acres of greenhouse tomatoes worldwide, with an estimated value so large that I thought it was a typo accept it was written the same way twice. 12,000 million Euros (about $14 billion) per year.”
Okay, so we now we know the value of our native Bumble bees.
Let’s now take a closer look at these interesting, almost cuddly little creatures with the furry backs.
Do Bumble bees live in hives?
Bumblebees, of the genus Bombus, are common native bees and are important pollinators for many of our woodland wildflowers. Like honeybees, they are social and live in a hive, but one that is the fraction of the size of a honey bee colony – think hundreds rather than thousands.
How many different types of Bumble bees exist?
In the United States alone there are 49 species of these native bees, separated into three different classes depending on the length of their proboscis, or tongue – short, medium, and long. The length of their proboscis will help dictate which species pollinates the various flowers, although some short-tongued Bumble bees have come up with an ingenious way to feed on Long-tube flowers by biting holes in the flowers near the nectar source and feeding through the hole.

Are Bumble bees threatened?
According to the United States Forest Service, Bumblebees have become a conservation issue, resulting from habitat fragmentation caused primarily by human activities, the use of pesticides, as well as disease transmission and the loss of native floral resources.
In the U.S., just in the past few years, two species of Bumblebees have likely gone extinct: Franklin’s bumblebee (Bombus franklini) originally found in a restricted geographic range from southwest Oregon to northwest California; and another species from the eastern United States, which was once found from Canada to North Carolina.
In Ontario alone, there are three at-risk bumble bee species: Rusty-patched (Bombus afinis), Gypsy Cuckoo (Bombus bohemicus) and Yellow-banded (Bombus terricola).
Where do Bumble bees live?
Bumble bees, like most native bees, are primarily ground nesting bees. In spring, the queens begin to emerge from underground where they have spent the winter, and begin to look for a nest site, which can include an already existing but abandoned mouse or rodent burrow.
Bumblebees visit flowers where they feed on the the nectar and pollen. Once their eggs have hatched, they use the plant resources to feed larval worker bees. Unlike honey bees that store large quantities of honey in order to survive winter, Bumble bees may use empty cocoons for short-term storage of nectar.
In a single summer, the Bumble bee queen produces a few generations of workers, which then take over the task of collecting nectar and pollen and help rear the final generation of the colony, which includes queens for the next summer, and males to mate with them.
The colony has all but died out by late fall. All that remains is a few workers and males, as well as the the new queens. These bees burrow into the ground to wait out the cold winter to, once again, begin the process the following spring.
How can we help Bumble bees?
There are reasons you often see native gardeners promoting the practise of leaving your leaves where they fall to help insects and other fauna survive winter.
Well the Bumble bee is a good case in point. Queen Bumble bees overwinter in our gardens in underground burrows and the leaf cover provides protection and helps hold in heat that is vital to their survival.
Check out my earlier post on Why We Need to Leave Our Leaves.
So, in addition to leaving your leaves on the ground in the fall and over the winter, it is also important to provide the native bees with plenty of fall flowers, especially native plants like asters and goldenrods. These late blooming plants are an important food source to enable next year’s queen bees to build up stores of food to last them through the winter in their dormant state.
In addition, refrain from digging up your gardens in early spring to allow the queen bumble bees to leave their underground burrows and begin their new hives.

Macro photography: How to get up close for flower and insect photos
Garden macro photography can open up a whole new world and getting good images have never been easier. Here are some tips on capturing more intimate scenes, from flower closeups to butterflies and other insects that call your garden home.

This image of Aphids on a milkweed plant is a fascinating study in nature. If you look close you can see ants “farming” the aphids while two lady bugs wait in the wings to devour the aphids. These are the fascinating images that macro photography offers photographers.
You don’t need expensive equipment to get great garden and flower close-up shots
Getting up close and personal to flowers and insects in the garden can be an eye opening experience.
Even on the worst of days, when the flowers look spent, the trees are tired and the unbearable heat saps the energy out of any hopes of capturing a beautiful image, there is always macro or closeup photography.
Somewhere out there in the garden – probably very close by – is an insect, a butterfly, a tiny flower, maybe a mushroom just begging to be photographed. And, depending on your expectations, capturing these images is not really difficult. Close-up images are available with almost every camera including more inexpensive compact, point-and-shoot cameras. If you have never used the closeup/macro mode, I encourage you to give it a try.
Closeup photography will open an entire new world to you that maybe you never knew even existed in your garden. The impressive colours in a beetle, the incredible detail of the wings on the butterfly, the daily life-and-death-struggle that largely goes unnoticed in the garden – all open up to us as we move in close.
For more on photographing flowers in your garden, check out my comprehensive post on flower photography in your garden.
For more on garden photography, be sure to check out my Ten tips for Great Garden Photography.
If you are looking to purchase a new or used camera, Check out my article on The Best Camera and Lens for garden photography.
If you are looking to upgrade your equipment, be sure to check out KEH Camera Exchange for excellent prices on used gear. You can also trade in your old gear to help you purchase new gear.
And, if you are wondering how a point-and-shoot digital camera that’s more than 10 years old can perform in the garden, be sure to check out my post on the Canon PowerShot Elph 500 HS.
If most of your garden images are pictorial approaches showing wide vistas of flower beds probably taken with a wide angle lens, or, even more intimate vignettes of groupings of flowers and maybe a birdbath, you owe it to yourself to experiment with macro or closeup photography.
Macro/closeup photography enables you to tell a whole new story in your garden. If you think there are no more images to be taken in the garden, think again.
If you are looking for more information on taking closeup or macro images in the garden, be sure to check out Kelbyone’s many online photography courses.

This native Bumble Bee on salvia was photographed with a manual focus 105mm macro lens on a 20-year-old DSLR camera with a flash equipped with a small, inexpensive flash mini softbox.
The image of aphids and ladybugs on the milkweed is a perfect example of the everyday struggle in our gardens that is easy to overlook. I was on my hands and knees trying to find a monarch caterpillar to photograph when I saw the scene playing out under the leaves of the milkweed. The scene would have gone completely unnoticed if I was not looking for close-up images down low in the garden.
What equipment is needed to shoot garden macro photography
Don’t get confused by the terms macro or closeup photography. Macro technically means getting so close that you photograph your subject at lifesize or 1:1. Closeup photography is simply getting in close enough to your subject to create an image that satisfies you. For example, neither a monarch butterfly, nor a large dahlia, need to be shot at life size for an effective closeup image.
For true macro, a specialized lens or accessories are needed. Most of today’s compact cameras come equipped with a closeup setting that allows you to photograph flowers, butterflies and insects up close.

A macro lens shot wide open probably at f2.8 creates this lovely soft background in this flower photography image. This effect would be difficult to achieve with a compact lens set on close focus.
In the image of the ladybugs and aphids, it certainly helped that I had my macro setup with me that included a DSLR, a manual focus 105mm manual focus macro lens and a flash equipped with a mini-softbox attached to soften the light. Although I consider this setup my more “serious” macro setup, the DSLR is 20 years old, the lens is at least 22 years old and even the flash is an older model. I shoot it all on manual – manual exposure, manual focus. Nothing fancy here.

This is an example of the images that are possible with a high-end point-and-shoot on macro mode. This Bee balm was photographed using the FujiX10 compact camera with a 28mm-110mm (in 35mm terms). Notice the soft background that is made possible by the speed of this outstanding lens.
Garden photographers may not want to invest in a more “serious” macro setup like this. No problem. Chances are you already have a perfectly useable closeup or macro lens on your compact point-and-shoot, travel, or bridge camera. Even your smartphone has the capability of getting up close to most subjects you will want to photograph.
Check out this link for my ten-year-review of the Fujifilm X10 that I used to take the Bee balm image above.
If you are looking to upgrade your camera equipment, be sure to check out the excellent equipment at KEH Camera Exchange. You can also trade in your gear to make the upgrade even less expensive.
The important factor is getting comfortable with using these features on your camera and learning to work with light to capture interesting images. Macro photography is no different than any other types of photography in that light is the key component to capturing interesting images. Harsh, mid-day light may not be the best time to photograph.

This Iris was again shot with a 100mm macro lens to give an extreme closeup. The size of the flower means it could have been photographed with many close focusing compact cameras possibly equipped with a closeup filter accessory.
Digital has changed the world of macro photography
If you are like me and struggled to obtain usable macro images during the film years, you might be surprised how digital has completely changed the approach to macro or closeup photography.
In my film years, I would not have thought of shooting closeup or macro images without the use of a tripod. The combination of wind blowing the subject around and film sporting ISO settings of 25 (Kodachrome), 50 (Velvia), made getting good macro images a real challenge.
Impossible without a tripod.

A monarch feeds on a thistle in late summer. Capturing these images takes time and patience but are beautiful natural snapshots in time.
Today’s modern cameras allow you to pump up the ISO to astronomical levels and still get excellent results without lugging around a tripod.
In fact, if you are shooting with a Fuji camera, you can shoot the digital equivalent of Fuji Velvia at pretty much any ISO you like. Even “Kodachrome”, which Fuji calls classic chrome, can be photographed at pretty much any ISO you like. That’s a far cry from using the ridiculously low ISO settings of ISO 50-64 for the original slide films.
ISO levels of between 1600-3200 would be unthinkable during the Kodachrome and Fujichrome years. Today, these ISO levels can be starting points for many of today’s modern cameras, especially if you use software like On1 NoNoise to reduce the noise in your images.
I like to stay below ISO 1000, but shoot as low as 200 ISO if given the opportunity and when I use flash.
What does all this mean to the garden photographer?
It means you can grab your compact camera, set it on closeup mode and get excellent hand-held images of a butterfly, or a closeup of your favourite flower in full bloom.
With a little more planning, you can set up a tripod beside your favourite flower, move in close and wait for a butterfly or insect to come land on it.

In this macro image you can see the extremely limited depth of field resulting from using the lens wide open (f2.8) with only the eyes being in focus. Today’s modern cameras offer “focus-stacking” which allows the maker to take several images focusing in different areas of the subject and then blending them together to make the entire subject tack sharp.
Modern technology has even made firing the camera from a distance with a wireless remote a whole lot easier. Heck, with some cameras, (a Lumix for example) you can even trigger it with an app on your cell phone while you’re sipping on a glass of wine or your morning coffee 10 feet away from the camera.
Times have certainly changed for today’s photographers wanting to add macro or closeup photography to their arsenal. All we gardeners need to do is take advantage of what today’s modern cameras and lenses offer us.
What accessories are good for garden macro photography?
As noted above, excellent macro images can be taken on anything from a good compact point-and-shoot camera with its built-in lens, to a modern high-end DSLR or mirrorless camera equipped with an expensive macro lens that enables extremely fine detail and close approach.
The quality of the image and your success rate will generally increase in direct proportion to the amount of money you invest in the equipment, but don’t let that stop you from getting the most out of the equipment you already have in your bag.
There are, however, accessories you can add to improve your results significantly no matter what equipment you are using.
• A good off-camera flash, for example, goes a long way to opening up possibilities in the macro world. I’ve added an attachment from Fotodiox that goes over the flash to create a mini soft box. This combination has certainly improved my macro images.
• Small LED lights, like this one from B&H Photo are another example of how technology has changed the world of macro photography. These small, battery powered lights that fit in the palm of your hand, provides a continuous light source that is easily manipulated around the subject even as you are looking through the camera.
• Similar to the LED lights mentioned above, is the Godox RING48 Macro Ring LED Light that fits around most lenses a provides perfect, but controllable light.
• Collapsible reflectors, like these from B&H photo, are available in gold, silver and white, and allow you to reflect light into dark areas of the image.
• Closeup lenses, like this kit made by Lensbaby at B&H Photo that thread on to the front of your lens are an easy way to turn any lens into a close focusing lens. I like to use one of these on the Fujifilm X10 which, although the camera already has an excellent close-focusing capability, only gets better with the Nikon close-up filter.
• Extension tubes can only be used on cameras with interchangeable lenses. Extension tubes like these at Adorama photography have no glass elements inside of them, are inexpensive and do not degrade image quality. Their prime duty is to allow any lens to focus more closely. That makes them a useful addition whether you are using a 50mm or a longer telephoto lens. Using them with a telephoto lens is exceptionally helpful to allow you to get images of small subjects from a distance.
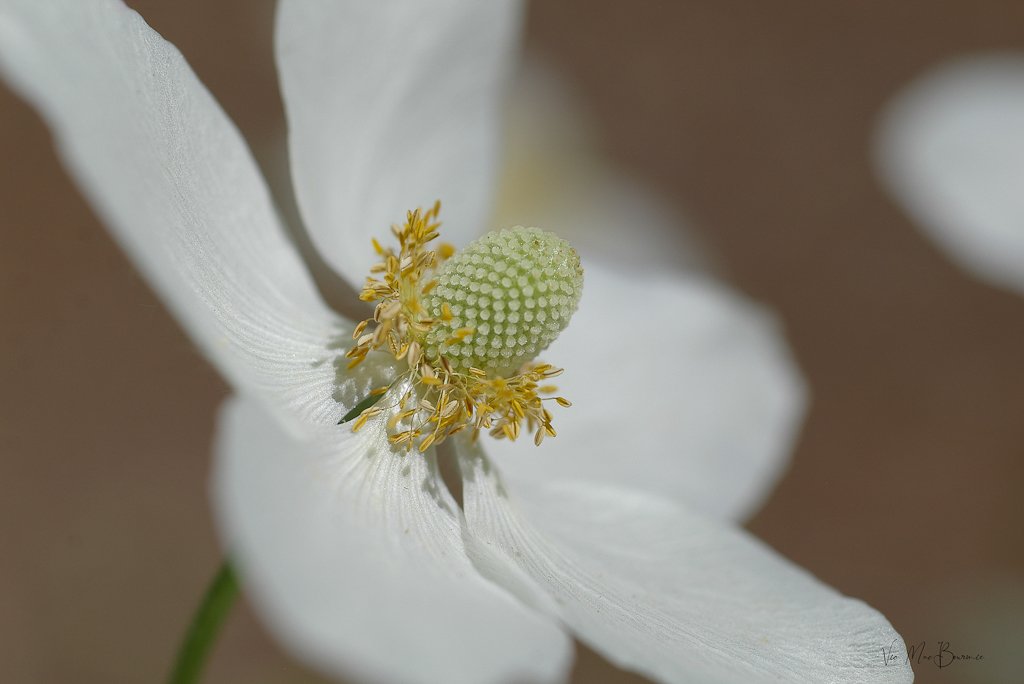
An up close macro image of this native bloodroot provides details that easily go unnoticed by the naked eye.
Just get out in the garden and give macro a try
There was a time when macro was a specialized area of photography. It involved expensive lenses and approaches that required meticulous attention to detail and exposure. That’s no longer the case. Getting great shots of your garden up close has never been easier with today’s modern cameras and accessories.
Take a few mornings to wander through the garden and catch the light skipping across your favourite flowers. Move in on the insect waiting for the sun to raise the temperature enough for it to begin its day.
Focus on what you want to capture up close in your garden and consider adding accessories that make it possible to capture those images. Close-up photography can open up a new world for you and hep you become much more intimate with your garden and the critters who call it home.

The Garden pond vs. Container pond
A garden pond is likely the single most beneficial act you could do to attract wildlife to your backyard, but not everyone wants to make that commitment. An alternative is to use a garden container pond which brings water into the yard and allows you to grow many of the plants that woul grow in a pond.
Adding water offers opportunities to grow new plants
Everyone loves a little water in the garden, but not everyone wants a full fledged garden pond.
For some, it’s the potential danger a pond might pose to children or grandchildren. For others, it’s the perceived maintenance a full in-ground pond requires to keep it looking and performing its best that convinces them not to install a garden pond.
No matter large, small or simply in a container, a natural pond will transform your garden probably more than anything else you can add to your garden and attract more wildlife to your yard than you could ever imagine. Install it right, and it will perform and look spectacular for years to come with minimal maintenance. If it’s a container pond, lower your expectations, but don’t be surprised if you find yourself falling in love with your tiny container pond and the plants that call it home.
I would love a pond in our current backyard.
In fact, at our previous home, I installed a lovely little in-ground pond complete with a waterfalls. It was the focal point in a massive backyard DIY landscaping project that took an average suburban backyard surrounded by pools, outdoor decks and acres of grass, and installed an island of natural plantings. To say it was a magnet for backyard birds would be an understatement.

It’s difficult to not love the beauty of a water lily in a pond. The same lilies can be grown in a container pond.
Installing a backyard oasis
My little backyard oasis began soon after we moved into the home. I noticed the builder was digging up massive boulders around the neighbourhood and looking to get rid of them. I was more than happy to take them and asked him to drop them in a corner of the yard. The massive boulders weighed close to a ton but through a series of levers and a whole lot of muscle (which I had back then) I was able to manipulate the boulders into a semi circle that became the perfect little secret garden in corner of the yard.
The circle of boulders in the corner of the yard became the “source” of the perceived water that would eventually run along a dry river bed surrounded by birch trees and grasses before flowing over some rocks and spilling over a small waterfall into a pond.

The recirculating waterfalls helped keep mosquitoes at bay and the moving water created sound in the yard to drown out much of the typical noise related to suburban gardens. Fish and frogs were added to the pond that eventually resulted in more fish and tadpoles and frogs. Insects, dragonflies and lots of birds visited the small pond in the middle of suburbia.
A full-sized pond really needs a proper combination of plants to keep it healthy and looking its best. The large pond needs a mix of plants including:
• Aquatics – a group of plants that have their roots submerged. Aquatics include water lilies, and lotuses as well as golden club, water hawthorn, and water violet.
• Floaters – plants include water lettuce and duckweed, which float on top of the water. This group of plants help reduce algae by blocking sunlight and competing for nutrients. Unfortunately, they also block you from seeing the water and can quickly overwhelm a smaller pond because they reproduce so quickly.
• Oxygenating – plants are mostly submerged, though it’s not unusual that part of them protrude above the water. Their ability to add oxygen to the water is particularly important if you include fish in the pond. Look for plants such as cabomba, anacharis and myriophyllum.
• Marginals – these plants take up residence in the shallower areas of the pond, along the edge or in the boggy area around the edge. They include both deep- and shallow-water plants and include cattails, forget-me-nots, sedges and rushes.
• Bog plants – These are the moisture-loving plants that thrive in extremely soggy soil and include Irises and sweet flag, ferns, astilbes as well as shrubs including dogwood varieties.
Container water gardens really only need a few of these plants to maintain a healthy balance. Most often an Aquatic plant like a water lily is combined with a few floaters like water hyacinth and an oxygenating plant.

Getting back to our former home and small pond. I truly loved that pond and was particularly proud of how it turned out. Eventually, I added a large overhead pergola with random flagstones that overlooked the pond. Large pines and cedars across the back increased the sense of being in a natural environment.
But there was no hiding the fact we were in the middle of suburbia.
So we moved.

The container pond is an option that can allow the gardener to grow plants they would not have been able to and attract wildlife at the same time.
Going from a garden pond to a container
In our current home, although I would love an in-ground pond, I knew that unless the pond was large and deep, it would be an ongoing battle with local wildlife to keep the pond from becoming a playground for racoons and other critters. I also did not want to fence off our large property partially for the cost, but more important, it would keep out much of the wildlife I was trying to attract to the yard.
Therefore, I settled for a patio pond container which I was able to find used on Kijiji . The pond involves almost zero maintenance but still gives me some of the benefits a full, on-ground pond brings to the landscape.
Let’s not kid ourselves, however, there is no comparison between an on-ground pond and a container pond.

I also installed a small DIY bubbling rock to give wildlife access to fresh water at ground level without the maintenance of a pond.
If you can and are willing to install a pond in your yard, I can guarantee that you will not regret it. I will add though, make the pond bigger than you think you want it. You will thank me later.
But, even a small pond will create an environment in the yard that is attractive to all types of fauna – frogs, toads, snakes and dragonflies – not to mention the birds and the mammals that will come to depend on the reliable source of water.
If you live in an area where winter brings freezing temperatures, keeping even a small area of the pond ice-free could become a lifesaver for a number of animals and birds. A small bubbling device is usually all it takes to keep an area of the pond ice free.
The benefits of a garden pond to area wildlife is undeniable, but for many it’s the ability to grow water plants and possibly even bog plants that make ponds and container ponds irresistible.

Marsh marigold, one of our native plants, are just one of the beautiful plants that can be grown in a bog area on the edge of a pond.
Water lilies in the garden
Water lilies (Nymphaea) are a good case in point.
In her informative book Natural Landscaping, Gardening With Nature To Create A Backyard Paradise, Sally Roth writes: “It’s amazing how satisfying even a tiny water garden can be. If you only have room for one plant, grow a water lily. They may seem costly when you compare the cost to perennials , but even the most common types are exquisite. A single water lily, partnered with a glimpse of dark, shining water, is a delight to the soul.”
Water lilies grow to between 3 and 6 inches tall and can spread out to between 4 and feet wide. Full sun will bring out more flowers which can vary in colour from blue, purple, yellow, red, white and even pink. Hardy waterlilies can survive in zones 4-10, whereas the tropical varieties, which often have larger flowers and a better range in colours, need to be brought in during winter or treated like annuals. The tropical varieties tend to be more fragrant and are available in day-blooming and night-blooming varieties. Hardy varieties only bloom during daylight hours.
I remember the first time a water lily bloomed in my pond. (see image below) That was an exciting time. Water lilies alone offer a wealth of possibilities for the gardener.

You don’t need a huge pond to grow one or two of the colourful flowers. Even a small pond will allow you to experience the joy of these plants.
But don’t think a large pond in the only way to grow a water lily. I have successfully grown them in my container pond.
What can you grow in a container pond?
Many of the plants that can be grown in a large on-ground pond can also be grown in a small patio container pond.
But, as Sally Roth writes in Natural Landscaping: “The biggest problem with container water gardens is that they’re too small. Water plants move faster than Napolean, an their aim is the same – to expand theri empire. Even if you choose well-mannered plants, you’ll soon run out of room for more than a few. What to do with the rest? If you are still not ready to install a pool, try a metal horse trough,” she explains.
She suggests painting it black with a can of matte-finish spray paint. I’m not sure how that would look in every garden but it certainly would give you the room to grow more plants.
Unlike a traditional pond, our container pond is always emptied at the end of the season. Mine is concrete based so leaving it full all winter could result in damage. I empty the container, turn it over for the winter, and refill it in the spring.
I try to store the plants over the winter from year to year. Some survive the winter in the shed, others do not and must be purchased each year. The good news is that the container is small and takes just a few plants to fill it up.

Duckweed and Water hyacinth help to quickly cover the pond and create shade which helps to keep the water free of algae.
Besides water lilies, I always grow Water hyacinth, (Eichhornia crassipes) whose roots help to keep the water clear and whose purple blooms can be stunning in the container pond.
Ruffled Water Lettuce (Pistia Stratiotes), Water Mint (Mentha aquatica), Corkscrew Rush (Juncus spiralis), Creeping Jenny (Lysimachia nummularia) and Pitcher Plants (Sarracenia spp.) are some of the best plants for containers as suggested by the website Pondinformer.
Build a bog garden for the ultimate in plant varieties
A bog garden is the ideal addition to a backyard pond, but it can also be installed in isolation by using a perforated plastic liner that holds water for an extended period of time and keeps the soil moist (almost wet).
Better still, if you have an area in the garden that stays wet just plant bog plants and let them take care of the wet area of the garden. Consider adding Cardinal flower for a dramatic effect and lots of hummingbirds and pollinators. The bog garden opens up a whole new world of opportunities.
Marsh Marigold is a local native plant that also does well in a bog garden. Also consider plants like the Ligularia with its tall yellow spikes.
Staying in the yellow family, Iris pseudacorus ‘Variegata’ can be a good choice.
Another plant to consider if the bog area is large, includes Cornus Alba a dogwood shrub with bright red stems.
Conclusion: Be sure to include a pond in your garden
A good size garden pond is an outstanding addition to any garden and one that will likely change the relationship you have with your backyard. The wildlife that the pond will bring into the landscape, the new plants and the movement the pond creates is difficult to overlook.
For the most part, the ponds are too shallow to pose serious danger to older children. My first pond was installed when my daughter was about six years old. The pond quickly became a hit in the neighbourhood with my daughter’s friends who took turns searching for the frogs, fish and other wildlife. Rather than being looked at as only a danger to children, consider them like an outdoor science classroom and an incredible learning experience for our children and grandchildren.
And, if the pond makes you too uncomfortable, consider the benefits of a container pond, which offers many of the same benefits a full-fledged pond brings.
Either way, a pond will be a great addition to your deck, patio or even in a corner of the yard where you enjoy taking in the early morning sun.

McGee & Co. brings indoor style to the garden
McGee & Co. take home and garden decor to new heights in their impressive on-line marketplace. A little elegance, a touch of rustic and some fine house decor add up to year-round inspiration.
Gift, design and accessory ideas for the home and garden
If the name Shea McGee is unfamiliar to you, it may be time to become familiar with this outstanding young designer. Her decor style is comfortable, cosy and yet has a nice touch of modern that easily transitions into today’s most beautiful home decor style whether its indoors or in the garden.
I first discovered her on the company’s YouTube channel, but it wasn’t long before her decorating show was picked up by Netflix. Good news for Netflix subscribers and Shea lovers, the second season of shows were just picked up by Netflix.
Her Southwest roots brings a style to her work that makes the transition from inside the home to the outdoor garden totally seemless.

Shea McGee brings timeless decor design to the home and garden. Now Ferns & Feathers readers can enjoy discounts from Shea’s impressive on-line market.
So, it’s no surprise that McGee and Co. markets an outdoor line of garden decor elements ranging from beautiful garden pots and other accessories, to outdoor rugs and furniture, to incredible exterior lights that bring an elegance to the garden. Her indoor accessories are also beautiful, but we’ll focus on the garden.
Take a moment to browse through her extensive lineup of beautiful outdoor decor and garden items. Her decor elements are meant for the most distinguished and elegant garden rooms and patios, but even if you are not a buyer, we can all be inspired by the exceptional offerings.
The small, handheld garden shovel is a just one example of the exquisite garden tools that, in themselves, worthy of hanging on a wall of the most luxurious she shed.
“With quality and craftsmanship, we bring beauty into everyday spaces. Our collections of furnishings and decor inspire you to live well.”

The McGee & Co website greeting says it all: “With quality and craftsmanship, we bring beauty into everyday spaces. Our collections of furnishings and decor inspire you to live well.”
In my mind, living well begins in the garden and McGee & Co. has that covered. Below are three garden utensils that are exquisitely made and have a made-to-last look and feel to them.
Click on the images below to get information on the items.


Let me introduce you to a few of my favourites. Unfortunately, at this time, McGee & Co. does not ship any large goods outside the United States. They did inform me that they will ship smaller items such as pillows outside the U.S.
We’ll start with some small items and go from there.

These brass garden tags add a sophistication to any container planter while helping forgetful gardeners remember what was planted. They make perfect gifts for gardening friends, but order two sets to make sure you have a set for yourself. This year, for example, I planted a number of natives from Ontario Native Plants and I can’t remember what I planted where. When the flowers come out, I’ll know what’s what, but in the meantime the tags would help and look good in the process.

The striped, handmade Clay Planter is just an example of the many containers available (see below image for more). These containers are a good example of the simple rustic style that is so prominent in Shea McGee’s decor style.
Again, simple elegance takes centre stage in these Striped Clay Planters finished with a coloured glaze to create this rustic look that is perfect, in its inperfection. McGee & Co. say the material is not entirely waterproof and recommend adding a saucer or using an insert to prevent damage. I can see the pieces taking on a mossy look over time if they were simply filled with soil and allowed to age gracefully.
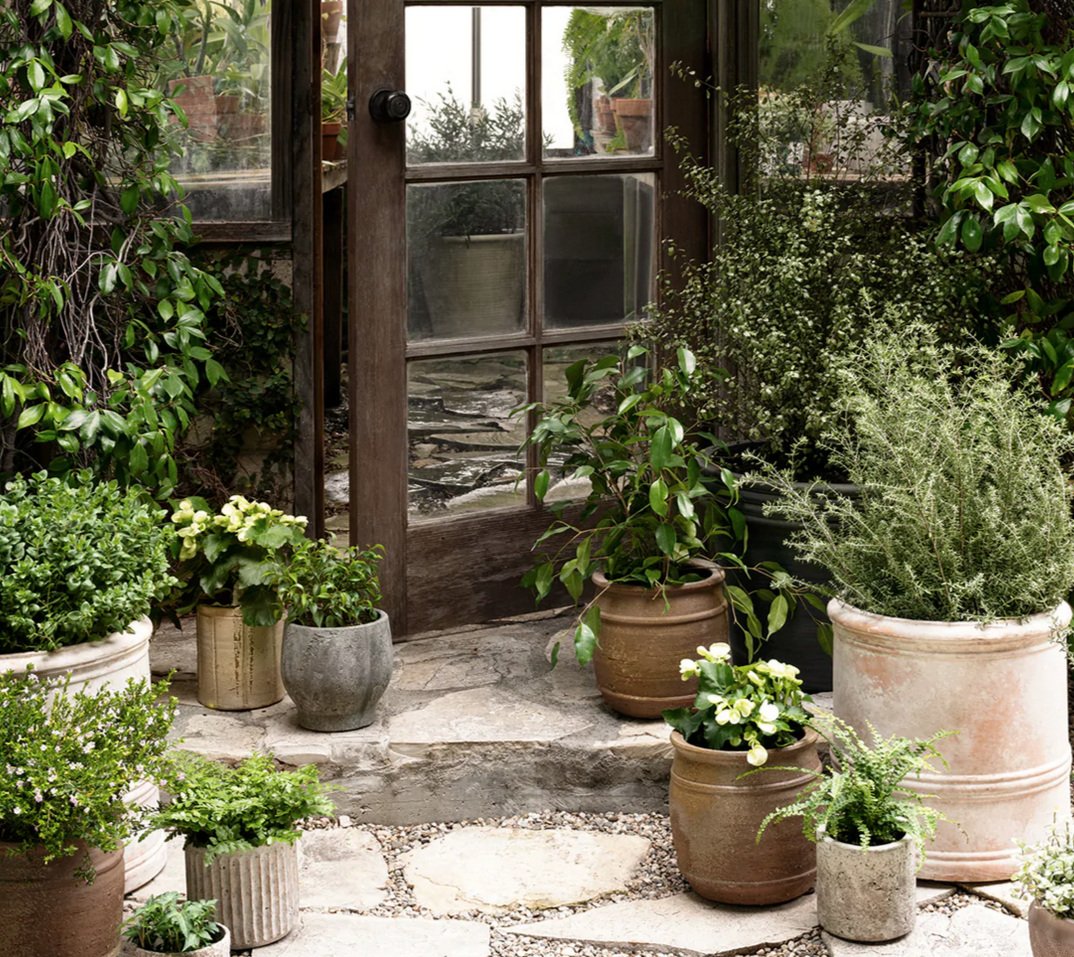
If you are in love with rustic pots be warned. McGee & Co.’s selection of charming, rustic pots are hard to ignore. Imagine a collection like these gracing your patio or front entrance? Spend a few moments on their site exploring various combinations that the on-line store offers.

These Wood-handled-secateurs are another example of combining beauty in an item that looks as good in your hand as it does on the patio table. If you are like me, having these handy for a quick Chelsey chop is important when you just can’t let it go until tomorrow. The secateurs are just an example of the outdoor accessories available on the website store.

The Hamlet Hanging Chair just might be the perfect spot for a morning coffee or evening glass of wine. It’s an example of bringing the indoors outdoors. McGee & Co. describe it as “an intricately woven rattan design, that is crafted from a semi-sanded frame and natural Kubu Core. Providing extra seating from kids rooms to outdoor covered spaces, this unique and eclectic chair envelops you with its rounded form and comfortably soft cushion.
Finally, no backyard is complete without a comfortable spot to settle into with a glass of wine, the birds and a cool breeze rustling through the leaves. McGee & Co. offers a line of outdoor furniture that brings style and elegance into the garden, sun room or patio. Whether you are in the market for outdoor furniture or just looking to add a piece or two, these designs are certainly an inspiration.
Fujifilm’s travel cameras are capable of impressive results whether you are travelling the world or just wandering into your garden for a day of flower or wildlife photography.