
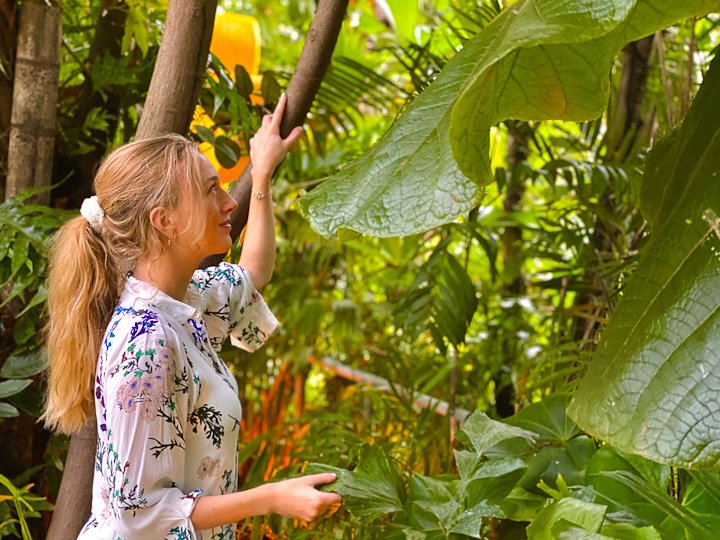
The Internet of Nature: How technology could shape our urban forests of the future
Dr. Nadina Galle and her work with the Internet of Nature uses technology to shape the future of the urban forest. The Canadian born former Fulbright scholar and MIT researcher now at the University of Amsterdam uses ground sensors and satellite imagery among other technologies to help cities monitor, care for and protect the urban forest to provide a better place for people to live in future.
New book, Nature of Our Cities, celebrates optimism in the midst of a changing planet
Dr. Nadina Galle may have got her “eureka moment” at the age of 12, but it took the release of her first book, The Nature of Our Cities, in June, 2024 to bring the “moment” into focus.

Dr. Galle’s first book promises to change the way we look at our urban spaces.
Terrified, at age 12, after watching a Canadian documentary called The End of Suburbia, she worried that the lifestyle she enjoyed growing up in a Canadian suburb in Waterloo, Ont., would eventually lead to the “collapse of the society (she) was born into.”
She remembers a happy childhood playing with her friends in their big, grass-filled backyards. It was a lifestyle, however, that even at an early age, she realized had its flaws.
“At the age of 12, I decided it would become my life’s mission to build better places for people to live,” Dr. Galle explains in her highly entertaining and informative TEDx talk.
“Gardeners, more than anyone, understand the intimate relationship between people and nature. This book offers them new, exciting tools—from AI-powered sensors that water newly planted seedlings to intelligent water gardens that mitigate floods—that can help anyone get involved in transforming where they live into resilient, vibrant ecosystems”
“Born in the Netherlands and raised in Canada, I developed my love for the outdoors and my commitment to conserving nature from a young age. Reading works by Jane Jacobs and James Howard Kunstler as a teenager, I questioned the imbalance between nature and the encroaching urban sprawl I saw around me in suburban Canada,” explains the former Fulbright scholar and MIT researcher.

Dr. Nadina Galle is at the forefront of using smart technology to protect the urban forest.
Today, Dr. Galle is working at the forefront of smart nature-based solutions, exploring how technology can transform the way we care for our natural urban environment. Her website The Internet of Nature is a treasure trove of information about how technology can benefit the urban forest including links to her cutting-edge podcasts.
“At the age of 12. I decided it would become my life’s mission to build better places for people to live.”
On her quest to build better places for people to live, she studied ecology, evolutionary biology, earth sciences, and eventually went on to earn a PhD in Ecological Engineering. In her fascinating TEDx Talk, she defines Ecological Engineering as the “design of sustainable ecosystems that integrate human society with its natural environment for the benefit of both.”
Remember that inquisitive, yet terrified little 12-year-old girl’s promise to herself?
Well, her lifelong pursuit of learning eventually led her to her PhD in Ecological Engineering at MIT and University College Dublin and what has emerged is what she calls “Internet of Nature.”
If that is not enough, Dr. Galle has just released her first book: The Nature of our Cities, Harnessing the Power of The Natural World to Survive a Changing Planet.
The 304-page book explores how innovators from around the world are combining urban nature with emerging technologies, to protect the planet’s cities from the effects of climate change and safeguarding the health of their inhabitants.
Dr. Galle explains in the book’s promotional material: We live in an age when humanity spends 90% of its time indoors, yet the nature around us—especially in America’s cities—has never been more vital. This distancing from nature has sparked crises in mental health, longevity, and hope for the next generation, while also heightening the risks we face from historic floods, heatwaves, and wildfires. Indeed, embracing nature holds untapped potential to strengthen and fortify our cities, suburbs, and towns, providing solutions spanning flood preparation, wildfire management, and promoting longevity. As ecological engineer Dr. Galle argues, nature is our most critical infrastructure for tackling the climate crisis. It just needs a little help.
What does all this mean to us urban and rural woodland gardeners?
Dr. Galle says Ferns & Feathers readers will appreciate her book on a number of levels.
“Gardeners, more than anyone, understand the intimate relationship between people and nature. This book offers them new, exciting tools—from AI-powered sensors that water newly planted seedlings to intelligent water gardens that mitigate floods—that can help anyone get involved in transforming where they live into resilient, vibrant ecosystems,” Dr. Galle told me.
• To order a copy of Dr. Galle’s book from Amazon, go here.
How gardeners can help protect the urban forest?
What does all this mean to the average woodland/wildlife gardener, or simply the urban homeowner living with a typical yard?
It means that although we gardeners may think of our gardens as ours alone to enjoy and experience, they are actually part of a much larger environment that makes up the urban forest – a forest that in most urban areas around the globe is under severe threat from natural (climate change) and human intervention.
Irish garden designer and author Mary Reynolds promotes this approach to natural gardening in her book The Garden Awakening where she advocates for homeowners to consider their properties like “natural arks” that form smaller islands of nature that can join together to provide much larger islands of native plants, trees and natural environments. (You can explore her approach further in my article about her work here).
This approach to urban gardening also means that traditional thinking probably has to change to ensure that our urban forests provide us with the natural environment so many of us depend on for our future well being. If the Covid-19 pandemic has taught us anything, it has made us more aware of the importance of green spaces and the natural environment to our own well being.
Protecting the urban forest has never been more important
The very fact trees sequester carbon is reason enough to plant as many new trees as possible. However, it’s been proven that older, existing trees (and their soils!) are even more effective at sequestering carbon, so ensuring their protection and continued health in our urban areas is vitally important.
Every year the urban forest is under greater threat, Dr. Galle explains in her TEDx Talk. This is hammered home by the fact that every week approximately 3 million people move (or are forced to move) to cities around the globe.
“Everyone is talking about how many people are moving to cities, but no one is talking about what kind of life they will live once they move there,” she explains.
How we protect the urban forest in the future is what Dr. Galle wants to change, and she wants technology to be leading the way. (More on that later in the article. First it’s important to understand our role as gardeners and homeowners in the whole process.)
“Roughly 50-70 per cent of the urban forest in any given city is on private/homeowner land, which means only 30-50 per cent is actually in the maintenance area of the city,” Dr. Galle explains via email to Ferns & Feathers from her home in the Netherlands.
“This is crucial because it shows the massive role homeowners can have in the development and longevity of the urban forest.”
An important point author Peter Wohlleben makes in his NYT best selling book The Hidden Life of Trees, (link to an earlier article on the book) and one that Dr. Galle echoes in her writings and talks, is that a tree planted in the heart of an urban landscape has a typical lifespan of a mere 7-30 years. The same tree planted in a natural forest can easily live to 100 years and considerably more given the right conditions.
Dr. Galle has even identified Wohlleben and the UBC forest ecologist, Dr. Suzanne Simard, whom he covers extensively in his book, The Hidden Life of Trees, as a major influence in her work, particularly research on how trees communicate through underground fungi that can connect to the roots of other trees (and plants) to create what’s called a mycorrhizal network. A mycorrhizal network can influence the survival, growth, health, and behavior of the trees linked within its extensive network or community. Trees use their network to not only communicate, but to share resources, often stemming from the resources of the “Mother Tree”, the most connected tree in the network.
This underground network, Dr. Galle emphasizes, needs to not only be protected through proper watering, fertilization and care, but encouraged to branch out in urban environments whenever possible. Success will depend on a multitude of factors including the cooperation of individual homeowners to protect the trees on their properties.
How valuable is a single tree on your property?
In fact, in his follow-up book The Heartbeat of Trees, Wohlleben gives an example of how a study conducted by Chicago University researchers found that a single tree planted on the lawn of an urban property can increase the benefits to the homeowner by the equivalent of an annual pay increase of $10,000. The study, conducted with thousands of Toronto, Canada residents, also showed that two trees planted in the front could provide the health and well-being benefits equal to an annual income increase of $20,000.
If this doesn’t convince homeowners of the importance of maintaining their own trees in their front yards, it’s hard to imagine what will.
“Most homeowners don’t realize the trees on their land (may be) protected by a private tree ordinance, meaning you can only cut down trees (even when you own the land!) with a permit,” Dr. Galle explains. “Otherwise, you can be fined, or even jailed (though I doubt that’s ever happened).”
“Many cities, like Santa Monica, for example,currently don’t have private tree ordinances, but after remote sensing analysis revealed they’d lost 20-30 per cent canopy cover on private residences in just a few short years, they’re rapidly trying to instate a private tree ordinance. Otherwise, there will be no urban forest left!" says Dr. Galle. (Readers can learn more about Santa Monica’s urban forester and his struggles to maintain its urban forest in a S2E10 of the Internet of Nature Podcast here.)
How can homeowners preserve and protect their trees?
Dr. Galle recommends four ways homeowners can preserve their trees and do their part to ensure the longevity of the urban forest.
• Understand your trees: use a tree identification app to understand what grows around you and learn as much as you can about them and their history.
• Don’t cut down your trees unless absolutely necessary. If you must cut a tree down, replant smartly, meaning planting native trees that will thrive in that location.
• Water your trees when it’s hot and dry, and use a sensor to help you understand when and how much water you have provided the tree so you don’t over water, which can also be dangerous to the tree.
• Find and invest in a good local arborist for regular tree health inspections. Regular inspections of your trees will help to keep you, your property, and the tree safe.
How technology can help protect the urban forest
Protecting individual trees is certainly a step in the right direction, but Dr. Galle is more focused on protecting the entire urban forest.
It’s obviously a momentous task that, up until recently, was often the primary responsibility of city planners, work crews and arborists working tirelessly to provide what they thought the trees, plants and wildlife needed to prosper.
What Dr. Galle and her co-researchers found after talking to these critical workers at the frontlines of urban forest protection is that they really did not know what was needed to protect the urban forest in its entirety. Their expertise certainly guided them in the right direction, but specific day-to-day, week-to-week, season-to-season evidence was sorely missing.
The result: Protecting the urban forest was, at least to some extent, a guessing game and climate change is making guessing that much more difficult.
So, Dr. Galle began to ask: “What if technology could step in where Earth’s biological communications networks have been altered and disrupted?”
And so, the Internet of Nature (IoN) was born.
What is the Internet of Nature?
Working with scientists, researchers and companies around the world – including Canada, the U.S., Australia, China, and across Europe – Dr. Galle is developing a multifaceted approach to monitoring the health of our urban forests through technology: more specifically the internet.
“After seeing both the ‘Smart City’ and ‘Green City’ agendas gain popularity, irrespective of one another, I began to explore ways to integrate these precision methods to build greener and smarter cities, she explains in an interview with the Amsterdam International Water Web,.
Dr. Galle explains that “The Internet of Nature (IoN) makes use of emerging technologies, like sensors, satellite imagery, computer algorithms, and many more, to represent urban ecosystems and turn green spaces into data that helps us better understand how to manage them.”
She goes on to explain that: “It doesn’t only collect data to help monitor these important spaces, but also reconnect city dwellers to nature — and better understand how people feel about it.”
“In my research and work, I have experimented with sensors, satellite and drone images, online reviews, big data, plant ID apps, and many more, to find the best ways to measure and monitor urban nature. From that, the Internet of Nature arose, helping us monitor nature, but also reconnect people to the greenery at their doorstep.”
As part of her lifelong ambition to provide healthier and better places for people to live, Dr. Galle explains that IoN technologies have experimented with sentiment analysis to mine citizen opinion of green space by training a computer to ‘decipher’ online reviews, interaction and engagement rates. “This way we learn more about how people experience green spaces.”
Sentiment analysis algorithms would, for example, enable cities to help establish how people feel about certain urban green spaces including parks compared to more natural areas based on reviews left on sites like TripAdvisor, or on-line questionnaires.

Information gathered from underground sensors is sent to an ipad where moisture and other factors can be monitored to help protect the trees in the area. Photo courtesy of Soilmania.
How sensors play a role in protecting trees?
By using electronic IoT sensors designed and built in the Netherlands by SoilMania, scientists and arborists are able to monitor tree’s needs, stresses and environment at any time through a computer and even apps on a phone. This information can then be extrapolated to all the trees in a given area and solutions provided to protect them.
SoilMania, founded only four years ago, is already being used on crops, fields and greenhouses; on golf courses and sports fields; as well as in public and green areas including entire cities to monitor the needs of the urban forest.
It may be nothing more than providing information telling arborists when a tree needs deep watering. The in-ground sensor will also tell workers exactly how much water and or fertilizer the trees need and provide information about how much water has reached the trees’ roots.
Sensors are even able to monitor, for example, the salt in the soil around a tree’s roots that can build up as cities continue to spread salt on roads during winter months. If salt levels build to dangerous levels, the company even provides a solution to bind with the salt or other toxic elements to neutralize them before it can damage the tree. The method has already prevented hundreds of untimely tree deaths related to salt damage.
During her time at MIT’s Senseable City Lab, she was interested in seeing if there was microbial activity in the soil around inner-city “street trees” using sensors to detect the activity and therefore the health of the tree.
This research also led to the possibility of using remote sensing technology through satellite imagery. “I’m particularly interested in hyperspectral imagery” that can pick up on vegetation and the health of vegetation in minute detail from satellites that are able to orbit the earth twice in a single day. Although such imagery is already being used in agriculture and forestry, significantly improved resolution now enables scientists and arborists to actually “measure the health of individual trees.

Information is gathered by the tree sensors and sent via cloud computing to computers to monitor soil around a tree or group of trees roots. Provided courtesy of Soilmania
In conclusion
Dr. Galle’s childhood dream of creating a better place for people to live continues to be a work in progress. Her commitment and dedication to achieving this goal has led her down a path of knowledge and academic excellence that is sure to end in success – exactly what that success entails is still yet to be written.
However, there are many barriers standing in the way – not the least the acceptance needed of how technology can solve the problems large cities face when it comes to protecting urban forests.
Added to that is the continued damage inflicted on our urban forests by nature, climate change, and most importantly, homeowners who either don’t know, or worse, don’t respect the important part trees play in our lives.
The challenges are too many for any one person to tackle, but, with the power of the internet, maybe, just maybe Dr. Galle and her team can find those solutions.
Let’s hope so. Our lives may depend on it.

Author Profile: Vic MacBournie is a former journalist and author/owner of the award-winning website and newsletter Ferns & Feathers. He writes about his woodland wildlife garden that he has created over the past 25 years and enjoys sharing his garden photography with readers.
Garden mister is cool addition to your wildlife garden
A recent heat wave put the focus on ways we can help our garden visitors through these difficult times and a mister is the perfect choice.

A chipmunk climbs up near the mister on a particularly hot day during a heat wave.
A recent heat wave sweeping across major parts of North America has reminded me of the importance of adding water to the landscape, and a mister is certainly a cool addition to any wildlife garden.
I set mine up as soon as the heat started and let it run throughout the entire time that saw temperatures reach well into the 40s C or 110-114 F. The cool mist can be a lifesaver for small birds, mammals and even insects looking to escape the worst of the afternoon heat.
I picked up our mister many years ago from a local home store. They were advertising it as a way for humans to enjoy a cool mist while on their decks and patio, but I instantly thought of the hummingbirds who are attracted to bathing in fine mists as well as gentle sprinklers.
A hummingbird buzzes around near a feeder and our mister seen here protruding from the left of the image.
For more on providing water in the garden for wildlife, check out my other posts:
• Best bird baths for the wildlife garden.
• Why use a hanging bird bath.
• Tips for using water to attract birds and other wildlife.
Most misters are easy to set up by simply attaching your hose to the end of the hard plastic female coupler on the mister, which are often shaped in a way to allow it to stand up on its own. Ours includes two tiny brass mist nozzles that send a fine cool mist up into the air about to about two feet in height.
Even a slight breeze sends the mist softly flowing across the patio or deck. I admit that it works well whenever the breeze blows the mist in my direction.

This image shows the mister in action with the tiny brass nozzles.
I set ours up around our patio pond, which is also set up as a hummingbird haven with several hanging feeders and plants the hummingbirds are particularly attracted to including cuphea, salvias and nicotianas, just to name a few.
The plants get a nice soft watering in the heat and the water helps to keep our pond filled to the brim so that our resident chipmunks and squirrels have easy access to the refreshing water.
There are several different styles and makes of misters available at Amazon and other on-line or local garden and wildlife stores.
This inexpensive mister available at Amazon is typical of the style of garden misters that are available, but the added addition of the screen filter can be helpful effectively removing impurities in the water and prevent the misting cooling system from being blocked by scale and keep the mister working properly for extended periods. The tiny nozzles can get clogged easy enough so any filtration of potential debris getting into the misters is a bonus.
In fact, a wasp decided our mister was a good place to build a nest one year resulting in a major obstruction that shut down our mister until I realized what had happened and cleaned it out.
This 60-inch flexible mister stands on its own as is even advertised for use with bird baths and hummingbirds. It’s nice to see the company is thinking about helping wildlife. It is equipped with standard 3/4-inch garden hose connector, and even includes “sealing tapes and high strength sealing washers,” to stop leakage between the adapter of the standing mister and the faucet.
If you are looking for more, this multiple head mister will provide wildlife, children or even your pet dog with a cooling mist from every direction.
One of the benefits of the misters is the ability to set the misters up for a variety of uses that range from cooling your own sitting area, an area your children or pets are using or, of course for wildlife. The misters are easily transported to different areas in the garden, patio or deck and use such a small amount of water that you will not notice it on your water bills or be overwhelmed by large amounts of water pooling on your deck or patio area.
Pentax Auto 110 vs The Pentax Q: A study in B&W
Comparing a tiny trio of digital and film cameras in the garden using B&W images.
Film vs digital in the garden
I’ve always admired the Pentax Auto 110 camera system. Back in 1978, Pentax released the tiny 110 camera along with three lenses – 18mm, 24mm and 50mm. It was followed in 1981 by the Auto 110 Super and three more lenses including a zoom and an all-metal 70mm telephoto. They are fast f2.8 lenses.
Fast forward to 2011, when Pentax drew from its rich history of tiny, high-quality cameras and lenses and released the incredible Pentax Q digital camera. Little did the Pentax engineers and designers know back in 1978 that their tiny 110 camera lenses would make a comeback 30-40 years later on a miniaturized digital camera.
A simple, inexpensive adaptor is all that is needed to fit the tiny 110 lenses onto the Pentax Q. And theses tiny, manual focus lenses work beautifully on the 110-comparable-sensor size of the Pentax Q line of cameras.

The miniature Pentax Auto 110 film camera, left, compared to the tiny Pentax Q. Notice how the film size is similar to the digital sensor making a comparison totally appropriate.
I purchased an almost complete 110 system with four lenses, a camera and flash, with no intention of ever using the camera to shoot film. But, after some thought, decided to at least run a few roles of film through the camera to compare the miniature Auto 110 with the tiny Pentax Q.
The decision led me down the road to Lomography, which is the company behind the resurgence of shooting film with vintage cameras. I purchased three rolls of film from Lomography – a B&W stock, a roll of colour print film, and a roll of Lomography’s specialty film that I’ll unveil in the final of this three-part series. The Lomography Orca 110 Film can also be purchased through Amazon.

The Pentax Q fitted with the adaptor and a 110 lens together with the remaining Pentax 110 lenses and the Pentax Q 50mm for size comparison.
Garden showdown with 110 lenses
Using 40-plus-year-old lenses on a digital camera is great fun, but how do they compare in a shootout between the digital Pentax Q and the original Pentax 110 film camera?
In a three-part feature, I’m comparing the two cameras using the original 110 lenses – the Auto 110 using film and the Q series taking digital images.
And, what better way to start than with a comparison between black and white images – digital vs 110 film.
Be sure to read to the end for a special comparison involving a third tiny Pentax camera.
A word of note: Although both cameras used the original 110 lenses, different crop factors created by using the lenses on both cameras resulted in different images. As a result, I used primarily the 18mm on the Pentax Q digital camera and the 24mm on the Auto 110 film camera. No metadata is available with the film camera images and, because the camera decides the f-stop and the shutter without revealing that information to the photographer, there is no way of knowing the data.
Mounted to the Auto 110, the 18mm wide-angle lens has the equivalent angle of view to a 35 mm lens on a 135 mm format, the 24 mm (50 mm equivalent), the 50 mm (100 mm equivalent) and the 70 mm (150 mm equivalent).
If you are wondering how these lenses translate in the world of traditional 35mm on the Pentax Q series, consider the 5.35 times crop factor of the original Pentax Q and you are left with the following: 18mm = 96mm, 24mm = 128mm, 50mm = 267mm and finally the 70mm = 374mm. The same lenses on the Q7 or Q-S1 – with a larger sensor and a crop factor of 4.65 – results in the following: 18mm = 83mm, 24mm = 111mm, 50mm = 232mm, and finally 70mm = 325mm. These numbers are rounded off, but you get the idea.

Lomography’s Orca, 200 iso, B&W print film can be expensive to process.
I used Lomography’s 200 ISO Orca film stock in the Pentax Auto 110, and set the ISO to 200 on the Pentax Q. On the Q, a fixed F-stop was used with the introduction of a home-made rubber washer inserted into the adaptor. (See earlier post here for more information.)
First impressions: Not the best results?
My first impression of the film images was not favourable. I felt the amount of grain overpowered the image and made them almost unusable. That, of course, was simply an over reaction on my part after having used digital cameras for so long. The scanned film’s grainy images soon grew on me and, with a little tweaking in Lightroom, I began to appreciate the scanned images more and more.
The small size of 110 film has never been a favourate film for photographers looking for a fine-grain image. And, of course, the more it is enlarged the larger the grain becomes.
(To see all of my Orca B&W images, check out my photo gallery HERE.)
In this post, we’ll explore both the “straight out of camera (SOOC)” images, as well as some that have been developed further in Lightroom and Photoshop.
Let’s take a look at a few images, shall we?

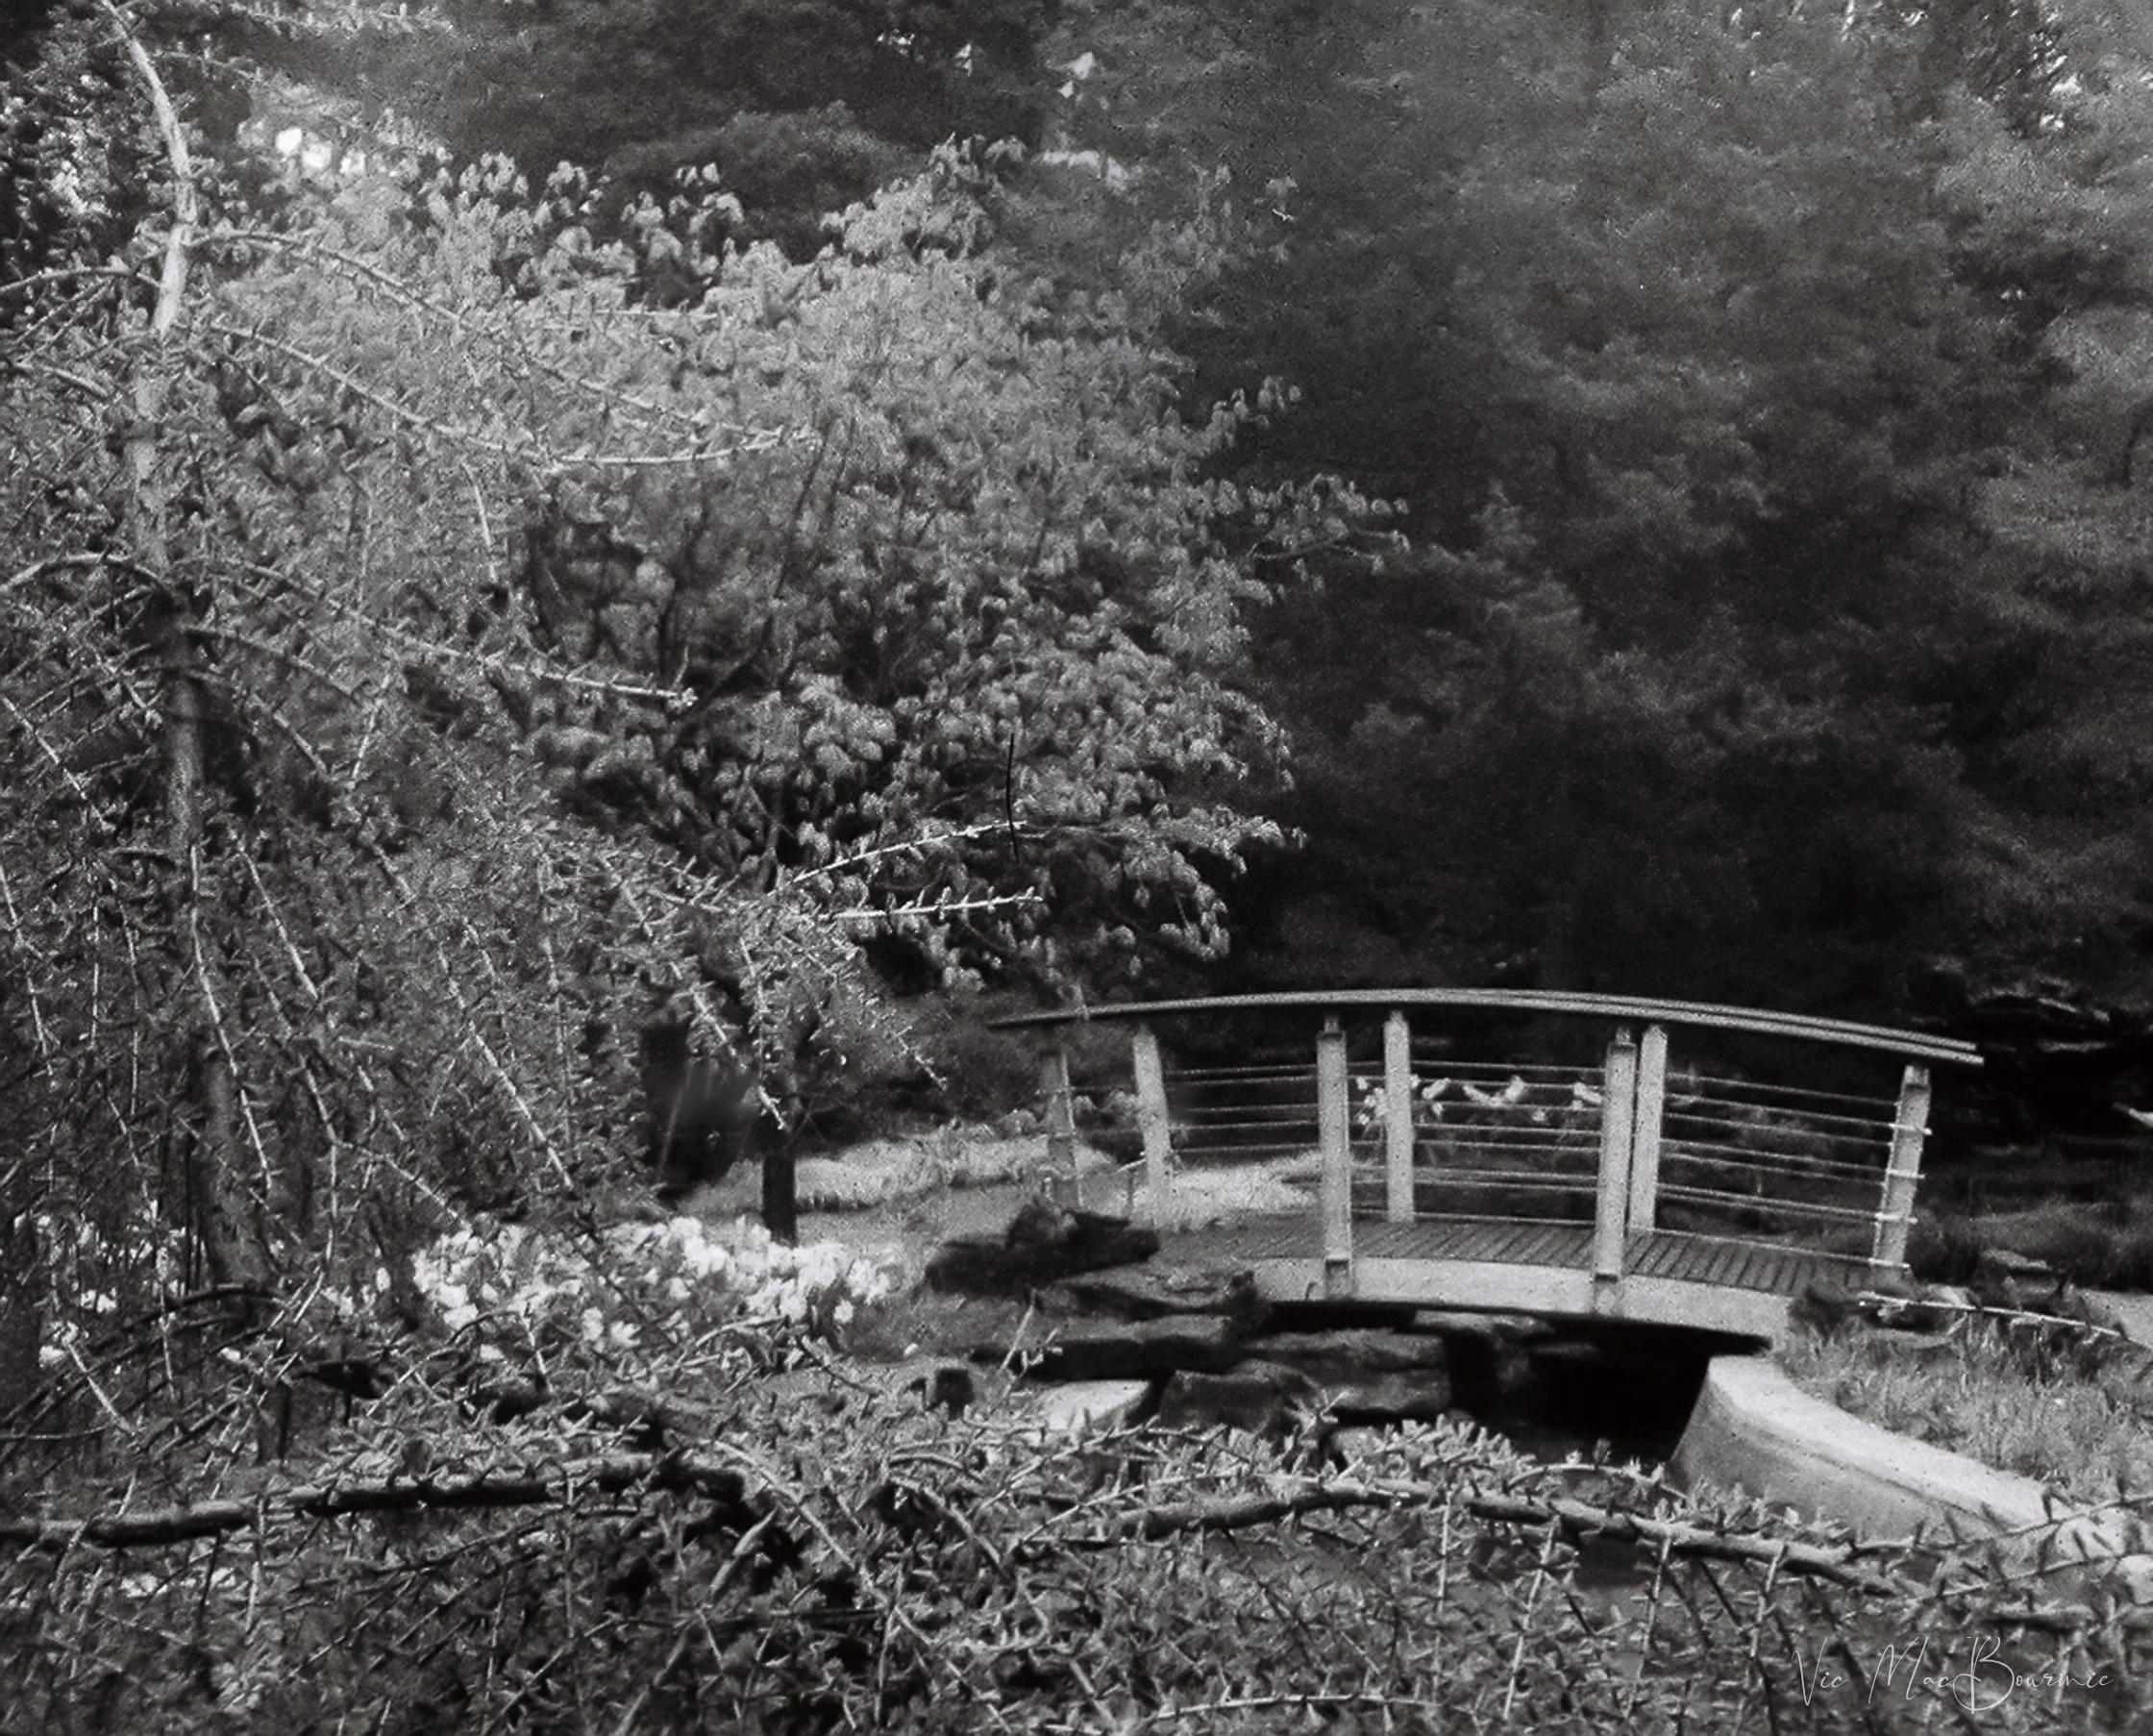
A garden bridge (SOOC) leads to a magnolia tree just beginning to open in a local public rock garden. This scanned film image shows high grain compared to a similar digital image below photographed with the Pentax Q and 18mm 110 lens.

The same garden bridge photographed with the Pentax Q and 18mm 110 lens.

The same film image with a little de noise added in Lightroom results in a slightly more pleasant image.

Local historic building photographed with Pentax Auto 110 on Lomography’s Orca film stock. The heavy grain seems appropriate with the subject matter.

A digital image of the same historic building photographed with the Pentax Q. Notice that the image’s grain or noise structure is much softer in this image compared to the one above.
The shooting experience: Pentax 110 vs Pentax Q
The shooting experience between the film and digital camera was really quite different and definitely favoured the much older and simpler Auto 110 film camera.
The combination of the very bright built-in viewfinder on the film camera, together with the split-image focussing screen, made the experience of shooting with the vintage film camera a real joy, not to mention the ease of getting sharp images. (Of the roll of 24 B&W images, about 22 were useable.)
On the other hand, trying to manually focus using the LCD screen on the back of the digital Pentax Q was difficult at times, especially in bright daylight. Although the camera features magnification to assist in focussing, the ability to get perfectly sharp images was often challenging. This is where the Q’s fine assortment of autofocus lenses would have come in handy.
That’s not to say that shooting the 110 lenses on the digital Q was not enjoyable, it was. But, compared to the original film camera that the lenses were made for, it presented some challenges.

A garden scene with the Pentax Auto 110 film camera.

A similar scene shot with the Pentax Q.

The film image above after some tweaking in Lightroom.
Here are more images taken with the film and digital cameras that illustrate the difference in grain and noise between the two formats.
I’m not going to go into too much detail at this point, preferring to leave more details for part-two and -three of the series comparing the cameras and lenses.

This image shows one of our town’s historic buildings. It is a straight scan out of the camera with no tweaking done in post processing.

A similar image taken with the digital Pentax Q and 18mm lens.

Cherry tree scans straight out of camera.

A similar image photographed with the Pentax Q and 18mm, 110 lens.
Adding the Pentax I-10 to the group
Earlier in this post, I mentioned that I was going to add a third camera to this comparison. The Pentax I-10 is another miniaturized, vintage digital camera produced by Pentax just before the introduction of the Pentax Q, and one that fits into this comparison nicely.

A tiny threesome used in this comparison. From left: the Pentax Q digital camera, the I-10 digital and the Auto 110 film camera.
It has a similar-sized sensor but has a built-in autofocus lens that gives it an advantage over the other two cameras, especially if age makes getting proper focus more and more difficult.
Below, are a few comparison images adding the Pentax I-10 to the group.

Image taken with the Pentax I-10 digital camera with its built-in autofocus lens. You can see the fine detail that has been brought out in this image photographed at at 160 of a sec at f5.3 and ISO 80.

The Pentax I-10 creates a beautiful, smooth image with little to no grain (noise) in this image of a bridge in the garden.

Garden bridge photographed with B&W film SOOC with the Pentax Auto 110.
The same image as above after a little de noise added to the photograph in Lightroom. I also removed some distracting elements in the scene.
The Darkroom tackles processing and scanning the 110 film
The Darkroom was the lab I chose to turn my B&W 110 film into digital scans and negatives. I can say the process and the results were excellent, but the final price tag was not.
I’m not sure of the final cost, but between purchasing the film from Lomography, paying for the mailing costs from the Toronto area to California and then adding the cost of developing, scanning and mailing the negatives back to me, it was not inexpensive. In fact, the cost I’m estimating to be over $60 Canadian, made the whole endeavour something that only the most dedicated film photographers would want to turn into a weekly or even monthly habit.
A few times a year might be something to consider, but digital cameras have certainly turned me into a penny pincher when it comes to paying for images.
I know, however, that there is a growing number of photographers who don’t like or want to be bothered with the whole digital process preferring to have prints in hand rather than digital images to deal with on their computers. And, if you already own the 110 or a 35mm film camera, than the costs may not be too exorbitant.
I’m sure if you live in the U.S. and scan your own 110 film, the final price can be brought down considerably, but the high cost is certainly something that would make me think twice about shooting another roll of B&W, 110 film.
I’m told my next roll – colour print film – is much cheaper. Stay tuned.

Garden Inspiration: Exploring the gardens of Niagara On The Lake
Throughout Canada, the United States and Europe there are special cities, towns and neighbourhoods dedicated to beautiful gardens. Niagara-on-the-Lake is one of those inspirational towns.

Alliums are a popular choice for the gardeners of Niagara On The Lake. Hear a lucky situation with the alliums protruding from the fence into the public sidewalk. A Lensbaby lens helped provide a dreamy look to the image.
Lensbaby optics add a romantic flavour to garden images
There are cities and towns all over Canada, the United States and especially Europe worth exploring just for their gardens. Even within large cities, there are neighbourhoods that offer the same inspiration in just a few square blocks.
One of these places, located not too far from where I live, is the small tourist town of Niagara-on-the-Lake. Not to be confused with nearby tourist Mecca Niagara Falls that has its own lovely public parks, but offers nothing near the private gardens of Niagara-on-the Lake.
Walking the residential areas just off the main commercial street has probably been one of my main inspirational points of my garden life. For years, my wife and I have visited this little gem where the Niagara River meets Lake Ontario, My wife tours the little quaint shops on main street while I take my camera and explore the garden scene.
Both are actually quite sensational – quaint with a serious spoonful of sophistication that is often missing in many neighbourhoods where money and the size of the house takes precedence over the gardens.
Here, it’s almost as if the gardens take centre stage around equally beautifully historic homes.

This soft, romantic image was taken with a Lensbaby Composer creating the dreamy effect and capturing the mood of the scene. Touring public or private gardens provides the ideal opportunity to practise creative photographic techniques.
Mackinac Island in Michigan is another community that comes to mind where gardeners can go to be truly inspired. I’m sure readers know more places of inspiration. Please leave a comment telling readers what your inspirational garden cities, towns or neighbourhoods are in the comment section at the bottom of the page.
It’s here, in Niagara-on-the-Lake, where I got the idea that driveways don’t have to be asphalt or concrete. A simple crushed red stone is not only acceptable but preferred for even the most sophisticated of homes.
It was here where I fell in love with Japanese Forest Grass after seeing it used in large clumps to welcome visitors in the front yard of an elegant home.
It was here, in neighbourhoods dominated by large trees, that I realized woodland gardens can take on a sophisticated look with trees and plants growing up through the ground cover.
And, it was here where I realized that garden art can take the form of a gorgeous bubbling rock, a simple garden swing or a natural moss-covered boulder greeting visitors.

A beautiful bench provides a little nostalgia to the garden especially when it is taken with a Lensbaby lens, giving it a soft, romantic look.
Although a visit to Victoria B.C. introduced me to the glory of Japanese Maples, it was their exquisite use in the landscape as understory trees in Niagara-on-the-Lake that inspired me to use many of them in our woodland garden.
It’s hard to believe that most of these gardens – many of them tied to elegant bed-and-breakfast facilities – were not designed and maintained by professionals. But, unlike many professionally landscaped homes in areas where I live, these have a sophisticated aesthetic that gives the impression that the gardens were lovingly installed over the years by the owners themselves.
On this afternoon, I chose to photograph the gardens primarily using a Lensbaby optic to give the images a soft, romantic appearance that seems to match the feeling the gardens present to the public.
The homes themselves, even newly built homes, have that same sophisticated look.

Red flowers complement the beautiful red door photographed with a Lensbaby lens to create the dreamy look.
On this visit, I was particularly drawn to the extensive use of alliums in many of the gardens. (See top photo) The balls of purple and white add architectural interest to the gardens and seem to fit naturally into the landscapes, often dripping out between stylish fences into the more public areas.
They certainly are stealing the show during the month of May when many gardens in my area are just beginning to wake up.
The moderating affect of Lake Ontario gives Niagara-on-the-Lake a slightly earlier start to gardening season and probably allows gardeners to push the boundaries of what they can successfully grow in the area.
Obviously known for their grapes and fine Ontario wines, Niagara-on-the-Lake’s real gem and maybe best kept secret isn’t the wine, fine dining, the Shaw Festival and elegant Inns, it just may be the gardens and gardeners that make this little tourist town so special.
If you are in the area this summer, make sure to drop by for a glass of wine and a self-guided walking tour of the glorious gardens.

Romantic porches, mature trees and white picket fences combine for a romantic image. The creative effects of the Lensbaby Composer and 50mm double glass lens adds a romantic look to the image.
Get creative with your garden photography
Photographing beautiful gardens and capturing inspirational garden vignettes is an excellent way to collect ideas for our own gardens.
It’s also an opportunity to get creative and try to capture the feeling that inspired you to stop and take the picture. Maybe it was the romanticism of the wisteria vine over the arbour, or the white picket fence covered in delicate white flowers.
Maybe the garden swing hanging from the tree branch brought back nostalgic moments of when you were a child.
does that clematis growing over the arbour, or the chair on the large front porch remin you of mornings at your grandparents?
On my most recent visit to Niagara-on-the-Lake, I used a Lensbaby Composer and 50mm double glass optic to capture many of the garden scenes. The soft, selective focus qualities of the Lensbaby lenses provide the perfect effects to capture the romantic garden scenes I came across on my short walk.
For more on Lensbaby optics and effects, check out my post on Lensbaby flower photography here.
All of the images were shot with the original Lensbaby Composer and 50mm double glass optic using the F4 disc on an Olympus micro 4/3 camera. I only mention the specific F-stop because the it has a major influence on the selective softness of the images.
Below are a few more images of the gardens taken with the Lensbaby. If you are looking for creative inspiration for your flower and garden photography, why not take a look at the American-based Lensbaby line of lenses and accessories?

White flowers cover this picket fence creating a truly romantic scene made even more special by the creative properties of a Lensbaby Composer and 50mm double glass lens.

A massive art installation inspired by nature works perfectly in this front yard.

The pastel colours make the perfect backdrop for garden containers and the perfect place to sit out overlooking the garden.
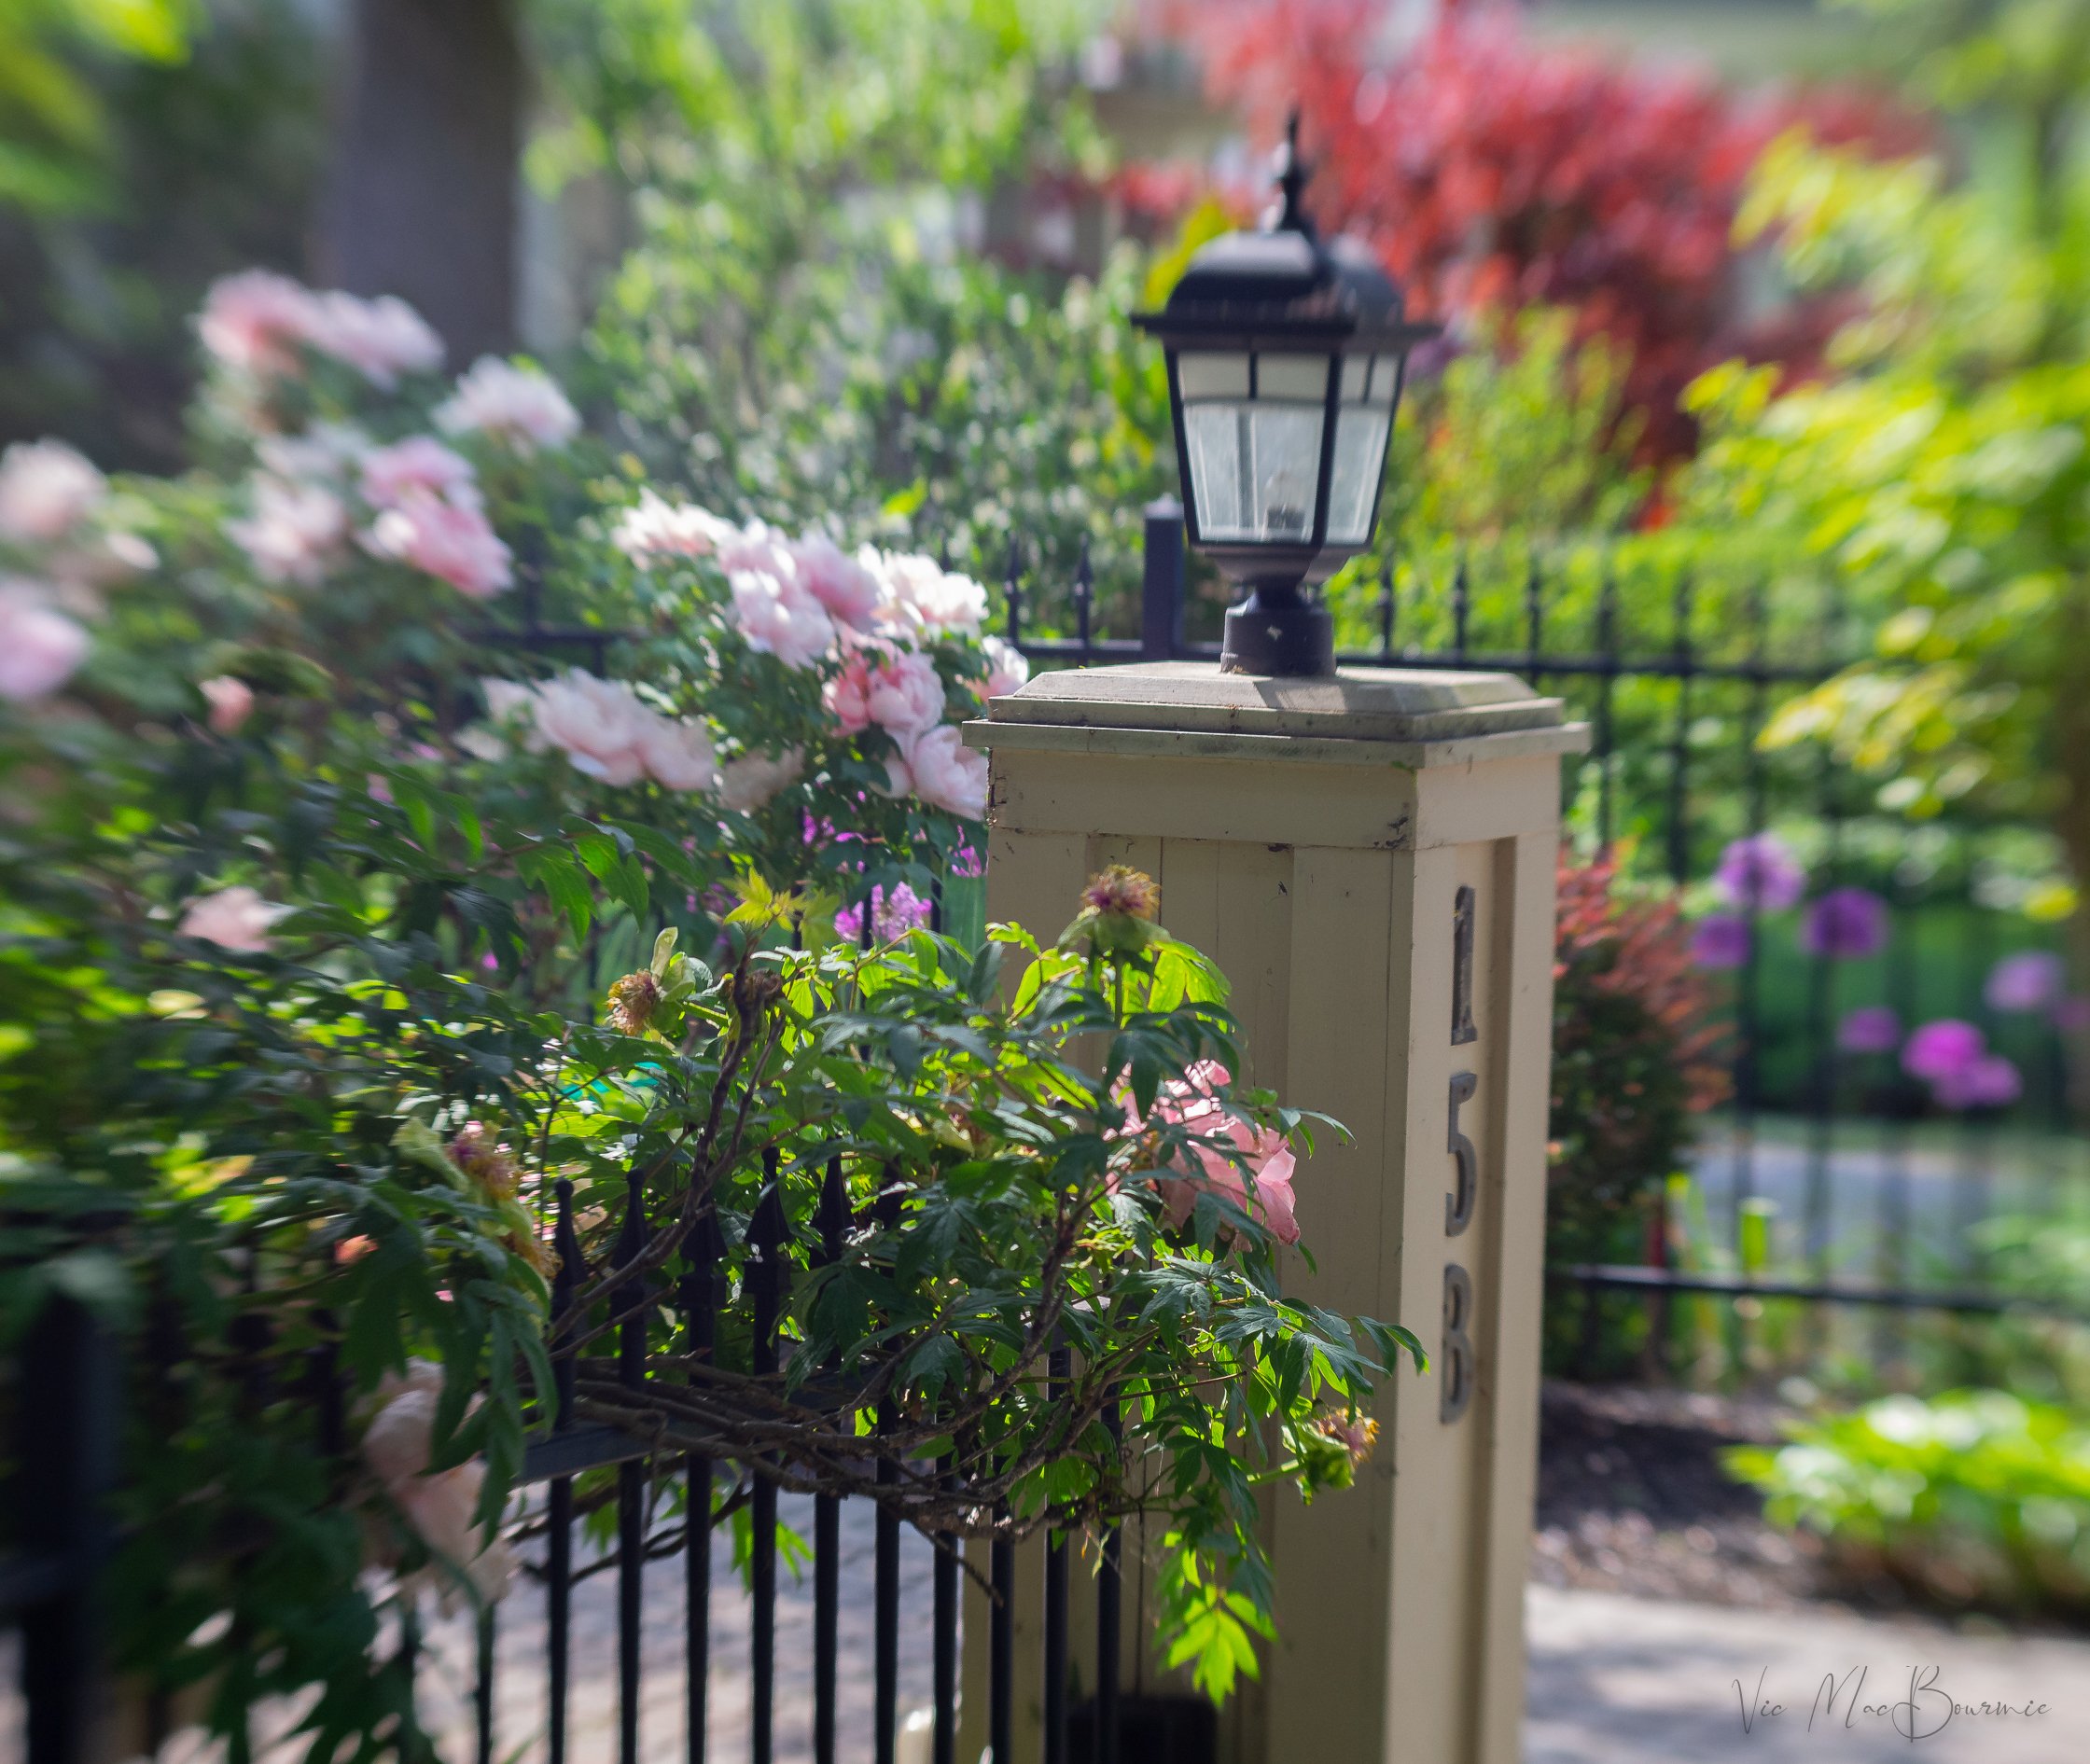
Soft pink roses surround a lamp post leading into the garden.

Allium is a popular choice among the gardeners in Niagara-on-the-Lake.

Flower photography: Exploring Lensbaby’s creative effects
Creative flower photography is taken to a whole new level with Lensbaby line of excellent lenses.
First impressions of the original Lensbaby Composer and close-up lenses

A Flowering Dogwood bloom photographed with a Lensbaby Composer and close up lens.
If you enjoy creative, interpretive flower photography and have yet to explore the Lensbaby series of lenses, you owe it to yourself to get your hands on one or more of these specialized lenses.
These “babies” are made for flower photography.
Of course, the Lensbabies lens’s unique characteristics can bring new life to portraiture, landscapes, still lifes and street images, but they truly shine in the garden where the goal is to capture delicate, romanticized images where overall sharp focus is not the end game.
It didn’t take much for the Lensbaby Composer to win my heart when it comes to creative flower photography
The enjoyment from the first time I tried out the lens opened a new world of creative flower photography for me. In the past, I have used selective focus (check out an earlier post) to create soft, delicate images of flowers in the garden.
The Lensbaby Composer allows me to take this creative approach to a whole new level.

Rocky Mtn. Columbine photographed with Lensbaby Composer and close-up lens at f2.8.
These babies are made for creative flower photography
It takes some practise to get confident with the lens and learn how to use it effectively. The key is to experiment and don’t be afraid to fail at first. Keep experimenting and exploring the lenses to find their sweet spots at various apertures.
These are not typical photographic lenses. In fact, the Composer double glass 50mm lens is probably one of the most unique lenses you’ll ever use.

My copy was actually made for a Canon full-frame camera, but a simple inexpensive adapter makes it perfectly useable on any micro 4/3 mirrorless camera. (Lensbaby lenses are available is most photographic camera mounts)
The well-built, 50mm lens, first introduced back in 2008, becomes a sweet 100mm equivalent on a micro 4/3 camera and the two close-up filters (4X and 10X) turns the camera into a magnificently creative 100mm macro or close-up lens.
There are also supplementary wide angle and telephoto attachments that offer more possibilities when used with the macro filters.
A word of caution – everything is manual on this lens from focusing to adjusting the f-stop.
Speaking of f-stops. On the original composer, different magnetic metal discs (see image below) are actually dropped into the front of the double glass lens to give you your chosen f-stops.
While the system works brilliantly, it can be a little clunky changing f-stops in the field. More modern versions of the lenses include the ability to choose the f-stop on the front of some of the add-on lenses.
But wait. The good folks at Lensbaby filled me in on some details that make the original Composer even better.
Let me explain: The Lensbaby optic swap system (in this case the Composer and the Double Glass) is a multi-element system. In order to be able to use the lens and take a photo you need two elements: the optic swap body, which acts like the lens barrel (in the case the Composer) and the optic or Double Glass element. So, it is actually not the Composer that dictates how you change the aperture but the optic. I am told by Lensbaby that my double Glass element can be swapped out for other optics, both current and discounted including (for example) The Double Glass ll which has built in aperture blades.
That makes the system even better, but I don’t mind dropping in the f-stop discs. It’s a minor inconvenience that can even add to the fun of this unique system.
In fact, since the creation of the original Composer back in 2008, Lensbaby has released a number of outstanding lens designs that enable photographers to create different creative effects from the Composer Pro with its multiple drop-in lenses (Amazon.com link to Lensbaby lenses), to its impressive Velvet line of more traditional “soft focus” lenses. This American company, based in Portland, Oregon, has continued to push the creative boundaries in photographic lenses and has developed a cult-like following among dedicated flower, portrait and creatively minded photographers.
For a closer look at Lensbaby offerings, including lenses and special effects filters, check out their website here.
The secret to the Lensbaby Composer and more recent Composer Pro lenses success is their ability to rotate on a ball socket creating its selective-focus effects.

By moving the lens around the ball joint, the main focus or “sweet spot” of the image changes position in the scene. Depending on the size of the aperture, the sweet spot is large (f8 to f16) or small (f2.8-f4).
By keeping the lens pointed straight ahead, the middle of the image is sharp while the outer edges are progressively soft depending on the aperture disc used.
In other words, if the lens is held straight, the middle is sharp. If the lens is tilted, that focus point shifts in the frame according to the amount of lens tilt. It takes very little movement along the ball and socket to create different focus effects, so it’s best to take it slow at first to get a feel for what works best.
It all sounds complicated, but in reality it’s not complicated at all.
And, once you begin to get the hang of it, your creativity and fun factor can take off.
After just a few uses here are some of my results.

Bee on cherry blossoms photographed with the Lensbaby composer and double glass 50mm.
A native bee checks out a cherry blossom in early spring. In this image, I used the Lensbaby Composer and 4x close-up lens with a slight tilt toward the been to ensure it was sharp while the remaining parts of the image were left to go into a dreamy, out-of-focus effect. Notice how the bee is very sharp, showing the capability of the lens at higher apertures. This image was shot at f5.6 or f8, hand held on a Lumix GF1.

Here is an example of how the middle of the Lensbaby remains sharp if the lens is straight and a small aperture is used.
Another image of cherry blossoms taken the same day most likely with the same settings. By setting the lens straight ahead without any tilt, it is possible to get a very sharp image in the centre of the image, with sharpness falling off in the corners. higher F-stops increases sharpness and reduces the amount of blur in the corner of the lens. It’s important to note that even subjects on the same focal plane will be blurred the closer they are to the corners of the frame or simply away from the area of focus.

This Canada Anemone was shot with the Lensbaby Composer at f2.8.
In this image of a Canada Anemone in bloom in our garden, a very large aperture (F2.8) combined with the X10 close-up filter created a very dreamy image where very little is in sharp focus. That’s okay because the qualities of the lens creates the delicate, soft-focus image I was trying to achieve.

Bleeding Hearts shot on Lensbaby Composer.
Similar to the image above, these Bleeding Hearts in our garden were photographed to create a dreamy, delicate image. The 10x close-up filter and f2.8 setting, created the delicate image I was trying to achieve.

This image of bleeding hearts was taken with the same settings from a different perspective. By placing a flower in front and behind the main subject, I was able to experiment with using a little selective focus in combination with the Lensbaby’s already creative approach.

Bleeding hearts photographed with Lensbaby Composer 50mm double glass lens.
This final image of Bleeding Hearts shows a cluster of the flowers taken without any close-up filters. Notice how the main flower in the centre of the frame is sharp while flowers on each side progressively become less sharp as they move to the edges of the image. This softness is evident even though the blooms are more or less on the same focal plane.
The following are a few more of my favourite images taken this spring with the Lensbaby Composer 50mm double glass lens.

A flowering Dogwood blooms in our garden photographed with the Lensbaby Composer and close-up filter.

A Canada Anemone focusing on the yellow stamens while the remaining parts of the image create a dreamy look to the image.

Yellow Columbine shot with lensbaby and 4X close-up filter.

Blue Columbine photographed with Lensbaby and 4X close-up filter.

An extreme close-up image of a Blue Columbine shot with the 10x close up filter at f2.8.

This image of an allium growing in the fern garden shows how the Lensbaby Composer with double glass element is capable of delivering extremely sharp images. This was photographed at F8 with the lens set straight ahead.

Not every flower image has to be a closeup. Here, dogwood flowers form the backdrop in a tranquil scene with ferns and a bird bath.
Author Profile: Vic MacBournie is a former journalist and author/owner of the award-winning website and newsletter Ferns & Feathers. He writes about his woodland wildlife garden that he has created over the past 25 years and enjoys sharing his garden photography with readers.

Create a tapestry of ground covers
Creating a tapestry of ground covers creates texture in the garden and adds interest that a single ground cover cannot create.

Hosta, pachysandra, ferns and sweet woodruff combine to form a tapestry of ground covers.
In any garden, but especially a woodland or shade garden, ground covers need to be a vital part of the design plan.
Without them, the forest floor either looks too bare or it begins to form its own ground cover based on whatever weeds are dominant in the area. A thick ground cover not only shades and protects the soil of the garden floor, it creates a beautiful green backdrop for other, more showy plants, to shine.
Make ground covers the star of the show
But what if the ground covers themselves were the real show in the garden?
By creating a tapestry of ground covers, all competing for their own space on the forest floor, it’s possible to turn them into the star of a particular part of the garden.

Mayapple, wild geranium and epimediums combine to form a very different tapestry of ground covers.
Think of the wall tapestries made up of mosses and ferns that have become so popular in the last few years, and translate that same look on to your garden’s floor.
The results can be stunning.
In fact, in one area of our garden where I have been adding ground covers (three great ground covers) for the past several years to cover up a messy sloped area between our home and the neighbours,’ the result is truly inspirational this spring.
By combining hosta, ferns, sweet woodruff, wild geranium, pachysandra along with a little Lilly of the Valley (I know it can be a problem) the area has been transformed from an eye sore to a lovely tapestry where the ground covers fight it out for dominance.

Wild geranium, epicedium and mayapple combine to create a tapestry of ground covers.
A little gentle persuasion on my part can hopefully keep everything in check and allow the tapestry to continue for several years before the more dominant ground covers can get a foothold in the space.
Growing up through the ground covers is a lovely Cornus Alternifolia (Pagoda Dogwood) that lends its elegant shape to the garden area.
Nearby, a ground cover of mayapple, wild geranium and epimedium are weaving their own tapestry under the canopy of our mature Linden tree.
Ground covers are most often either an overlooked component to a landscape, or used singularly in a mass planting. While a mass planting of a single ground cover such as pachysandra can create a unified landscape and is almost certainly better than the most used ground cover of all – turf grass – adding a second or third ground cover, preferably ones that are native, can add real texture and diversity to your landscape.
Why not consider setting up an area of your garden where ground covers take centre stage and add real texture to your garden floor in the way of a beautiful ground cover tapestry.

This fawn was spotted hiding in the deep ground cover of ferns, hosta etc.
Update on our ground cover tapestry
Shortly after writing this post, we woke up to a beautiful little fawn hiding in our thick ground cover. Mom either gave birth to the fawn nearby because we picked her up alone on a trail cam the night before, or she brought the fawn to the location just for the day because it was gone by the late afternoon.
I guess the old saying: “build it and they will come” can be changed to “grow it and they will appear.”
Author Profile: Vic MacBournie is a former journalist and author/owner of the award-winning website and newsletter Ferns & Feathers. He writes about his woodland wildlife garden that he has created over the past 25 years and enjoys sharing his garden photography with readers.

Holly: A dog with a heart so big she needed a pacemaker
Let me introduce you to my garden buddy. We’ve walked down the same garden path together, stared death in the eye, and came out stronger on the other side. Holly, our Humane Society rescue is quite the little fighter. Take a minute to get to know her and our incredible journey together.

Digital paintings of my best garden buddy Holly who needed a pacemaker installed more than three years ago.

She was a very, very good girl
Let me introduce you to my best friend, Holly. The dog with a heart so big she needed a pacemaker. Actually, make that two pacemakers. The first pacemaker’s battery began to run out after serving her well for almost 4 years, so she had to have a second one installed.
We had to say goodbye to Holly Sunday, April 28th, 2024. It was one of the hardest things my wife and I ever had to do. Sixteen years as a loving part of our family, makes saying goodbye almost unbearable.
But let me tell you about Holly, her pacemakers and her love for life and our garden.
More recently, knowing that the end was near, I began to document her life more and thought B&W images worked best. This is her most recently, still with that puppy inquisitive look.
The original pacemaker operation involved inserting a wire into the dog’s main artery in her neck and running a wire into the malfunctioning heart chamber where it is attached to the wall of the heart. Then, the wire is attached to a pacemaker, turned on and tucked away just under the dog’s skin on her shoulder where it sends electrical impulses to the heart and keeps my little girl alive.
She was quite the character. From the day we got the little bundle of energy she’s been by my side. I remember spending the first night with her in the basement sleeping side by side on the couch. At that point she was not house trained so we made many trips outside that night.
For years we shared our spring and summer mornings together out in the garden. Me with my coffee in hand, and her, vigilantly watching over the garden to ensure no intruder should appear.
The chipmunks, red, grey and black squirrels are all okay. In fact, they are all her little buddies. But our neighbourhood fox, a rabbit or a deer, well they are not welcome and will get the official send off with a frantic series of warning barks.
Warning of what, we’re not quite sure.
We always kept her on a leashing the garden. A long one mind you, where she could run from one end of the yard to the other. The leash just gently stopped her from potentially chasing any wild animals.

Mornings together on the patio, me with my coffee and her watching out for Woodland visitors to the garden.
In more than 12 years as the garden watchdog, Holly has not killed or even injured a single garden friend or foe.
She’s literally one-of-a-kind. A miniature Golden is the best description of her. Weighing in at about 35 pounds with a black nose and the cutest ears anyone has ever seen, this little Humane Society rescue still thought she was a puppy right up until the end.
At least in the mornings. That’s when she was all spunk. By mid-day, after her walk, she was ready to begin her day-long nap which lasts into the evening with only a short burst of energy right around dinner time.
Age catches up with all of us and Holly was no different. Most people who met her still thought she was a puppy, or at least many years younger than her age.
Holly wasn’t always full of energy. Several years ago we thought we were going to lose her. After she stopped eating and lost a lot of her spunk we rushed her off to our local vet only to find out her heart was in rough shape. Tests showed it had dropped to only 31 beats a minute (dogs usually clip along at about 100-plus beats a minute) and had become quite enlarged.
Several tests and veterinarian visits landed us at a specialized animal hospital where we met Dr. Minors, an animal cardiologist and surgeon who explained that one of the chambers in Holly’s heart was misfiring and that she would be a perfect candidate for a pacemaker.

Here pacemaker seen here in an xray and the wire that runs through a major artery in her neck and attaches to the inside of her heart.
The operation had to be scheduled for weeks down the road. In the meantime, a number of tense weeks passed where Holly’s heart would cut out and cause her to faint for a few seconds before recovering. On the day of the operation, we said our goodbyes and handed her off to Dr. Minors and her team of cardiac specialists.
The operation involves inserting a wire into the dog’s main artery in her neck and running a wire into the malfunctioning heart chamber where it is attached to the wall of the heart. Then, the wire is attached to a pacemaker, turned on and tucked away just under the dog’s skin on her shoulder where it sends electrical impulses to the heart and keeps my little girl alive.
Two days later she was out of the hospital and within a week or two right back to her old self.
Now, she wears her pacemaker on her shoulder just beneath the skin for all to check out whenever I tell them about it.

Holly outside on her table after her second operation to replace her pacemaker after the first one’s battery began to run out..
And I never passed up the opportunity to fill people in about our little bionic puppy named Holly. Afterall, we both travelled a similar path – me a double by-pass survivor and her with her pacemaker.
My little buddy, who grew old along with us, seemed just as happy as I did to sit quietly and take in the early morning sounds of the garden waking up.
Me with my coffee, and her, ever vigilant, eagerly waiting to awaken that inner puppy with a warning bark or two before nap time.
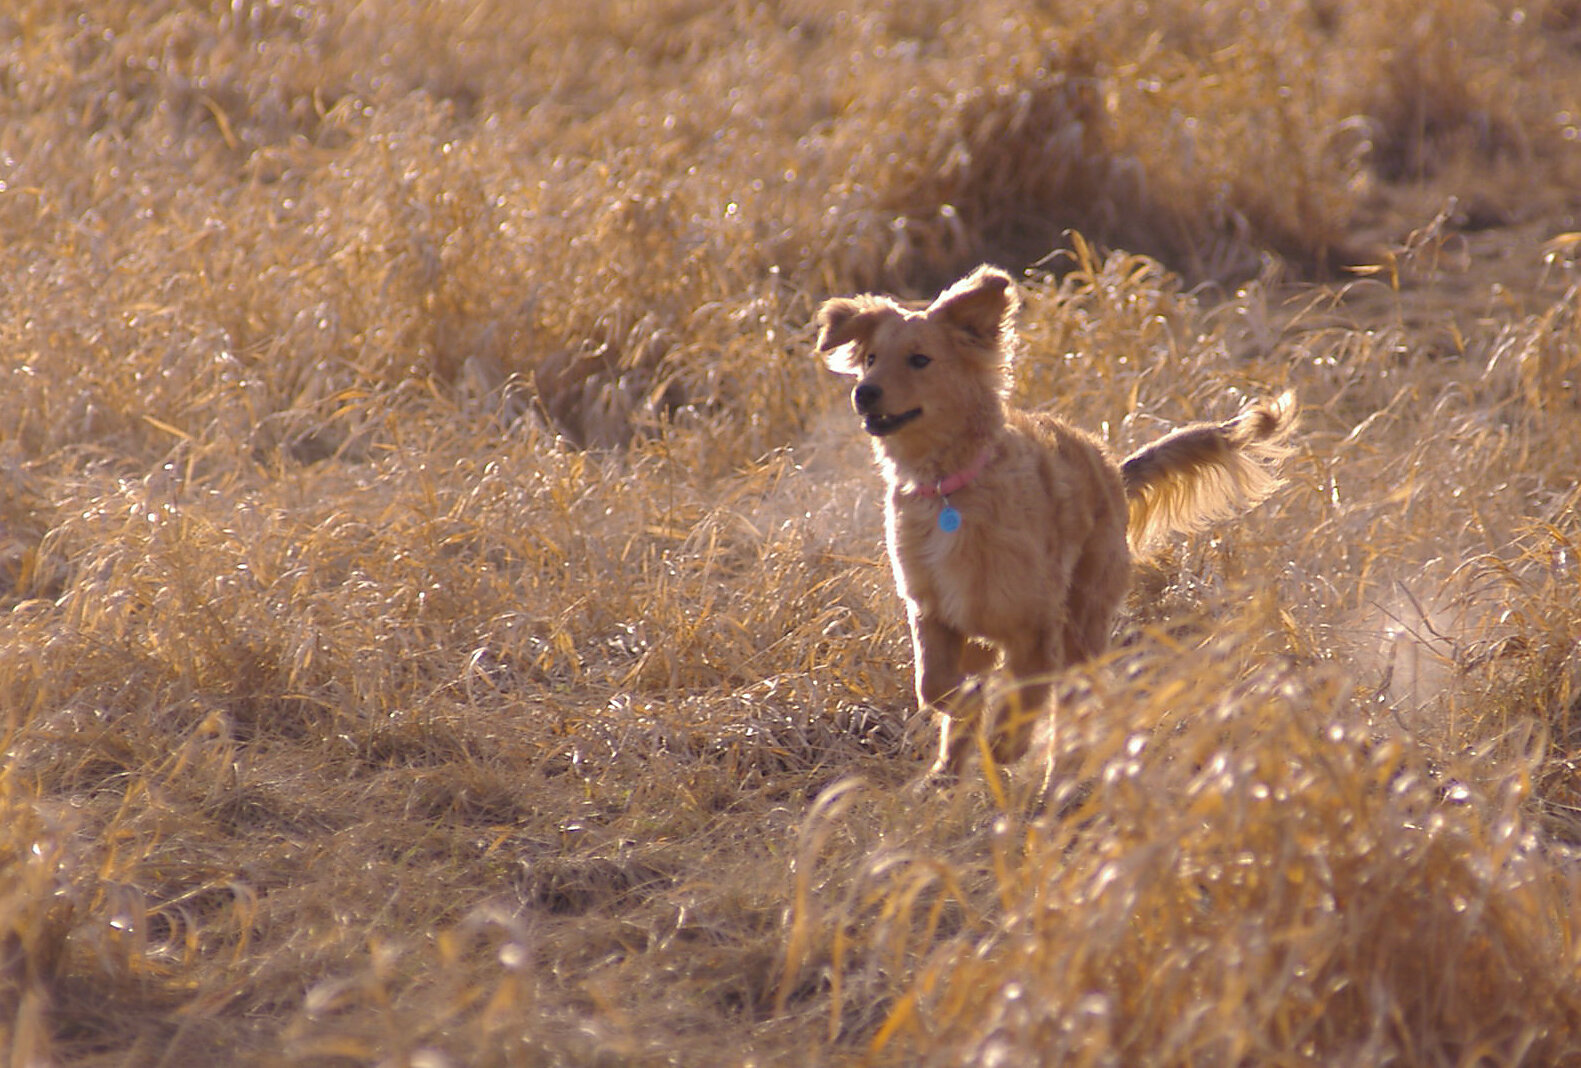
Holly at a full run at one of the local dog parks. She certainly loved running free through the tall grasses.
Be prepared for the high cost of pet care
On a side note: My wife and I were lucky enough to be in a financial position to proceed with Holly’s treatment which, as you may have guessed, was quite expensive.
Having your own cardiac surgeon comes at a price, and pacemakers, even used ones, do not come cheap. We believe that having a pet comes with a lot of responsibility and that includes a financial commitment to care for the animal the best you can. Providing basic flea, tick and heartworm medication such as Advantage is really only the beginning of the regular costs of sharing your life with a pet, be it a dog or a cat. Let’s not even get into pet supplies and accessories. A younger couple in a different stage of life may not have been able to afford the health care Holly needed.
We did not have health care insurance for Holly, but I know of a co-worker who used her insurance several times when her rather young dog developed eye and joint problems that required surgeries. If you think you might be forced to make a difficult decision if your pet became ill or just needed major surgery, consider purchasing health insurance for your pet. Choosing between life and finances is not a position you want to be in.

Holly relaxing with one of her little friends on the patio.
Holly a fighter to the end
About two years ago we discovered a lump on Holly’s shoulder. Tests showed that it was likely cancer and we were told that she might have as little as six months to live. Well, our little trooper survived for almost two years after the diagnosis.
Her favourite time of the day was spending mornings out in the garden with me enjoying the birds and the wildlife.
I like to think she was the protector of the little chipmunks and squirrels that were her friends in the garden, and for as long as she was around, they had a friend and a protector in the little rescue dog with a heart so big she needed a pacemaker to keep it going.
She may be gone now but she will not be forgotten. Every time I have my coffee outdoors in the garden, I think of her and how much she loved our garden time together.
Always be kind to animals, whether they are your pets or garden visitors.


A walk in the garden: Finding inspiration in public gardens
Public gardens are an excellent way to find inspiration for your own gallery.

Rock steps take visitors down into the former quarry at the Royal Botanical’s rock garden providing inspiration and ideas for gardeners.
Three tips to inspire creativity in your home garden
A light rain kept the the public away and left me alone in a spectacular sunken rock garden to explore its magnificent beauty and draw inspiration from the plants and garden design.
The result was not only inspirational, at times it was almost spiritual. The spiritual component was, at least in part, due to the intense feelings I was experiencing from having to say goodbye to my 16-year-old dog, Holly, just a day earlier. The solitude was the perfect escape from the overwhelming grief I was experiencing.
In three hours in the garden, I saw only one other guest. The rest of the time, the garden could have been my own.
Although native plants were few and far between, the garden design and natural planting designs growing along the edges and down into the heart of a sunken quarry, reminded me of the importance of using boulders as a backdrop for flowers, shrubs and grasses. The quarry lent itself to dramatic vignettes with flowers and ferns growing out between the massive rocks and stepping stones that led you deeper into the former quarry.
Exploring the garden also enabled me to see what plants were in bloom or coming into bloom at this particular time of year in my growing zone. It showed me plants growing in a natural environment, from the conditions it was growing to the amounts of sun and shade it was exposed to. It showed me how the garden experts here used companion planting to bring out the best in the plants. Years of testing proved helpful for the finished products.
Too often we are enticed to buy plants from nurseries because they are in bloom at the front of the store. At the nurseries we don’t get the opportunity to see the plants growing in their natural environment. In addition, most of the nursery plants are grown in greenhouses and so are often far ahead on their actual bloom time creating a false sense of when the plants will bloom in our own gardens.
I was particularly interested in the plants that trailed over the rock ledges.
(For more on exploring public gardens, check out my earlier posts on the best woodland gardens to visit in the United States, and some of the best public gardens in Canada.)
Use trailing plants over large rocks
Tip one: Use plants that spill over the top of boulders or trail down slopes. The inset image below shows large boulders in our front yard that hold back the main garden. In one area, we have creeping phlox spilling over boulders onto the front of the driveway. I love the look it gives but seeing what the public garden was doing showed me that there are many more possibilities that could be implemented in our garden.

Basket of Gold and creeping phlox combine for a sensational scene at the public garden.

Creeping phlox spills over boulders along our driveway.
The combination of the yellow, basket of gold, perennial alyssum (Aurinia saxatilis) with the creeping phlox is a combination I’ll be adding to our front boulder wall. Up in the top right of the above picture are the remains of Hakonechloa or Japanese Forest Grass also spilling down the rocky cliff.
Japanese Forest grass, especially “All Gold,” would be a beautiful addition spilling over our front boulders. I have several clumps in the front that could find a new home beside the boulders.
Aurinia saxatilis more commonly called “basket-of-gold” is the dominant flower in the image above. It is a low-growing, spreading perennial that produces a profuse spring bloom of bright yellow flowers. It’s easy to see from the images that the flowers are extremely attractive in rock gardens, sprawling over rocks or cascading down rock walls. Following the colourful bloom, it can be left as an attractive ground cover. It’s unfortunate the plant is a non-native (central Europe to Turkey) because I would use it everywhere in the garden as a spring ground cover. It is a mat-forming perennial with woody roots that grows to 6-12 inches tall and features spatulate basal leaves (to 5 inches long) and smaller linear-oblanceolate stem leaves. Leaves are gray-green. Bright yellow flowers in corymbose panicles bloom in spring. Additional common names include yellow alyssum, madwort, goldentuft and gold-dust.
Walking down into the quarry from high above was a constant reminder of the possibilities of working with steep inclines, especially if large boulders are added. The walls of the rock quarry created lovely dark backdrops to show off the flowers, shrubs and trees to their fullest. In our gardens, unless we are blessed with an old rock quarry, we cannot duplicate this effect, but we can plant evergreens to form a dark background.

A beautiful magnolia comes into bloom surrounded by evergreens in the public garden.
Create dark backgrounds to highlight flowering trees, shrubs and plants
Tip two: Consider planting a wall of cedar, spruce or native white pine along one side of the garden to create a lovely dark backdrop to plant light-coloured flowers, flowering shrubs and trees in front of to show them off in their best light. A clump of birch trees, for example, would be a standout in front of a tall wall of black cedars or Green Giant cedars. In one area of the garden, the blooms of a mature magnolia tree (see above image) sparkled beneath a wall of dark rocks and evergreens.

A bridge leads to a walkway and a lovely saucer magnolia coming into bloom amidst a background of evergreens.
So many of us plant flowering trees such as magnolias, serviceberries and dogwoods that look great in the garden. But imagine them with a wall of dark evergreens behind them. Proper pruning would make them standout year round, but imagine the show in spring when they are blooming lovely shades of white and pink upon a dark background of evergreens.
Throughout the sunken gardens, I was stopped in my tracks at vignettes that captured a particular part of the garden. Some of them were small vignettes highlighting a tree or shrub, others were large views that still captured the intimacy of a much smaller garden.

A beautiful weeping willow surrounded by daffodils stands out against an evergreen backdrop in the public garden.
Create garden vignettes and a sitting area to experience them
Tip three: Look for big or small garden vignettes where you can turn the focus on a particularly impressive specimen tree, shrub or drift of flowers. This helps you turn the focus on certain areas of the garden.
In the rock garden, a spectacular weeping willow takes the spotlight surrounded by drifts of daffodils. The fresh green leaves of the willow against the dark background created magic in the soft misty rain. At the same time, the garden designers made sure that visitors had several vantage points to view the tree in all its glory.

These red Adirondack chairs are placed perfectly on the upper level overlooking a beautiful sunken public garden. They are a good reminder of the importance of creating garden vignettes.
Public gardens concentrate on providing spectacular views for its visitors. But those views fall a little short if there are not comfortable places to take in this impressive views. Garden benches, large flat boulders that can act as seating areas, and comfortable garden chairs invite visitors to rest and take in the scene.
There was no better example of this than the two bright red Adirondack chairs on the upper level of the rock gardens looking out over the sunken garden. The chairs almost beg visitors to sit down and take in the scene that spreads out before them.
They are a reminder for this gardener to ensure there are many places to take a seat, relax and take in the beauty of the garden.
Author Profile: Vic MacBournie is a former journalist and author/owner of the award-winning website and newsletter Ferns & Feathers. He writes about his woodland wildlife garden that he has created over the past 25 years and enjoys sharing his garden photography with readers.

The art of capturing Cherry trees in bloom
Capturing the Cherry Tree blossom can be challenging but these five tips will help ensure your success.
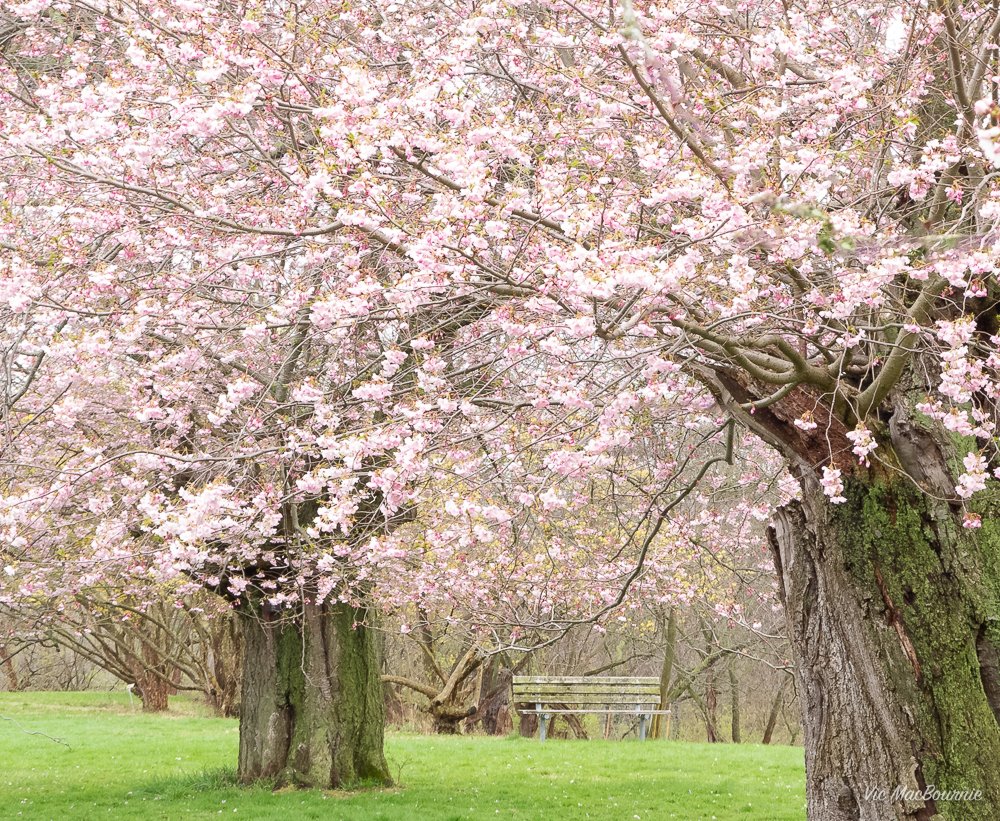
These Cherry trees in blossom at a nearby public garden were taken in soft, overcast morning light with my Fujifim X10. I thought including the empty bench was an important element of the scene and helped to ground the image.
Five tips to photograph the essence of these beautiful trees
It’s early spring and the Cherry tree blossoms are emerging along with tourists looking to capture the ultimate selfie. I’m here in our local botanical garden with my tripod and a couple of cameras looking to document the cherry trees in all their beauty.
The early morning light is at its best and most of the “tourists” are still at home just getting out of bed. That’s a good time to begin shooting. Not only is the early morning light at most locations at its best, but this is the only possibility of capturing the trees alone in the landscape.
Tip one: Get out early to beat the tourists and capture the trees in their best light. Getting up early is always a good idea whether you are photographing the trees in your own garden or at a public garden. Light is the key here and soft morning light on these trees in bloom helps to capture the soft petals in a delicate light.
Also, since the flowers on the trees are white or pink, consider over exposing the image 1/3 of a stop to “hold the whites” and not end up with a muddy, underexposed images that fall short of what you are seeing. The camera is going to want to turn those lovely white/pink flowers middle grey. By overexposing the images slightly, the whites are kept clean. Use the over exposure button available on most modern cameras.

Don’t forget to move in close to capture the unique characteristics of the flowers. This image was taken with the Lensbaby Composer together with closeup filters. For more on the Lensbaby, see below.
Cherry Tree bloom: A worldwide attraction worth capturing
The cherry tree blossom is a phenomenon that sweeps across the world as spring arrives creating a spectacle from Japan’s incredible displays to the National Cherry Blossom Festival in Washington where tourists and residents even turn to websites to help them find the ultimate location to capture a photograph.
Whether it’s Japan’s incredible sakura cherry blossom show, the Washington display, a local cherry tree festival or a beautiful tree blooming in your backyard, the secret to capturing these delicate blooms is a combination of an ideal scene and good timing.
For the blossoms, that time is during peak bloom, which is defined as when at least 70 per cent of the cherry trees have fully opened. This year, peak bloom for the Yoshino cherry trees in Washington hit around March 17. In Toronto, Canada, peak bloom was around the week of April 21-26th. In Japan the sakura bloom lasts from late March through May.
The best viewing of the cherry blossom trees typically lasts four to seven days after peak bloom begins.
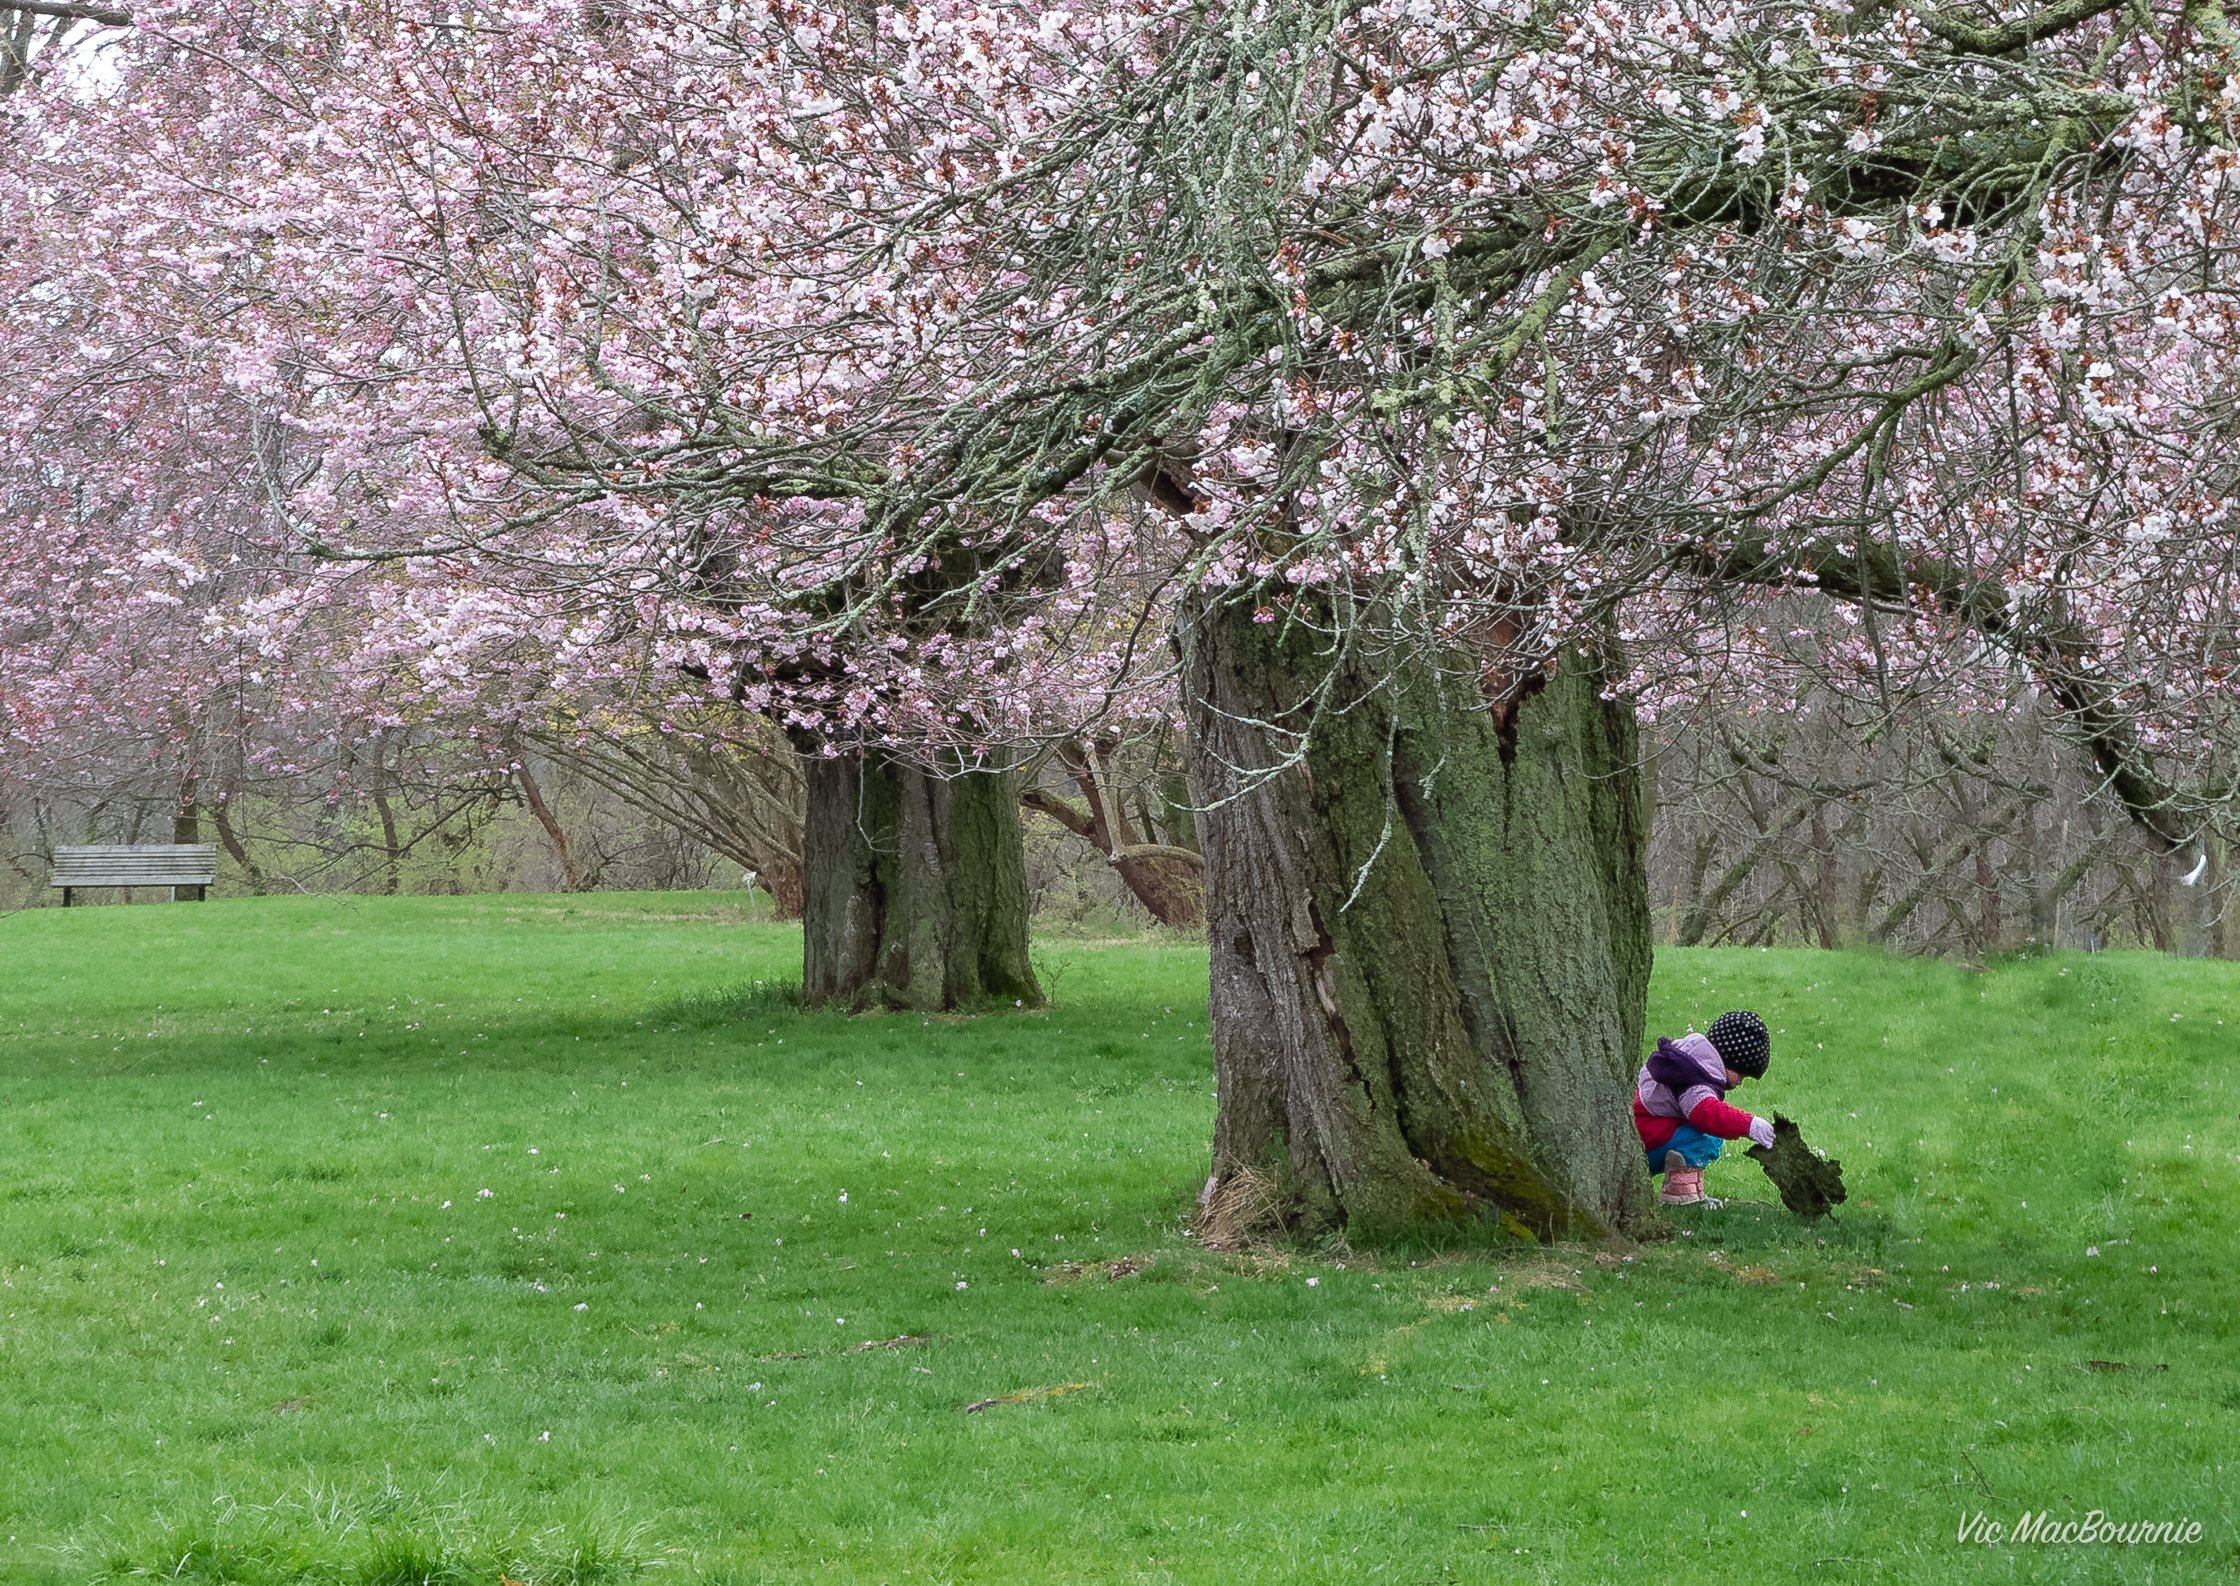
This image uses a more photojournalist or “street photography” approach by capturing a young child collecting fallen blossom petals from the trees.
Tip two: Try to get out a few times during peak bloom.
Capturing good images of the cherry trees in bloom is best achieved by visiting the trees several times during peak bloom. By making multiple visits to the cherry trees at different times of day, your opportunity to capture the potential of different scenes and changing light increases dramatically. It’s also an opportunity to explore different approaches from macro photography to a more journalistic approach of documenting the tourists.

Capturing cherry blossoms should include moving in close to individual blooms. Here, I used the 50mm Lensbaby composer to capture a lovely group of blooms with selective out-of-focus elements that creates a delicate look to the image. By finding a branch that hangs down, I was able to obtain a soft green background.
Tip three: Be creative. Try to go beyond just documenting the trees in bloom.
It’s also a great opportunity to try different lenses, and cameras in an ideal environment. Pull out your cell phone to capture images that can instantly go on to social media, but use your cameras and specialty lenses to capture the more atistic and intimate images.
Experiment with different cameras and lenses when you have such a perfect subject. Here, I used a vintage lens 18mm 110 manual focus lens on my tiny Pentax Q to capture this image.
In the above image, I used a vintage lens meant for vintage 110 lenses on my tiny Pentax Q to capture the image. It’s not only fun, but again it provides you with an opportunity to give your lenses a real work out to create more unique images from different perspectives.
Use a macro lens to capture up-close images of the individual blooms at life size. Open the lens up to its maximum aperture and include out-of-focus cherry blooms in front of the lens while focussing on a more distant bloom to create a beautiful “selective focus” image.
On a recent visit to photograph cherry blossoms at our public gardens, I focussed on a more artistic approach using a 50mm Lensbaby on my Olympus micro 4/3rds system. By working with a Lensbaby lens, photographers can create interesting out-of-focus elements in their images.

The combination of finding a native bee on the cherry blossom while photographing with the Lensbaby was too much to resist. The combination added a natural element to a creating approach.
Tip four: Look for special situations that add a surprising element to your images. While I was working with the Lensbaby, I noticed a native bee sitting on one of the blossoms. It created the perfect opportunity to add a natural element in a creative way.
Don’t wait for blue skies to get out with the camera. While blue skies can make for dramatic pictorial images, overcast days are ideal for capturing soft light. But don’t stop there. Rain can add further drama to the scene whether you are shooting close-up images or taking a more pictorial approach.

This extreme wide angle image shows the intricacy of the branching together with the profusion of flowers. The blue sky works as an ideal background to the pink flowers.
Tip five: Get right under the canopy of the tree and shoot up with a wide angle to capture the intricate branching of the tree. If there is a blue sky, consider using a polarizer to deepen the blue and show off the flowers. Lay on the ground and look up. Also, this is the ideal time to experiment with many of the built-in filters incorporated in many digital cameras. Try the soft focus filter for a delicate look. Although many photographers use them for portraits, they can work well with flower photography.
Black and white images might be something you want to experiment with while you are photographing the trees.
If you are looking up at a white sky, try shooting with the high-key filter to create a very light and airy image. In addition, consider shooting in black and white for dramatic results.
Try experimenting with ICM or intentional camera movement. This is a technique where the photographer uses a long exposure and moves the camera during the exposure. Results are varied, but interesting images with a creative flair are possible using ICM. In the photograph below, two images of the cherry tree were sandwiched together in photoshop to create a single image. The first image is the traditional one while the second is a very abstract image of the trees during significant camera movement. Included is a smaller photo showing the ICM image.
Finally, don’t be afraid to incorporate the cityscape in the background whenever possible to help give the image a sense of place. If you are shooting in Washington, be sure to include elements in the scene that gives readers an idea of where you photographed the image. Consider shooting a panorama of the scene or pull out your extreme wide angle for a unique feel.
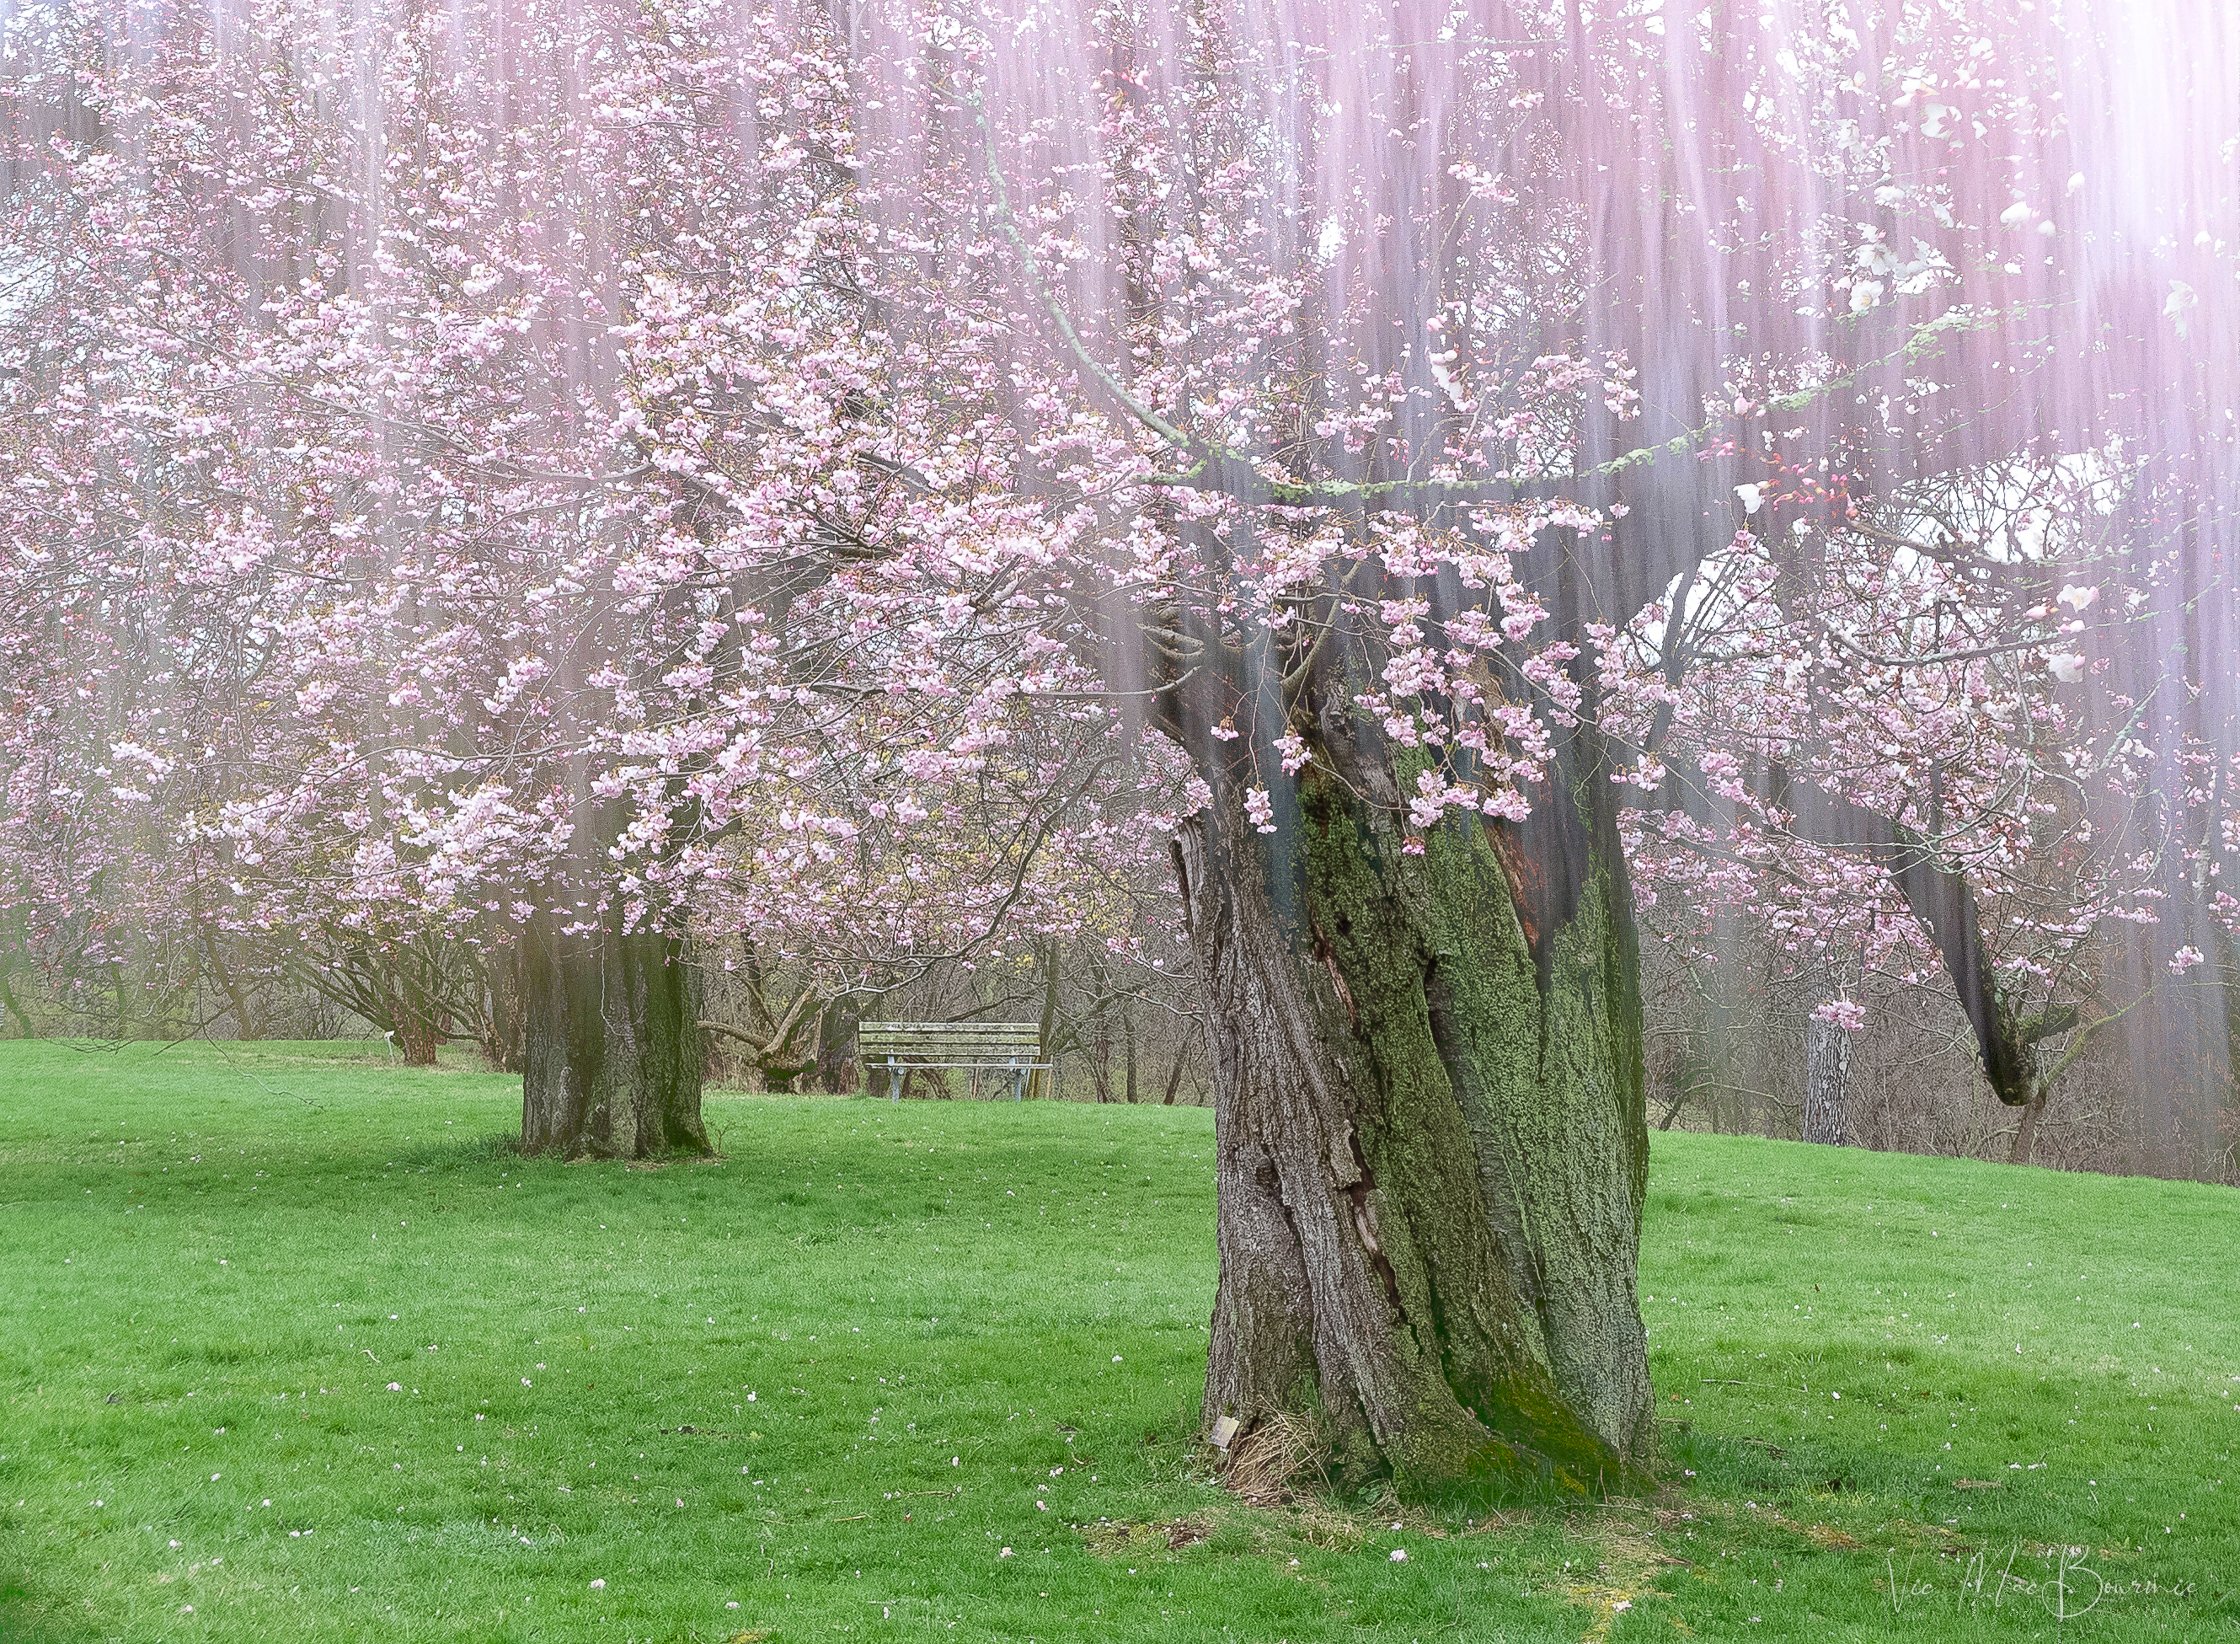
In this image, I combined to photographs. One is the traditional image and a second image, using intentional camera movement, was placed over the original to create a soft pink veil.

This is an ICM image of the cherry trees that was used to create a double exposure in the above image by sandwiching it with a more traditional image.
In conclusion, take advantage of an ideal situation
Whether it’s a sea of cherry trees blooming in a public garden, or a single tree in your own garden, consider it an opportunity to go to town. Focus on capturing that iconic image but don’t be afraid to stretch your creative vision to the max. Bring out your widest lens, a fisheye or extreme wide angle. Pull out a macro lens, use built-in filters or add them to the front of your lens.
Find unique angles… shoot the scene like a photojournalist would and include people in the scene. Look up, look down. Return to the scene at different times of the day, during bright sunny days, overcast days and even rainy days.
Use the opportunity as a learning experience and most of all have fun.
Author Profile: Vic MacBournie is a former journalist and author/owner of the award-winning website and newsletter Ferns & Feathers. He writes about his woodland wildlife garden that he has created over the past 25 years and enjoys sharing his garden photography with readers.

Pentax I-10 Digital is forgotten gem with vintage style
Pentax’s tiny I-10 digital is a beautiful little point-and-shoot camera that looks all too familiar to the Auto 110 and the lovely miniaturized Pentax Q series of cameras.

A CCD, feature-rich point and shoot that captures beautiful garden images
The Pentax I-10 might be a tiny camera, but its classical vintage styling and feature-packed offerings make it the perfect carry-around camera for beginner photographers looking for a capable camera while sporting a very real cool factor.
Available in classic black and stylish white, the 14-year-old digital point-and-shoot camera from Pentax’s Optio line, boasts a built-in 5X, 28-140mm lens, along with a long list of shooting modes and interesting filter effects including a BW setting, toy camera, several portrait and macro modes, a soft focus effect filter and a variety of picture frames.
And, while it’s simplicity makes it ideal for beginners, even seasoned photographers wouldn’t mind carrying this stylish, yet pocketable little gem around with them at all times.

The tiny Pentax I-10 is a point-and-shoot camera with a 28-140mm equivalent lens.
There’s plenty of capability here for the average photographer looking to simply capture their gardens, flower and insect photography, kids, pets, vacation and about-town images.
Add to the already impressive feature list a total of 12 megapixels and sensor-shake image stabilization.
Oh, and did I mention that it features a CCD sensor? Yes, that same sensor that photo enthusiasts all over the internet are craving for to create a vintage look straight out of camera.
Not bad for a camera released in 2010.
It’s long out of production, but if you look on eBay and other on-line photo retailers these sweet little cameras come up for sale, often in mint condition for a very good price. I picked up mine on the day of this shoot from a lovely woman on Kijiji for $60 Canadian in mint condition complete with the original box a 6 Gig SD card and even a great little carrying case.

This tiny trio of Pentax cameras illustrates how the company perfected tiny but high quality cameras. The Pentax Q (left), the Pentax I-10 Digital (centre) and the Pentax Auto 110 film camera (right).
Vintage styling based on the classic Pentax 110 camera
If the Pentax I-10 reminds you of a camera you’ve seen before, you are probably right. The I-10 released in January 2010, was based on the vintage Pentax 110 Auto camera, released on June 23, 2011, and was the camera released just before the more modern miniaturized Pentax Q series of tiny Pentax gems.
One look at all three cameras and it’s not hard to see that Pentax builds beautiful tiny classic cameras. In fact, I’ll go out on a limb and say “no one does it better than Pentax.”

The Pentax I-10's rear view shows the 2.7-inch screen.
The Pentax I-10 point and shoot is no exception. Behind its seriously good looks is a 14-year-old point and shoot camera with extremely high build quality right down to the leatherette covering the front of the camera.
When you consider this is a point and shoot from the Optio line the Build quality is even more impressive. I’ve never cared for Pentax’s Optio line of consumer cameras until I saw this one.
“To say I was pleasantly surprised is an understatement. Actually, I was shocked with how well it performed.”
I took all three cameras – the digital I-10, the 110 film camera and the original Pentax Q – along for a walk through a rock garden on a rainy morning as part of a website post I am working on comparing the three cameras.
It was only the first time I used the Pentax I-10 but, after only a few minutes running through the menu system, I was ready to explore what this vintage-looking camera could do and compare it to my much-loved Pentax Q and eventually the Pentax Auto 110.
To say I was pleasantly surprised is an understatement. Actually, I was shocked with how well it performed.

A weeping willow stands guard over the public garden.
Pentax I-10 goes to work in the garden
Behind the cute, retro styling 12MP sensor, 2.7" LCD with 720p HD movie shooting and a 5x zoom covering a 28-140mm equivalent range, is an impressive little point and shoot performer. Mind you it’s not going to give you poster sized prints. Because of the small sensor, its dynamic range isn’t going to blow you away, and severely cropping images might be a little risky. But if you are looking for eye-popping colour from the jpegs right out of the camera, you’ll be impressed. Especially since this camera fits into your pocket or purse with lots of room to spare.
In the garden, I set the camera to landscape mode, set the ISO to no more than 200 and went to work. The landscape mode boosts greens and blue skies and worked well for the subject in hand. I switched to macro mode for a shot I stumbled upon and was surprised with the result, but more on that later.
I’ve been a Pentax fan all my life and the results from the morning shoot gave me no reason to think otherwise. Pentax lenses have always been a selling point and this little lens punched above its class, but especially in the wide-angle range. Telephoto shots were a little soft, but nothing post processing can’t fix in a flash.
Colors were exceptional. This may have had as much to do with the shooting conditions as the lens, but I was truly impressed.
The ease of use is certainly a selling factor for me. Set it on landscape mode and let the camera do the work. I traditionally would not want the camera to make most of the choices, but the choices the camera made suited me just fine in this instance.
Being a point and shoot camera means there is little to no control over shutter speed and f-stops. The camera also shoots only jpegs, leaving RAW to more seasoned photographers. If you can live with these limitations, then this is a camera that might interest you.
For a more complete breakdown of the camera’s features, check out Photography blog’s review here .

I stumbled upon this lovely little image of a pine cone in grasses and used the camera’s macro mode to capture it. Later, I turned it into a lovely black and white image in camera. (inset)
Two macro functions and fun filters on the Pentax I-10
I was particularly impressed with the macro functions on this camera. The first macro setting, easily accessed on the back control button, gets you close-up photography that allows you to focus on a subject that is 8cm away from the camera. The super macro mode gets you even closer to true macro, mind you the camera has to be very close to the subject.

Using the in-camera filter, I was easily able to convert the coloured jpeg into B&W.
I stumbled across a lovely little image along the path of a pine cone in some grasses. The resulting hand-held image was stunningly sharp thanks to the camera’s anti-shake feature, and rendered the colors beautifully thanks in part to the CCD sensor and rainy, overcast conditions.
Once again, the toy-like Pentax came through delivering images that would please most casual photographers.
I wanted to turn the closeup image of the pine cone into a black and white but for the life of me could not find the filter settings in the menu system. It wasn’t until later that I discovered that the filters for this camera could only be used after the image was taken.
By hitting the image review button, photographers have access to a number of very impressive filters including black and white. Once you make the conversation, you can choose to save it separately, make a copy or overwrite the existing image.
This is a great way to reconsider any photograph you took on your outing. By adding a filter, or even a digital picture frame, you can create new images while still having the original.
Not only did I convert the close-up shot to black and white, I also added a frame that gives the image a more of a lomography look. There are lots of silly frames for use with family images as well.

Another image turned into a B&W, but in this image I added one of many frames available in camera.
While flipping through the available filters, I noticed the camera included colour extract filters.
I enjoy looking for images that work with colour extract filters because they can be very effective. The image below shows how effective the “extract” filter can be if used successfully. One of my final images during the shoot was of two bright red Adirondack chairs beside a massive rock overlooking the garden. It was the perfect opportunity to use the color extract filter set to red. The camera turns the image into B&W and then “extracts” only the color the photographer stipulates in the image.
When faced with a situation like the one below, the extract filter is exquisite.
The image, a perfect ending to an overcast day in the rock garden.
For more images from the same outing, check out my post on three garden design tips from a public garden outing.

The Pentax point and shoot includes an extract filter that allows the photographers to choose a color that is extracted from the scene before it is turned into a B&W image. When used successfully, the resulting image can be extremely effective.
Author Profile: Vic MacBournie is a former journalist and author/owner of the award-winning website and newsletter Ferns & Feathers. He writes about his woodland wildlife garden that he has created over the past 25 years and enjoys sharing his garden photography with readers.

Rabbits in the woodland garden
Rabbits are a reality in any garden. They are sweet little beings that need a safe place to call home and why not make it our woodland gardens.

Rabbits can be a pain but if we plant enough for everyone they should not be a problem.
Our gardens need to welcome all critters big and small
Let’s face it, rabbits, like deer, are a reality in the woodland garden.
I’ve never had a “problem” with rabbits. Maybe it’s the fact that a garden in a natural state ensures that nothing really gets out of control. Sure, rabbits have dined on my plants and the bark of trees in winter, but I’ve never felt a need to do anything about them and, quite frankly, never would.
I think the key to dealing with rabbits and deer and any other garden nibbler is to plant enough to satisfy the needs of both the gardener and the wildlife that uses our gardens to survive, raise their young and live their lives in peace.
In our garden, we have hostas that every deer and rabbit seems to love. They are old style and came with the house. I plant them everywhere by dividing them regularly. The deer and rabbits are welcome to them. My hope is by offering them these hostas they will leave my other plants alone.
It works… to some degree.
Of course using plants that rabbits and deer don’t care for is a good first step. There are multiple posts on line listing plants that rabbits don’t eat. You can find a list of a few of the plants – both native and non-native – later in this post.
I’m sure our resident foxes, owls and possibly even the odd coyote take care – in short order – of any abundance of rabbits in the neighbourhood. They are also doing a good job with mice, rats and voles that decide to take up residence in the garden. For more on natural predators, go to my post on The Urban Fox.
I try not to get too friendly with any rabbit that appears in the garden knowing that it’s like not going to be here for the long term and keeping it as wild as possible may be the difference between life and death.
If a rabbit is causing you grief, it’s important to remember that they are prey for so many animals that their life expectancy is so short that there is a good chance that any damage they cause to plants is likely short lived.
According to the Audubon Society cottontails: “have a life expectancy of less than two years. Nearly half the young die within a month of birth, largely because cottontails are important links in many food chains.”
In fact, if you are looking to attract higher predators, rabbits will surely get the job done. Hawks, owls, fox, coyotes and a host of other animals consider rabbits fair game.
Enjoy them whenever you see them, but don’t get too attached to seeing them in the garden unless you like having your heart broken.
“I think the key to dealing with rabbits and deer and any other garden nibbler is to plant enough to satisfy the needs of both the gardener and the wildlife that uses our gardens to survive, raise their young and live their lives in peace.”
If you are “collecting” plants rather than creating a natural habitat, then a single rabbit family can cause havoc in the eyes of that gardener. Don’t be a collector of specialized plants if you live with rabbits, deer and other grazers. Or, if you must grow these prized plants, just give them proper protection.
Personally a garden dotted with small fences around prized plants has never looked very appealing to me. My motto is: “if it can’t make it on its own, it’s out. I’m not fighting Mother Nature. That’s not a win, it’s a lifelong battle. Yet so many gardeners choose to accept that lifelong challenge.

There are lots of ingenious ways gardeners have devised to protect plants to varying degrees of success.
My neighbour, for example, uses sticks poking up through hostas to keep deer from devouring them. I’m sure it helps to some degree and still has a more or less natural look.
Rabbits are a little more difficult to keep out of areas of the garden. Obviously, if you’re growing vegetables, a fence around the vegetable patch that goes deep underground should get the job done. If you only want a few veggies for the kitchen, one or two raised planters are another option worth investigating.
The raised planters may not keep deer, squirrels and raccoons out, but they do a good job with rabbits.
Always be kind to rabbits and other wildlife
The last thing we should be doing is going on the attack against these helpless garden visitors.
I remember being on a garden tour a few years ago and having to listen to a man bragging about what he does to rabbits that dare set up a home in his precious garden and dine on his prized plants.
It was enough for me to speak out and offer the man a few choice words he could take home to his precious garden.
Don’t be this type of gardener. Open up your garden to wildlife big and small and I guarantee the rewards will be so much more than watching a hosta bloom.
Ten Native plants rabbits stay away from eating
One of the problems with rabbits is that they seem to like everything that grows in our gardens.
There are, however, plants that these little critters are not interested in munching.
Here is a short list of native plants that should escape most rabbits.
Native plants play a crucial role in creating a sustainable and wildlife-friendly garden. When it comes to deterring rabbits, incorporating native plants that they typically avoid can be a smart strategy. Here is a list of 10 native plants to North America that rabbits don't eat:
• Echinacea: Also known as coneflowers, these colorful and drought-tolerant plants are not a favorite snack for rabbits. Check out my post on the Purple Coneflower.
• Black-eyed Susan: With their bright yellow petals, black-eyed Susans add a pop of color to your garden while repelling rabbits. Check out my post on Black-Eyed Susans.
• Butterfly Weed: As a member of the milkweed family, butterfly weed is unpalatable to rabbits but attracts Monarch butterflies and their caterpillars. Check out my earlier post on Butterfly Weed and Milkweed for monarchs.
• Wild Bergamot: This fragrant perennial, also called bee balm, is a native plant that rabbits tend to avoid. For more on Bergamot, check out my post on growing wild bergamot.
• Joe Pye Weed: With its tall, pinkish-purple blooms, Joe Pye weed is a rabbit-resistant plant that adds height to your garden. For more on Joe Pie Weed, check out my post on growing Joe Pye Weed.
• Goldenrod: A late-season bloomer, goldenrod is not on the menu for rabbits and provides a vibrant touch to your landscape. For more on Goldenrod, check out my earlier post on growing Goldenrod.
• Wild Columbine: The unique shape and colors of wild columbine flowers make them a beautiful addition that rabbits tend to steer clear of. For more, check out my post on Eastern Wild Columbine or Rocky Man Columbine.
• Cardinal Flower: This striking red flower attracts hummingbirds but deters rabbits, making it a great choice for a wildlife-friendly garden. For more, check out my post on Cardinal Flowers.
• Wild Ginger: With its heart-shaped leaves and subtle flowers, wild ginger is a native plant that rabbits are not interested in nibbling on.
• Virginia Bluebells: These delicate, bell-shaped flowers are not a preferred snack for rabbits, making them a lovely addition to your garden.
Non-native plants rabbits prefer not to eat.
• Marigolds: These colorful flowers not only brighten up your garden but also repel rabbits due to their strong scent.
• Geraniums: Another fragrant option, geraniums are known to deter rabbits from munching on your plants.
• Daffodils: While toxic to rabbits if ingested, the strong smell of daffodils usually keeps them at bay.
• Lavender: Its aromatic scent makes lavender a great addition to your garden as a natural rabbit repellent.
• Foxglove: Toxic to rabbits, foxglove is typically avoided.
• Lamb's Ear: The fuzzy texture of lamb's ear leaves is a deterrent.
• Onions: The strong flavor of onions/alliums is a turn-off for rabbits, making them a good addition to your garden.
• Garlic: Similar to onions, garlic's pungent taste repels rabbits from your plants.
• Catnip: While attractive to cats, catnip is known to repel rabbits due to its strong scent.
My close encounter with this cute bunny
My inspiration for this post came when I recently stumbled across this cute little fellow during a drive in the country looking for bluebirds and other spring migrants.
I noticed something ahead on the dirt road that appeared to be eating something. Once I got close enough, I recognized it as a small rabbit probably licking road salt from the winter’s salting program.
As I approached, it hopped to the side of the road. I would have drove off accept I noticed it sitting in the grasses on the roadside and, since I had my 300mm f4.5 resting in the passenger seat beside me, I decided to see if it would allow me to get some images of it from inside the car.
Sure enough, the little rabbit was not afraid and posed nicely for me for a few minutes before we went our separate ways.
Her calm and trusting disposition reminded me how sweet these animals are and how – whether they know it or not – they are threatened every minute of their lives by predators including we humans.
Let’s not be part of that stress in these sweet animals’ lives.
There’s no need to add gardeners to their already long list of predators. We can learn to live with them.
In fact, I would encourage you to invite these beautiful animals into your yard. Enjoy watching them and their families and embrace their cuteness.
Life is too short to worry about that prized hosta.
Author Profile: Vic MacBournie is a former journalist and author/owner of the award-winning website and newsletter Ferns & Feathers. He writes about his woodland wildlife garden that he has created over the past 25 years and enjoys sharing his garden photography with readers.

Adding Trilliums to your woodland or shade garden
There are more than 40 different species of Trilliums. Look to plant ones that are native to your area.

It’s hard to resist a scene like this downed birch tree literally surrounded by thousands of trilliums along Trillium Trail.
Memories of thousands of trilliums covering the forest floor
Trilliums were one of the first ephemeral wildflowers that caught my attention on the forest floor. At the time, we lived near a Provincial Park that included an area known as the Trillium Trail. I spent many summer evenings strolling along Trillium Trail looking for the perfect composition among the hundreds of thousands of trilliums.
As far as the eye could see were trilliums. I’ve not been back in a long time and I understand that the number of trilliums along the trail are down substantially. The decline was no doubt the result of a host of reasons not the least being the thousands of visitors deciding they would like a few Trilliums for their own gardens, to the natural decline of the habitat as the young forest matures. Click on the link for my earlier post on why we should NOT be picking or digging up wildflowers.
Trilliums are ephemerals that are meant to be enjoyed when our garden conditions favour them. An open woodland with a soil rich in humus is ideal for these showy white flowers. Plant them in clumps so you can appreciate them from afar.
Don’t make the mistake of planting them in a sunny area with poor soil. They likely won’t survive for more than a season or two and you’ll be wasting the opportunity to plant them in an area where they will thrive.

Our front yard several years ago with many white trillium clumps. Many of the trilliums have disappeared but a few remain having escaped the rabbits and deer.
Early in our woodland garden journey, I planted a number of trilliums in our front garden under the summer shade of a Crimson Maple. (see image above) That should have been ideal for the wildflower, but our soil was much too sandy to feed these wildflowers properly and encourage them to multiply into a mini Trillium Trail. Instead, the rabbits and deer likely chomped on them and most that escaped eventually gave in to the poor, sandy soil.
I should say, however, a few have survived and still continue to put on a little show in the spring. In the meantime, I’ve learned enough to plant any new Trilliums I purchase in the back where our soil holds much more organic matter and is ideal for trilliums and other ephemerals.
The rabbits and deer continue to take a toll on our trilliums, but I’m convinced I can get enough into the ground to revive, at least partially, that feeling I had of walking along Trillium Trail and feeling the magic of Ontario’s official flower carpeting the ground around me.
It’s hard to imagine a woodland without Trilliums.
Easily recognized by their three petalled white flowers surrounded by a whorl of three green leaves, these early spring bloomers have long been a favourite of gardeners looking to celebrate spring.

Example of a white trillium turning to its pink stage as it begins to fade in late spring or early summer.
Although there are more than 40 trillium species, with varying colours ranging from white to yellow, maroon and approaching nearly purple, most are familiar with the white trillium (T. grandiflorum).
If given proper growing conditions, Trilliums are relatively easy to grow and are long-lived in our woodland gardens. Provide them with an organic-rich soil that is well drained but kept moist all summer. The flowers will bloom early before the trees are all leafed out, and become dormant by midsummer.
Trilliums do not transplant well if they are dug up from the forest floor, so always purchase Trilliums from a reputable nursery.
Gardeners on a budget can propagate Trilliums from seed, but expect to wait up to five years before you begin to see blooms. Seeds sown in the garden will not even germinate until the second year. Propagating trilliums by rhizome cuttings or, even better, division when the plant is dormant is probably an easier way to go.
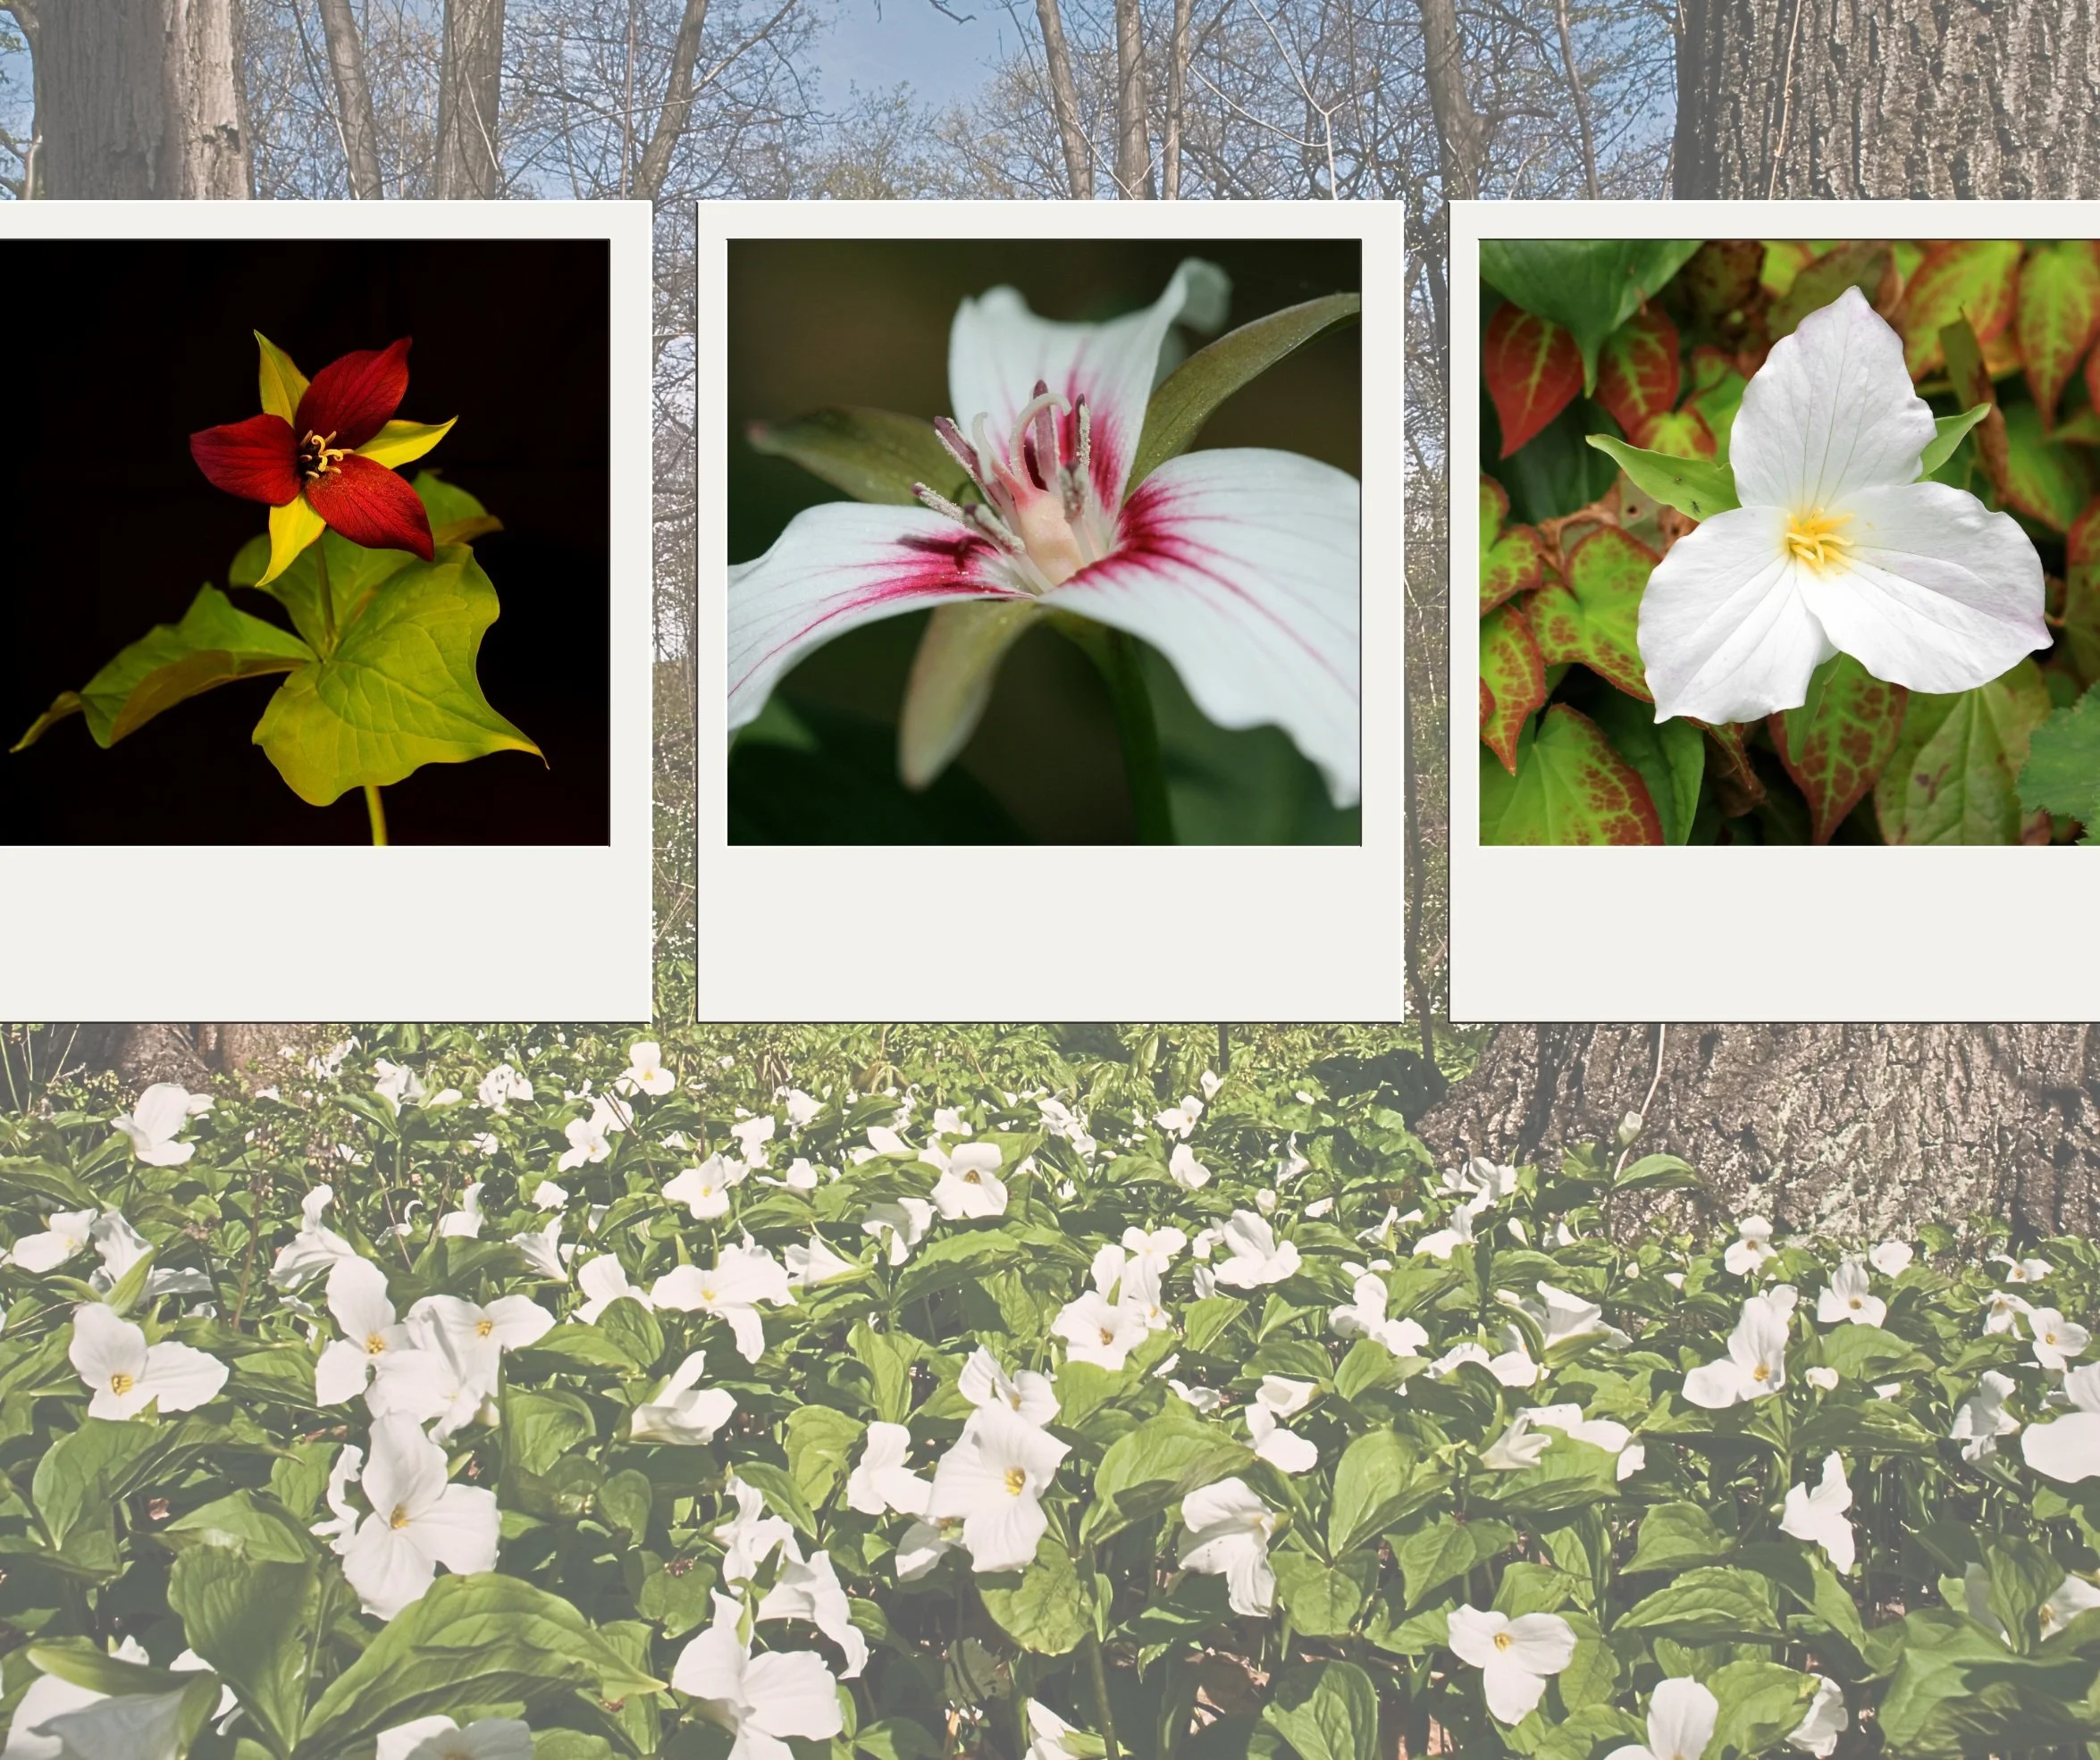
There are a total of 40 species of Trilliums to choose from, however, look for Trilliums native to your geographical area and growing zone.
What type of conditions are needed to grow trilliums successfully?
To grow trilliums successfully, it is crucial to provide the right conditions. Trilliums thrive in woodland settings with dappled sunlight and rich, well-draining soil. These plants prefer moist, humus-rich soil with a slightly acidic pH level. Adequate moisture is essential, especially during the growing season, but it's important to avoid waterlogged conditions that can lead to root rot.
Additionally, trilliums benefit from a layer of organic mulch to help retain moisture and regulate soil temperature. Planting them in areas with good air circulation can also prevent fungal diseases. It's recommended to avoid disturbing trilliums once they are established, as mentioned earlier in this post, they do not transplant well due to their sensitive root systems.
Overall, providing a shaded, moist, and nutrient-rich environment is key to successfully growing trilliums in a woodland garden.

This is an example of how the white trilliums begin to turn pink as they age resulting in some people thinking they have pink trilliums.
Can you grow trillium from seed?
To propagate trilliums, you can indeed grow them from seed. Collect mature trillium seeds in late summer or early fall when the seed pods have ripened and turned brown. It's essential to sow the seeds immediately as they have a short viability period.
Start by preparing a seedbed with well-draining, moist soil in a shaded area of your garden. Sow the seeds at a shallow depth, covering them lightly with soil. Keep the seedbed consistently moist but not waterlogged to promote germination.
Trillium seeds can be slow to germinate, often taking 1-2 years to sprout. Patience is key when growing trilliums from seed, as they require a period of cold stratification to break dormancy. This mimics their natural growth cycle in the wild.
Once the seeds have germinated, continue to provide the young plants with the ideal woodland conditions they prefer.
How long before trillium seeds produce plants?
Trillium seeds can be notoriously slow to germinate, testing the patience of even the most dedicated gardeners. On average, it can take anywhere from 1 to 2 years before trillium seeds produce plants. This extended timeline is due to the seeds' natural dormancy period, which requires a cold stratification process to trigger germination.
During this dormancy period, the seeds undergo a necessary chilling period to mimic the conditions they would experience in their native woodland habitats. This process is essential for breaking the seeds' dormancy and stimulating growth when conditions become favorable.
While the waiting period may seem long, the reward of seeing delicate trillium seedlings emerge from the soil is well worth the wait.
Author Profile: Vic MacBournie is a former journalist and author/owner of the award-winning website Ferns & Feathers. He writes about his woodland wildlife garden that he has created over the past 25 years and enjoys sharing his garden photography with readers.

How to plant a hanging basket
Hanging baskets are perfect opportunities to add a punch of colour to your patio.
Try these tips to create stunning hanging baskets
Planting a hanging basket is one of the more creative and satisfying gardening projects in spring. It can be as simple as planting a single, fast- growing plant like a Proven Winners’ Supertunia in a small hanging basket, or as complicated as adding a host of plants including numerous fillers, spillers and thrillers that combine to create a breathtaking hanging basket.
In our primarily shaded woodland garden, six hanging baskets play a vital role in providing much-needed colour in the garden. In fact, the combination of hanging baskets and containers placed throughout the garden are, at times, the only real colour brightening up our woodland.

Hanging baskets don’t have to be complicated. Using a single species can be an effective way to add colour to the garden. Here, three varieties of Supertunia create a cohesive look with a low maintenance approach.
The importance, therefore, of getting them right can be the difference in enjoying a colourful garden from spring through fall, or learning to appreciate the textures and varying greens so often associated with a shade or woodland garden.
There are basically three types of hanging baskets: steel baskets lined with a coco mat, plastic pots and peat-based pots. The plastic and peat planters are most often the ones purchased at nurseries already planted up. The peat based planters offer the benefit of looking good even before the flowers have spilled over the container, while the plastic container work well to retain water during the hottest days of the summer.
The steel baskets with coco mats are most definitely the most aesthetic of the group, but because water drains so freely from them, keeping them properly watered can be tricky requiring you to water them twice a day in the summer.
If you are planting your own, chances are you are using the steel planters with coco mats.
For more on container planting check out my story on creating container and hanging baskets for hummingbirds.

Consider your conditions
It’s important to establish the light conditions your planters will be in before you begin planning your containers.
While full sun in a hot dry climate like those experienced in Arizona is different from full sun in the Pacific northwest, the same general principles can apply. The difference is the time of day the plants are in the sun. In hot dry areas, provide the required sun primarily in the morning when it is not as hot. In the high humidity areas of the coastal areas or around the Great Lakes region where humidity can be extremely high that sun can be provided in the hotter parts of the day in the afternoon.
Rule of thumb is that full-sun plants need a minimum of six- to eight-hours of sun to do well and produce an abundance of flowers. Part sun, part shade want 4-6 hours of sunlight and full shade want 4 hours or less of sun to perform well and not have their foliage get scorched by the sun.

Hanging baskets are a great way to add a pop of colour to your patio, but don’t be afraid to hang them from tree branches farther out in the garden.
Size matters when it comes to containers
The next consideration is the size of your container. The larger 17-18-inch containers will retain a lot more moisture than the more traditional 14-inch containers which need to be watered several times a day during the heat of the summer. It’s always a good idea to add a perforated plastic liner inside the smaller containers to help it hold water longer. I use a a green garbage bag cut up to get the job done.
Start with new potting soil
It all starts with an excellent mix of fresh new potting soil, not garden soil. Be sure to completely clean out your old soil and coco mat and use all fresh soil and mat rather than simply topping up last year’s soil.
It’s no secret that keeping hanging baskets properly watered, let alone keeping them from drying out between waterings, is the biggest challenge most of us face. Water retaining granules may look like a simple solution, but they have their own inherent problems. While many garden nurseries advertise soil with built-in water granules that help hold moisture in the soil, the jury is still out whether these polymer-based granules are good for the environment. It’s probably better not to add these granules to your soil or purchase soil with these water-retaining granules already included.
Adding a slow release granular fertilizer to the soil gives the plants a good start and provides the fertilizer at the roots of the plants where they need it most to get a good start. You can top up the slow release fertilizer every six to eight weeks in addition to the weekly fertilizing with a water soluble fertilizer.

Although not a hanging basket, our window box features many of the plants that also work in a hanging basket, including Lemon Coral sedum, Supertunias, Superbells and coleus.
Getting started with your planter
Insert the coco mat into the basket and add potting soil until it is about one inch lower than the lip of the container. The number of plants to use depends on the size of the basket. The rule of thumb is that for a 14-inch basket you should use three to five plants (depending on the type of plant you are using.
For a 15- to 18-inch basket you should use between 5 and 7 plants.
When you are adding the plants, ensure that they are not root bound from the nursery. If they are, you can break up the roots a little before planting them.
Once they are in place, tamp the soil down around the plants to remove any air pockets, and water them in well.

By adding favourite plants such as these cuphea plants, you can attract hummingbirds and butterflies to your hanging baskets.
Let’s talk plants for hanging baskets
Let’s face it, preparing the pot is easy, choosing the plants for your containers can be the difficult part. Throughout this article I refer to specific plant names that are often associated with Proven Winners’ plants. Similar plant varieties are available from other sources, however I have had only positive results from Proven Winners’ products. Finding their plants, however, is not always the easiest of tasks. You can order directly from the Proven Winners’ website in the United States and Canada.
The options are too numerous to list here, but if you are planting several hanging baskets, don’t be afraid to experiment a little and have some fun. Last year, for example, I planted up a couple of containers and planters with hummingbird in mind so that I could photograph them at more or less eye level as they worked the hanging basket right near my favourite sitting spot.
To be successful, however, we need to first think about where our containers are going to be placed – in sun, shade or a combination of the two.
The other consideration is the amount of maintenance the plants require. Just keeping the containers well watered can be enough, having to go around and deadhead the spent flowers is only going to add to the maintenance. And, if it’s not done regularly, will result in a messy looking unkept basket that is too easy to give up on early in the year.
Plants like Proven Winners’ Supertunias and Superbells are excellent because they are self-cleaning, easy and fast growers. I have also found them to be good for attracting hummingbirds and other pollinators from native bees to butterflies.
Also look for lower-maintainenance plants that can stand up to drying out a little between waterings.

Adding Cuphea to your hanging baskets will attract hummingbirds to your hanging baskets.
Some sun loving plants to consider
• Petunias are available in a wide range of colours. Not all are created equal. Some stay small, while others grow fast into large plants that spill over the sides of your basket in short order. Supertunia Vista are the ones I always look for to plant in my containers and hanging baskets. Supertunia Vista Bubblegum is a favourite for its never-ending pink blooms. The Vista series grows huge whether they are in a basket or planted in the landscape. One supertunia vista in a 14-inch basket is often enough to fill out the basket beautifully all on its own. Make sure not to plant it with smaller, slower growing plants because chances are it will soon overpower that plant and bury it beneath its flowers.
• Calibracoa or Superbells are another favourite. They are also available in a variety of colours and can stand up to drier conditions for short periods of time.
• Trailing verbenas are exquisite plants that help make up the spiller component in your baskets. These can be the main plant in your container or compete with the likes of Supertunia Vista plantings.
• Lantana are heat-loving annuals that do well in dry conditions often found in our containers. They will not compete with the most vigorous of plants, and do not spill out quite like the Supertunias and Superbells, but they will perform nicely as colourful fillers in the container.
• Geraniums are classic container plants and excellent to use as your thriller. They can, however, get quite large and require some dead heading so you might want to think twice before using them in smaller containers or hanging baskets.
• Lobelias make for lovely fillers adding a delicate touch to a basket planted with less aggressive plants that allow these smaller plants to stand out. They make a nice accent plant but prefer cooler less intense sun than some of the other plants mentioned above.
• Lemon coral sedum is a great foliage plant that adds a chartreuse, lemony-yellow accent to containers.
• Potato vines in both black and green provide beautiful foliage accents to containers and baskets as they trail to the ground. They do require a little more care to ensure they get consistent moisture and do not dry out. Pairing them with plants like Calibracoa that like to dry out between waterings might not be the ideal situation for either plant. Always try to match plants with similar water needs in your containers.
•Euphorbias adds a delicate cloud-like effect to any container filling in areas around the crown of the basket or container.
• Alyssum has come a long way from the time your parents used them along a pathway. Today’s plants grow much larger and can be used as spillers or trailers in containers. The purple variety are exceptionally popular to add a pop of color.
Three strong foliage trailers for sun and shade to consider
• Creeping Jenny is another trailer that adds a hit of chartreuse to the baskets as they reach for the ground.
• Dichondrea Silver Falls is an icy blue plant that can take dry conditions and continue to perform well.
• Licorice vine (Helichrysum petiolare) is good to use in varying lighting conditions as it can take both full sun and shade. The Black Heart variety is particularly good for shady conditions.
Plants that do better in shade (4 hours of sun a day)
• Coleus is the ideal shade loving plant that depends only on its foliage for its striking look. Available in a host of colours, this is a must for the shade container. Coleus can grow quite large so you may want to look for smaller varieties. Chocolate Drop is a coleus with smaller leaves that trail and can act as both a filler and thriller in a smaller basket where it is not overwhelmed by large, more aggressive plants.
• Torenia or wishbone flower is a short plant with numerous flowers that can work well in baskets.
• Browalia is a popular choice, available in both blues and whites
• Begonias are an excellent choice. Trailing Begonias add a lot of colour and foliage interest. They are available in several varieties from trailing plants that can work as spillers to more upright varieties that work as thrillers. Look for varieties with outstanding foliage to add more interest to the container.
• Impatiens are not just for the landscape. Many varieties are available including some with interesting foliage.
• Heucharas or coral bells use foliage to add texture.
• Ferns can act as an ideal thriller for the summer and then planted into the garden in the fall if you choose a hardy version. Maidenhair fern may be perfect for a smaller shade container. If you are using ferns, ensure sure that the surrounding plants can handle the moisture levels ferns require.
• Trailing ivy works as a trailer. Look for an ivy with variegated foliage to add interest to your shade container.
If this leaves you totally confused, you can simply go to Proven Winners’ website and click on Garden Ideas. Use the filters to specify your requirements and tap into their valuable recommendations. You can follow their recommendations exactly or choose to experiment a little with plants that might be more your style or provide wildlife with a more sustainable source of food.
Author Profile: Vic MacBournie is a former journalist and author/owner of the award-winning website Ferns & Feathers. He writes about his woodland wildlife garden that he has created over the past 25 years and enjoys sharing his garden photography with readers.
Why we need more birch trees in our gardens
Birch trees are among the best trees for wildlife we can plant in our gardens. Not only ar they a beautiful addition, they are also important for wildlife.
Are birch trees good for wildlife?
No matter how much I love dogwoods, it’s the birch trees that take centre stage in our woodland garden.
Three large clumps of White Birch create the main focal point in the backyard, whether you’re outside on the patio or looking out the bay window from the kitchen/dining room. I decided to plant the trees quite close to the house directly in front of the windows so we could experience everything they bring to the garden winter, summer, spring and fall.
The mini birch grove creates a secluded spot surrounding a dry river bed and small bubbling rock. For more on our birch grove and bubbling rock, check out my earlier post here.
A male cardinal sits in our birch tree in spring.
While the elegant peeling bark and white trunks create the aesthetic appeal, it’s their attractiveness to birds and other wildlife that makes them true stalwarts in the garden.
Birds often sing from the tree’s elegant branches where, in spring, if you’re lucky, you can catch a warbler chasing insects around the tree branches. In summer, our birch trees make the perfect landing spot for hummingbirds that rest on the delicate branches in the open shade the trees create.

Birch trees are an elegant addition to any garden whether they are used as a single specimen, in clump form or en-masse as seen above.
“Birches are excellent sources of food for wildlife. Not only do they support several hundred species of moths and butterflies, they also produce seeds and flower buds that are important food sources for songbirds, small mammals, grouse and turkeys. Species with exfoliating bark provide lots of nooks and crannies in which insects hide in the winter months and thus provide woodpeckers with food when they need it most.”
Even in our front yard, I’ve created a spot for three narrow-growing birch trees (Betula pendula 'Purpurea' ) that work perfectly as an attractive buffer between us and our neighbours’ properties. I remember planting the trees at least ten years ago when they were nothing more than $10 whips. Since then, these fast-growing trees have grown into handsome specimens that have kept their narrow, shape while taking on their white trunks.
Birch trees, of course, are highly valued in gardens for their aesthetic appeal and their ability to attract diverse wildlife.
Their striking white bark and delicate leaves add a touch of elegance to any garden landscape, making them a popular choice among gardeners.
In his book The Natural Garden, Ken Druse writes about the non-native ‘Whitespire Birch’: “Many birch species have problems, but the beauty of their bark and their overall form make them desirable as specimens. … Plant several against a backdrop of evergreens. Because they are are relatively short-lived (50 to 70 years) consider planting a second some fifteen to twenty years after the first.”

This birch tree clump and native grasses shows how beautiful the trees are in every season.
Birch trees’ role in attracting wildlife
Beyond their beauty, birch trees play a crucial role in supporting wildlife populations.
The unique characteristics of birch trees make them a magnet for various bird species, such as chickadees and finches, that are drawn to the trees for both food and nesting sites. Additionally, birch trees provide a vital food source for insects, caterpillars and butterflies, further enhancing the biodiversity of the garden ecosystem and creating a built-in food source for birds.
It’s hard to argue that by planting birch trees in our gardens, we not only enhance the visual appeal of our outdoor spaces but also create a welcoming habitat for a wide range of wildlife. The symbiotic relationship between birch trees and wildlife underscores their value in garden settings, making them a cherished addition for both nature enthusiasts and garden lovers alike.
What birds are attracted to birch trees and why?
Birds are attracted to birch trees for a variety of reasons, making them a hub of avian activity in our garden.
The trees provide a valuable food source for birds, with their many small, winged seeds contained in the droopy catkins early in spring, followed by the leaves budding out, and the myriad of insects and caterpillars attracted to the trees.
You can expect species like the American Goldfinch, Purple Finch, Pine Siskin, Chickadees, Fox and Tree Sparrows and even Ruffed Grouse to drop by to feed on the seeds produced by the trees in spring.
But, of course it’s not just the seed eaters that are attracted to the trees.The real value of the birch tree are the insects that are drawn to them. Experts have documented several hundred species of Lepidoptera (moths and butterflies) that utilize birch trees.
In fact birch trees are host plants for butterflies like the Mourning Cloak as well as incredible moth species like the Cecropia, Polyphemus and the Luna Moth. The trees, therefore, are important to both the moths and butterflies as well as the birds that count on a good supply of these caterpillars to feed their nestlings.

Soft uplighting on the white birch can turn your yard into a magical experience.
Wherever there are insects and caterpillars, it’s likely you’ll find woodpeckers as well. Our birch trees attract more than their share of woodpeckers to the yard. While it can be a little disconcerting watching them peck away at your favourite tree, remember that they are actually doing you and the tree a favour by removing many of the potential borers before they can do damage.
In his book Bringing Nature Home, author Douglas Tallamy explains the importance of birch trees in our gardens adding that the tree supports more than 320 species and 413 Lepidoptera (moths and butterflies). Birches are not the top tree in the food chain, but they are among the best behind only oaks, willows and cherry/plums on the list of best trees to support wildlife.
Tallamy’s book points out that Birches are one of the host plants for the magnificent Tiger Swallowtail butterfly as well as the impressive Cecropia Moth, Imperial Moth, Luna Moth, Polyphemus Moth, Promethea Moths, Four-horned Sphinx Moth and Small-Eyed Sphinx moths. He adds that only the Arched Hook Tip moth and the Chocolate Prominent lepitdoptera survive only on birch tree leaves.

Please do not spray your birch trees if you see caterpillars on your Birch tree. They are totally normal inhabitants on the trees and an important food source for birds, especially in spring when they are feeding their young.
Tallamy writes: “Birches are excellent sources of food for wildlife. Not only do they support several hundred species of moths and butterflies, they also produce seeds and flower buds that are important food sources for songbirds, small mammals, grouse and turkeys. Species with exfoliating bark provide lots of nooks and crannies in which insects hide in the winter months and thus provide woodpeckers with food when they need it most.”
In our backyard, the cardinals like to use our birch trees to survey the area before moving in to the bird feeders or one of the many bird baths.
Our backyard birds rely on the trees not only for sustenance but also for nesting sites. As the trees get older, they can even be home to larger birds such as Great Horned owls.
The dense foliage and branches of birch trees offer a safe and secure environment for many birds to build their nests and raise their young.
What insects and butterflies benefit from birch trees?
Birch trees play a crucial role in supporting a diverse array of insects and butterflies within garden ecosystems.
These trees are particularly essential for the survival of various insect species, including the striking Mourning Cloak butterfly and the iconic Luna Moth. Additionally, birch trees provide a vital habitat for caterpillars such as the Eastern Tiger Swallowtail and the Viceroy butterfly.
In terms of insects, the birch tree serves as a host plant for the Bronze Birch Borer beetle, which plays a significant role in the decomposition process of decaying wood.
Furthermore, the Birch Leafminer moth relies on birch trees for its larval stage, contributing to the intricate web of interactions within the ecosystem.
Overall, the presence of birch trees in gardens not only enhances the visual appeal but also fosters a thriving community of insects and butterflies, highlighting the importance of these trees in supporting biodiversity and ecological balance.
What are the different species of Birch trees available?
Birch trees are known for their diversity, with several species offering unique characteristics and benefits to garden ecosystems. One of the most prominent species, native to northeastern U.S. and Canada, is the Yellow Birch (Betula alleghaniensis).
This species stands out for its distinctive yellow bark and its ability to thrive in cooler climates, making it a popular choice for gardens in these regions.
Another notable birch species is the Paper Birch (Betula papyrifera), recognized for its striking white bark that peels in thin layers, adding visual interest to garden landscapes. This species is well-suited for areas with moist soil conditions, making it a valuable addition to gardens near water features or wetlands.
“Many birch species have problems, but the beauty of their bark and their overall form make them desirable as specimens. … Plant several against a backdrop of evergreens. Because they are are relatively short-lived (50 to 70 years) consider planting a second some fifteen to twenty years after the first.Whatever it is, the way you tell your story online can make all the difference.”
Additionally, the River Birch (Betula nigra) is a favored choice for its unique exfoliating bark that reveals shades of cinnamon, cream, and salmon underneath. This species is particularly resilient to various soil types and can tolerate wet conditions, making it versatile for different garden settings.

Birch tree clump with Canada anemone and native grasses.
Is the river birch the best birch tree for our gardens and why?
The River Birch (Betula nigra) is indeed considered one of the best birch tree species for gardens, and for good reasons.
Its unique exfoliating bark, showcasing shades of cinnamon, cream, and salmon, adds a visually appealing element to garden landscapes.
Moreover, the River Birch is highly adaptable to various soil types and can thrive in wet conditions, making it a versatile option for different garden settings. Its resilience to wet soil conditions sets it apart from other birch tree species, allowing it to flourish near water features, ponds, or wetlands without compromising its health.
Additionally, the River Birch provides valuable habitat and food sources for wildlife, attracting birds, insects, and other beneficial creatures to garden ecosystems.
How large do birch trees grow?
Birch Trees grown in favourable conditions can get quite large reaching from 30 to 65 feet high (9-19 meters) with a spread of 15-30 feet (4.5-9 meters). Birches are fast-growing, short-lived (50-70 years) trees, that do best in natural areas away from high-stress situations.
What conditions do birch trees like to grow?
Birch trees prefer well-drained soil that is moist but not waterlogged. They also appreciate full sun exposure, although some species can tolerate partial shade.
Birch trees’ shallow root system can be very sensitive to heat and drought. The trees need moist, cool soil, but also sunshine on its leaves to flourish.
Plant your birch tree at a site that will shade its roots in the afternoon but still provide sun to canopy for a good part of the day. Mulching also helps to maintain soil temperature.
Another crucial factor for birch trees is soil pH. They prefer slightly acidic to neutral soil, with a pH range between 5.0 and 7.5.
Additionally, birch trees are sensitive to drought conditions, so regular watering, especially during dry periods, is necessary to keep them healthy. Mulching around the base of the tree can help retain moisture and regulate soil temperature, benefiting the tree's growth.
By providing the right soil conditions, adequate sunlight, and proper watering, gardeners can create an optimal environment for birch trees to thrive and enhance the beauty and biodiversity of their outdoor spaces.
Author Profile: Vic MacBournie is a former journalist and author/owner of the award-winning website Ferns & Feathers. He writes about his woodland wildlife garden that he has created over the past 25 years and enjoys sharing his garden photography with readers.

Wolverine Scanner review: Revisiting your old images
Today’s film revival has caused many of photographers to look into different ways to scan their old slides or negatives. The Wolverine system and other all-in-one scanners are worth investigating.
Simple scanner converts slides and negatives to digital
If you’re like me and have boxes or binders full of old slides and negatives collecting dust in the basement, you might be thinking of the best way to turn them into digital images.
A quick look on Amazon, Ebay or one of the many on-line photography sites turns up a host of options from flat-bed scanners that include slide and negative attachments, to small, stand-alone scanners that store the scanned images directly on to an SD card, eliminating the need for hooking into a computer to scan the images.

This image, originally shot on slide film, shows how well the Wolverine F2D can capture former analogue images whether they are slides or negatives.
There are more expensive scanners that look promising and there are even devices that allow you to duplicate your analogue images into digital with your existing digital camera and macro lens.
There is also the option of sending your favourite slides or negatives away to be done professionally. These companies will either email the scans to you or put them on a CD or DVD which can then be pulled into your computer or smartphone.

This image of ladyslipper orchids scanned reasonably well despite the higher-than-normal contrast.
The choices can be overwhelming and, depending on what you decide, can get quite expensive. The results too, are not always what you were expecting.
Years ago, I used a dedicated Canon slide and negative scanner to convert my slides to digital and the results were excellent. Unfortunately computer upgrades made the scanner obsolete unless I purchase an older computer with a SCSI outlet. The options today may be more numerous but not necessarily as good.

The key to success and ultimately satisfaction is deciding how you intend to use the finished scan.
If you simply want to convert the images for sharing with friends and family or on social media, you might be surprised about how little “quality” is required to get an acceptable image.
A few years ago I purchased an older, inexpensive Wolverine F2D (film to digital) all-in-one scanner to convert some of my favourite slides into digital images to share both on this website as well as social media.
This image shows some of the weaknesses of the scanner and it’s inability to capture the details in the reds and yellows of this scene.
Newer, more expensive Wolverine scanners such as the Titan 8 in 1, 20 megapixel high resolution film to digital converter, promise much better results with a wide array of film sizes from 35mm, to 127mm, and even 110mm. I have not tested these but if the results are as promised they appear to solve many of the weaknesses I experienced with the much lower resolution older unit.
The revival of analogue film cameras and lomography make these Wolverine scanners much more interesting and useful for today’s modern film shooters. Older models like the one below are available on Ebay and other on-line retailers for very reasonable prices.

The older Wolverine F2D digital scanner proved to be useful to convert older slides and negatives, even if the quality was not always ideal.
The Wolverine system of “scanners” boasts simplicity of use and on that note I give them top marks. All you need to do is drop in an SD card, pop four slides into the holder, push them in to the scanner, watch for the flashing orange light in the small colour window on the front of the unit where the image is shown, and press the red button twice. Voila. The digitized image is sent directly to the SD card in seconds, which can later be transferred to your computer. The same process, more or less, is carried out for scanning negatives. The whole scanning process takes seconds rather than minutes. In addition, no software is necessary to convert the negatives or slides into jpegs, making the whole system convenient and simple for those who just want to convert their old images to digital as simply as possible.
Providing the slide/negative is clean and you are not particular about the quality of the image, your work may be done. However, if you are looking for a clean, high-quality image that is a proper representation of the original image, your work may be just beginning.
I notice that on some of the on-line reviews, some users say the images that come out of the scanners are unuseable. My experience shows that this is not necessarily true and, that with a little work, most of the images are acceptable, some are very good and a few are pretty much unusable.
However, to say a good working knowledge of Lightroom or Photoshop is necessary to achieve these results, would be an understatement. Much post-processing work is often necessary to obtain acceptable results. In addition, I find E6-processed slides such as Fujichrome or Extachrome scan much better than Kodachrome. In fact, Kodachrome slides are often unusable no matter how much work is done on them.
Using the provided tool to clean the scanning bed is critical to reduce the amount of post processing necessary to clean the images.
The following are just a few images scanned on the Wolverine F2D and post processed in Lightroom.

This field of Goldenrod in selective focus is an example of a slide that was scanned successfully with the Wolverine.
This image of Goldenrod in selective focus is the type of image that converted easily from analogue to digital with minimal post processing. Its lack of extremes makes it a good candidate for scanning. Images with high dynamic range become extremely difficult to capture and the result is either burned out whites or blocked up blacks that can make the image unuseable even for most social media posts.
A major problem you’ll face with these inexpensive all-in-one scanners is that the final file size is small. On my scanner, I’m barely getting a jpeg file size over 1 megabyte. That just isn’t enough to work with. If there is any real serious post processing required, the image is just going to fall apart and make it unuseable.
However, if the original scan is good, it’s likely that you can get a very useable image.
The rusted car door below is a good example of how high-quality scans are possible with this unit. Colours are excellent and very true to the original with only minimal post processing.

An all-time favourite image of a rusted automobile in a classic car graveyard scanned beautifully with the Wolverine showing that impressive colours are possible with the Wolverine scanner.
Printing these images beyond 4x6 would be interesting and likely not result in satisfactory images for most people looking for a high-quality print. But I really don’t think these scanners were meant for anything more than sharing on social media or with friends and family.
The speed and simplicity of scanning hundreds of slides or negatives in short order is very enticing, but if at least a third of them are really not usable for most of us, then I think you have to take a hard look at whether you should purchase one. Newer models offer more options and a larger finished image size so they may provide much better results on more difficult images.
Let’s look at a few more successful images.

This wild geranium with ferns required more post processing than I wanted but the results are satisfactory.

A visit to Pt. Pelee resulted in this image of a warbler which the Wolverine captured nicely.

The Wolverine F2D captured these vivid colours beautifully along with the frost.

This fawn in the forest is an example of the scanner falling a little short.

Although this image may look acceptable, the scanner struggled to capture the pinks of the cherry tree and the much darker trunk of the tree. A considerable amount of post processing helped save the image, but still falls short compared to the original slide.

This is a good example of how the Wolverine scanner captured the image but struggled to deal with the extreme white feathers around the Great Horned owl’s head. For many of us, this may not be a problem, but for those looking to get the most out of their old slides and negatives, this scanned image falls short.
Should you purchase an all-in-one scanner?
I want to say everyone should purchase one of these scanners to convert their old slides and negatives into usable images for social media or sharing with families. However, there are many negatives which stop me from recommending these scanners to everyone. If you are looking for the ultimate scan quality, these are probably not for you. If post processing is not your thing, these may not be for you.
Dust is a big problem, and the amount of post processing in Lightroom or some other program to get usable results with some images makes me want to think that it may be too much for some.

These frosted ferns were captured nicely on the older Wolverine F2D all-in-one scanner.
If you are looking for consistent high-quality results, one of the flat-bed scanners by Epson might be a better but more tedious choice. If you have no experience in post processing or hate spending time on the computer, you either have to accept the results or opt for a flat-bed scanner with built-in software that removes dust.
However, if you enjoy post processing and cleaning up your favourite images then one of these scanners might just do the trick. The fact that you don’t have to attach it to your computer means you can sit down and watch your favourite Netflix shows while you scan hundreds of older images to an SD card.
That convenience and ease of use might be enough to convince you to invest a small amount into rescuing your old images.

2024 Gardener’s Idea book: A sure sign of spring
Proven Winners’ 2024 Garden Idea Book is another impressive and informative booklet gardeners will want to get their hands on as soon as possible.
Order your free Proven Winners’ booklet or download it to get started right away
You know spring is around the corner when Proven Winners’ unveils its popular Garden Ideas book.
This year’s free booklet is another impressive effort filled with inspiring photographs of real-life garden ideas ranging from using annuals for high impact colour, to creating colourful containers. For woodland gardeners, there is even a section on their favourite deer resistant plants.
All valuable information to go into the spring season ready to create the best garden ever.
Whether you choose to order a hard copy (sign up here) of the more than 40-page booklet, or simply download it and enjoy it from the comfort of your laptop or computer, you’ll find all the information you need at the Proven Winners site here.
For more posts on past PWs’ Garden Idea Books:

Jazzing up the curb appeal with supertunias is featured on the cover of this year’s Proven Winners’ Idea Book.
The feature garden on the cover takes a jazzy, free-form approach to the garden with a pleasant combination of rocks, boxwood, ornamental grasses, a lovely container arrangement and massive plantings of Supertunia Vista Jazzberry Petunias.
Proven Winners’ calls it jazzing up the curb appeal and although it’s a little much for my taste, most gardeners will love the easy-to-duplicate look. Supertunia Vistas are extremely fast-growing and spreading annuals that I’ve used for years in my hanging baskets for maximum impact.
It’s hard to go wrong with Proven Winners’ Vista series – available in several colours and colour combinations. I’ve had great luck with their Bubblegum Vistas that add a hit of pink in the woodland garden in hanging baskets and in containers around the patio. While there are better flowers to attract hummingbirds and butterflies, the petunias get the job done.
In typical Proven Winners’ style, the booklet provides plenty of images complete with schematics of how the containers were planted. If your hanging baskets often fall a little flat, PWs’ creations are not only beautiful but PWs’ are quick to share their secrets right down to the number of plants in a basket.
From Supertunias to Superbells
Proven Winners move on to their second favourite hanging basket fillers in the form of Superbells, which is really their name for the more commonly named Calibrachoa.
The wide ranging selection of double Superbell varieties from pure white, through blue, violet, ruby, orange and yellows, makes them an ideal choice for gardeners looking to add a delicate touch to their containers and hanging baskets.
Other features include spread on the use of Caladiums, especially for more tropical gardens from Arizona to Florida that experience ever increasingly intensive high heat during the summer.
Proven Winners says their “Heart to Heart® ‘Lemon Blush’ flourishes in unrelenting heat and shade all season and looks fabulous doing so. Its vibrant tropical foliage shines in contrast to spikier drought tolerant plants characteristic of hot climates, contributing lush texture and color to patio pots and entrance beds.”
I’ll be trying some of those this year in some of our shadier locations.

From flowers to garden writers and Influencers
Eight garden influencers, including Laura from Garden Answer, California’s Janey Santos from @DigPlantWaterRepeat and Floridas Josh and Jose from @Mr.Gardeners are featured over eight pages.
Moran Amos’s (@coffee.and,chlorophyll) rural Wyoming garden covering zone 5A Northern USA and Eastern Canada, is another featured garden. Her garden is described by Proven Winners as a “zone 5a, rural Wyoming “Gusty Garden” is ripe with bountiful produce, happy birds and bees, and the occasional passing moose which really riles up her hunting dog, Hadlee. With only 90-120 frost-free
days in the Mountain West, she makes the most of every moment. In addition to growing many hardy perennials, Morgan enjoys trying out new annuals each summer.”

Got deer problems? Proven Winners has a number of suggestions for deer resistant plants to consider.
Perennials and shrubs of the year
Proven Winners’ announces their favourite plants of the year including a yellow-bluish variegated hosta and lovely salvia.
Pink Profusion perennial Salvia is a beauty worth trying to get your hands on this season. Proven Winners describes it this way: “Prolific and Perpetual. Enjoy vibrant pink flower spikes in multiple waves through summer. One of the best salvias of its type for the South and a must-have for drawing in pollinators.”
There are more favourites, of course, including a rose, hydrangea, weigela and sweetspire.

Here’s a great idea for those homeowners struggling with how to improve the look of a privacy fence.
More PWs’ Idea Book features
The booklet wraps up with features on garden planning and design, the resurgence of bicoloured and patterned flowers and a feature on vertical gardening with @CaseyLynnLawrence who uses seven small window boxes to create an impressive and beautiful vertical garden for a wood fence.
The finished result is simply spectacular (see image above) and worth considering if you are one of the many homeowners stuck looking at a wooden privacy fence all summer.
The booklet ends with a feature on houseplants and Proven Winners’ deer resistant plants.
A word of note about Proven Winners. Although their plants perform incredible well, they are cultivars and are not considered native plants and therefore do not offer the same benefits that native plants offer our wildlife. Some of their plants are particularly attractive to hummingbirds and butterflies, particularly their salvias, however, they should never replace the use of native plants when they are available.
Author Profile: Vic MacBournie is a former journalist and author/owner of the award-winning website Ferns & Feathers. He writes about his woodland wildlife garden that he has created over the past 25 years and enjoys sharing his garden photography with readers.
How to attract screech owls to your woodland wildlife gardens
Screech owls are popular visitors to suburban woodland gardens and are beginning to increase their numbers in Canada, in part, because more homeowners are installing nesting boxes on their properties. Screech owls are among the smallest in North America but they eat more than their share of mice and rats making them a favourite for woodland gardeners.
What do screech-owls sound like? Where do they live?

A screech owl peers out of its home in our garden in the evening just as the sun sets.
I know they’re here. I’ve heard them. Many times.
And now, a few years later, I’ve finally seen one in the garden. I suspect they’ve been around all this time but they are not all that easy to see. Sundown and sunset are the most likely times to see them, but even then their natural camouflage makes them almost impossible to spot.
Plenty of nights when I take our dog Holly out before bedtime, we’ve heard them calling out – screeching, if you will. It’s a little eerie at times when you are not expecting it, but it’s music to my ears now that I can identify the call. (Link to screech owl vocalizing.)
It’s not exactly a screech, more a whinny like a horse and trilling, but it could be mistaken for a Screech if you’re alone in the middle of the night in a forest.
Eastern Screech owls are not large.
Many people even mistake the robin-sized nocturnal woodland owl with short ear-tufts and yellow eyes, for fledgling Great Horned owls when they notice them in their neighbourhood. Not that they are easy to notice in the first place. Not only do they blend into the forest, their nocturnal habits make them a rare sighting if you are not making a conscious effort to find them.
These small owls, however, can be more common in your neighbourhood than most may realize.

Screech owls are wonderful little birds to have in your yard. By putting up a specialized house for them, you may be able to attract them into your yard. In these images you can see both the red and grey versions of the owls.
Where do screech owls live?
The Eastern Screech Owl, a common species found east of the Rockies, can be spotted in a variety of habitats including woods, suburbs, and parks. These adaptable birds are not picky when it comes to their living arrangements and can even be found nesting in larger backyard nest boxes.
Their ability to blend seamlessly into their surroundings makes them difficult to spot during the day, so it’s best to listen for their distinctive calls at night.
Geographically, the Eastern Screech Owl’s range extends from the Rocky Mountains to the Atlantic coast, covering a vast area from southern Canada down to Florida and southern Texas.
In fact, these adorable little nightbirds are quite common throughout Eastern United States as far south as Florida, including parts of southern and central Ontario into Manitoba and Saskatchewan.
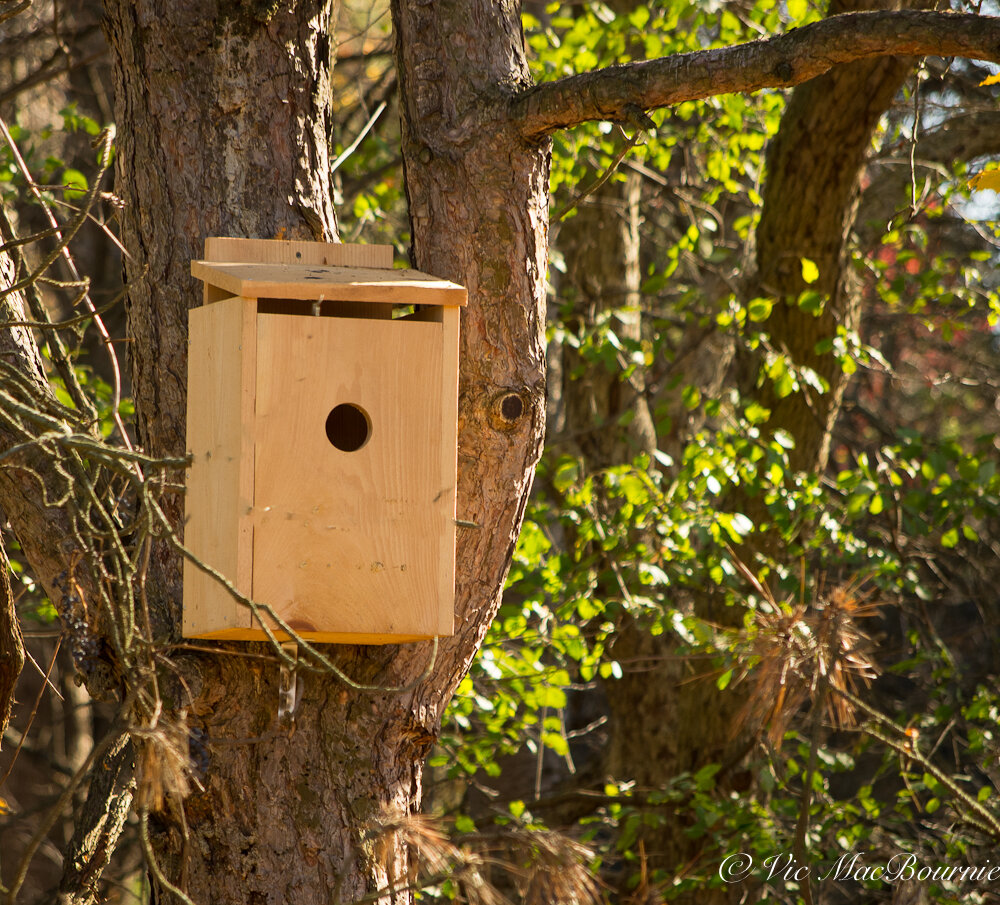
One of our screech owl boxes installed on a mature pine just waiting for its first homeowners.
Although these little guys are still widespread and fairly common, they are gradually declining in parts of their range. If there is good news in climate change, it is that the Screech owl is slowly expanding its range farther into Ontario, Manitoba and Saskatchewan and even into Alberta.
In Canada, this species is a year-round resident, with the majority of the population concentrated in southern Ontario.
Whether it’s in the dense woods, the quiet suburbs, or the bustling parks, the Eastern Screech-Owl has managed to adapt and thrive in a wide range of environments. So keep your eyes peeled and your ears tuned in as you never know when you might catch a glimpse or hear the haunting call of these elusive birds.
The North American Breeding Bird Survey estimated that between 1966 and 2015, the number of Screech owls increased in Canada, but declined in the United States. But of the estimated 900,000 global breeding population, 95 per cent live in the U.S., 4 per cent in Mexico and a mere 1 per cent in Canada.
Cool facts about Screech Owls
Screech Owls are the smallest owls in North America
In some parts of the U.S. including Texas, Screech owls use small blind snakes to keep their nests free of insects while they are raising their young. A study showed that owls that brought these small snakes (more like a worm than a snake) into the nesting area had fewer insects like ants, termites or larvae. Researchers found that the snakes proved beneficial to the young owls who were found to have fewer health problems and a better chance of survival. (Click here if you want more information about the collaboration between the owls and snakes.)
The tips of flight feathers of the Screech Owl are serrated and, as a result, their flight is almost silent and allows them to swoop down on unsuspecting prey.
Screech owls have such an acute sense of hearing they can find small mammals such as mice under very heavy snow or vegetation. This makes them successful hunters in all seasons.
Their large eyes give them excellent eye sight at night, but because of the position in the front of their heads they are able to move their heads 270 degrees in either direction. This gives them the ability to see in an almost complete 360 degrees.
During the day, Screech owls conceal themselves in trees, their plumage camouflaging them against the bark. If they feel extremely threatened, they will make themselves appear very thin, squint their eyes and sway back and forth to imitate the natural movements of a branch in the wind.
Owls represent wisdom in early Indian folklore
These owls were considered protectors in ancient Greece mythology and accompanied Greek armies to war.
If you are looking for Screech Owls, natural woodlands with an open understory are an excellent place to start, and a woodland garden rich in native plants and trees can be the perfect spot for a couple of screech owls to call home.
The abundance of native plants and trees will help attract insects which form a large part of the Screech owls’ prey made up of small mammals, birds and reptiles.
You’ll also find Screech owls in the small woodlots around farms where the hunting is good for field mice – one of their favourite prey.
They generally favour deciduous or mixed woods with plenty of open ground for hunting. Wooded areas along streams and rivers also provide prime habitats for these owls. Suburban yards and city parks can be ideal places for them to take up residence provided there are large trees and nesting cavities.
Unfortunately, homeowners remove many of the owls’ natural nesting holes when they remove dead snags from their yards. Thankfully, nesting boxes have taken over where natural nesting holes have been removed.
Nesting boxes are said to be part of their success story and expansion of the owls’ range.
I recently picked up two large home-made boxes (see photo above) which have been installed about 15 feet up in two trees in our woodland garden. One of the boxes found a home in our mature Austrian Pine.
Owl boxes, although on the large side compared to traditional blue bird boxes, are available at some specialized wild bird stores as well as through Amazon. JCs wildlife screech owl box is even featured in this you tube video and comes highly recommended.
It’s never too early to get your boxes out to give the owls an opportunity to discover them.
Screech owls are secondary inhabitants of nesting sites so they are always on the lookout for a new home.
They can often be found nesting in former woodpecker or squirrel tree cavities. Breeding season for Eastern Screech Owls is generally around mid April, but it can range from mid March through to mid May.
The elaborate courtship ritual begins with the male enticing the female by calling from a variety of branches until they are close. This is followed by what can only be described as a scene out of a 1980s disco hall with the male bobbing and swivelling his head and entire body as he slowly winks at the female. If the female ignores him he takes his dance moves to an even higher level, if she accepts, they touch bills and begin preening each other. Pairs pretty much mate for life.
When do Screech owls nest
The nestling period is between 26-30 days and incubation can be between 27-34 days. The hatchlings are born with eyes closed and covered in white down.
When on the nest, the female remains in the nest except for brief excursions at dawn and dusk.
The male provides the female and nestlings with all the food, while the female rips and tears it into small bits for the babies.
Both parents provide food for young owls, who leave the nest about 4 weeks after hatching.
Their diets vary from small animals, including birds and mammals as well as earthworms, insects, and pond inhabitants like tadpoles, frogs and lizards where available. Rats, mice and squirrels, moles and even rabbits are on their lists as well a birds including birds as large as jays, grouse doves and woodpeckers. They’ve even been known to cache extra food in tree holes, when prey is plentiful in the area.
Adults tend to remain near their breeding areas year-round, where the males defend small territories around nest sites. Breeding territories range from 4 to 6 hectares (10-15 acres in wooded suburban areas. Territories are much larger (200 acres) in open rural areas.
Captive Screech owls can live up to 20 years, while wild birds live much shorter lives. Predators include larger owls such as the Great Horned Owl, minks, weasels, raccoons, skunks, snakes, crows and Blue Jays.
Where to install your owl nest box
The nesting boxes need to be installed in large mature trees between 6-30 feet high. They should be mounted in an area that affords a clear flight path in and out of the box as well as nearby branches where the fledglings can make their way to after immediately leaving the nest. Mounting the box in a southerly direction is ideal but an easterly or western exposure has also proven successful. A northern exposure is not advised.
It helps to have an uncluttered understory for the owls to successfully hunt.
Author Profile: Vic MacBournie is a former journalist and author/owner of the award-winning website Ferns & Feathers. He writes about his woodland wildlife garden that he has created over the past 25 years and enjoys sharing his garden photography with readers.
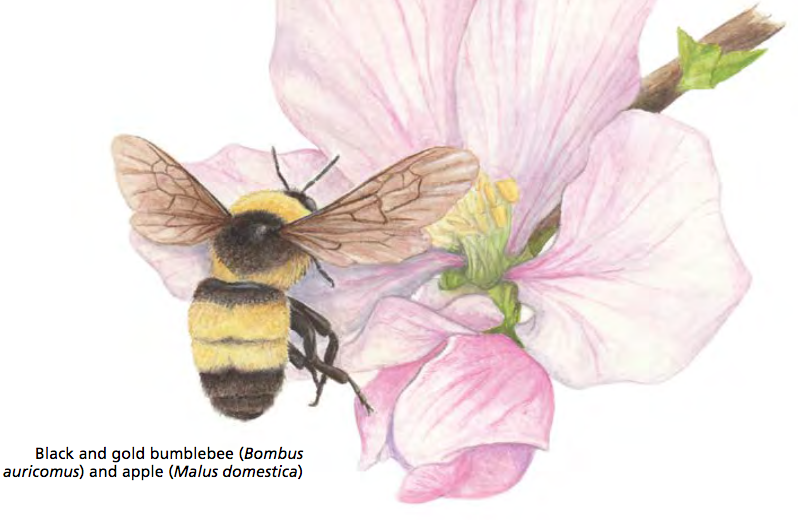
A Garden for the Rusty-Patched Bumblebee: Creating Habitat for Native Pollinators
A Garden for the Rusty-patched Bumblebee is a bible for native gardens in the Great Lakes region.

A native Bumblebee covered in pollen works the flowers of a beauty berry.
A Garden for the Rusty-Patched Bumblebee: Creating Habitat for Native Pollinators by Lorraine Johnson and Sheila Colla (2022 paperback) 250pp Douglas & McIntyre
Authors explore benefits of using native plants in our gardens
Native plant gardening – once a bastion for former tree-hugging hippies – is fast becoming an acceptable almost trendy form of gardening from inner cities to suburbia and from beginners to seasoned gardeners.
And that’s just fine with garden authors Lorraine Johnson and researcher Sheila Colla whose informative and entertaining gardening book, A Garden for the Rusty-Patched Bumblebee, is all about promoting the use of native plants to create habitat for pollinators.
But they’re not kidding themselves about the amount of work still ahead.
While the use of native plants in gardens is fast becoming more commonplace, the gap between non-native and native plant gardeners remains a massive problem that threatens the future of pollinators that depend on native plants for their continued existence.
A Garden for the Rusty-Patched Bumblebee is aimed at narrowing that gap and bringing more gardeners into the fold, while providing existing native plant gardeners with a blueprint on how to explore native plants and gardens to a fuller extent.

A Garden for the Rusty-Patched Bumblebee is an outstanding addition to any gardeners’ library.
At the heart of the book, is the detailed profiling of more than 300 native plants, (over 250 pages) along with sample garden designs, ideas for beautiful plant pairings and numerous tips for success. All of this valuable information is meticulously illustrated by Ann Sanderson’s incredible artwork.
This beautifully-illustrated plant guide is so detailed that it connects each plant with its pollinators and the hosts (caterpillars and insects) that depend on the plants to mature into adulthood as bees, butterflies and other insects. This feature in the book will go a long way to helping gardeners discover the crucial connections between native plants and native pollinators, and learn how to cultivate patches of pollinator paradise.
“There is much about the natural world that science has yet to discover and understand, but one thing we do know is that native plants and native pollinators form systems of association that are vital to supporting all life on earth,” the authors write. “When we plant native plants, we are supporting and strengthening this web of connections—supporting and strengthening ecological relationships that have functioned for millennia.”

Ann Sanderson’s outstanding illustrations add a touch of elegance and creativity to the book.
Although the authors focus is on native plants and pollinators of Ontario and the Great Lakes region, it is a must-have for native plant gardeners looking to better understand the relationship between plants and their pollinators.
“When we fill landscapes with introduced, non-native plants, we are severing crucial, dependent relationships between native plants and wildlife that have evolved over millennia,” the authors write. “These partnerships and interdependencies support all life on Earth, including us.”
“Non-native plants may provide pollinators with some of the resources they need, such as nectar, but not the pollen or other resources (oils, for example) that specialist bees require, nor the host plants that moth and butterfly larvae require.”
And speaking of specialist bees.
That’s where the title of the book comes into play. The Rusty-Patched Bumblebee has not been seen in Ontario since 2009 when co-author Sheila Colla happened to catch a glimpse of one while searching for it as part of her research work at York University in Toronto.
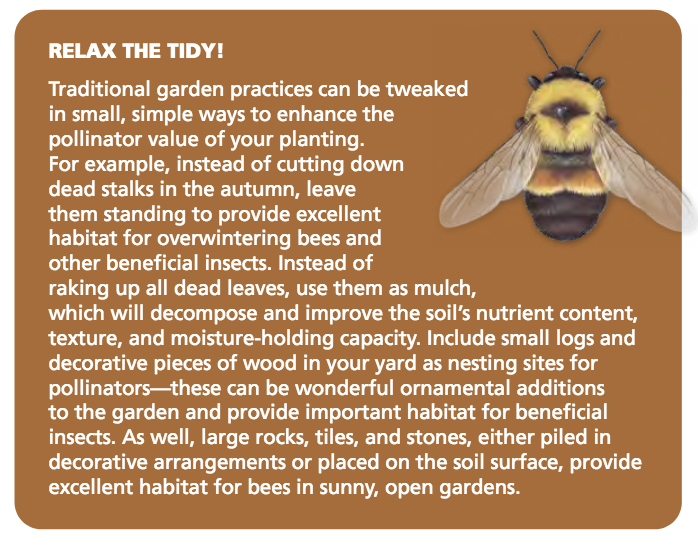
Illustration by Ann Sanderson.
The authors hope the sudden disappearance of this native bee once common in the area should be an awakening call for scientists and a call to action for gardeners.
“There has been a lot of interest lately in honeybee-keeping as a way to help pollinators. However, starting a honeybee hive does not help save wild bees, any more than keeping backyard hens helps save wild birds,” the authors write. “There is a growing body of scientific studies documenting that non-native honeybees are negatively affecting native bees”
Johnson and Colla are hoping gardeners realize the importance of helping our native bees, and they are more than willing to provide the blueprint for gardeners.

This Illustration by Ann Sanderson is an example of the many gardens provided to readers, complete with native plant suggestions.
Designing your patch of native garden
While the plant profiles form the root of the book, the detailed plans and helpful suggestions will be the catalyst to inspire gardeners to put their shovels to work. The authors even go so far as to offer advice on how to design your native plant garden. Here’s just a sampling of the advice Johnson and Cola provide in the book.
• Choose native plants according to your conditions: sun, partial sun/shade, or shade; moist, regular or dry soil.
• Plan to have a diversity of continuous and overlapping blooming periods, from early spring to late fall, with three species in bloom at any one period.

• Include a variety of flower colours and flower shapes—for example, tubular blooms, cup-shaped blooms, etc.
• Consider the eventual height, spread, and flower colour of each plant, and decide on a design that appeals to you.
• Design in groups with three to five plants of each species, in clusters, to produce abundant foraging opportunities.
• Space the plants roughly 1 to 2 feet apart, depending on the mature size of the species, because many native plants will greatly expand in size over their first few years of growth and will crowd each other if planted too closely together.
From designing your native plants to maintaining the finished garden
• Keep your newly planted patch well-watered for the first growing season—especially during periods of drought. In the following years, you will only need to water during extended periods of drought when the plants are showing signs of water-deficiency, such as wilting. Keep in mind, though, that some wilting during hot summer days is to be expected, and plants will bounce back.
• Remove any unwanted plants (for example, aggressively spreading non-native plants) as soon as they appear, and be careful not to pull out young volunteer seedlings of native plants.
• Mulch your plants to help control weeds and retain soil moisture, but ensure that your patch includes some areas of bare soil for ground-nesting bees.
• Consider deadheading spent blooms to encourage more f lowering—and thus more nectar and pollen for pollinators.
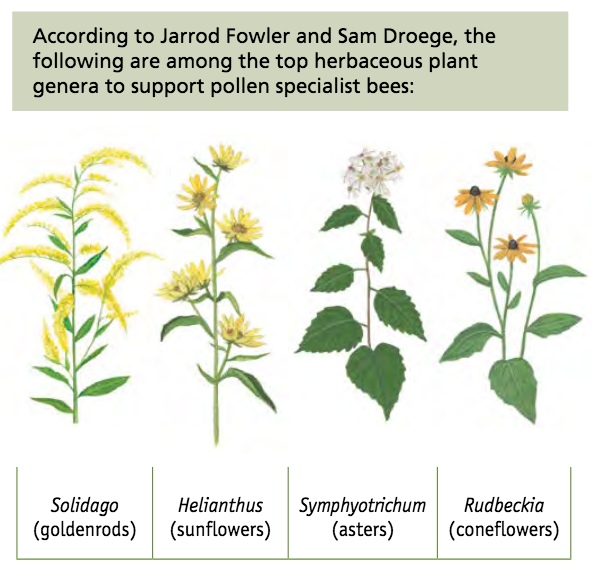
Illustration by Ann Sanderson.
• Don’t use pesticides (they are toxic to bees and other creatures). In Ontario, the cosmetic use of pesticides (which includes herbicides and fungicides) is banned.
• In the fall and winter, leave stems and dead stalks on plants rather than removing them, as they provide habitat for overwintering bees. In the spring, it is best to wait until there have been two or three weeks of warm daytime temperatures (above 10 C) before cutting back stalks, to give bees time to emerge. But if you decide to cut the stalks before then, cut them only to about 30 cm (12 in) to 40 cm (15 in) tall.
• If you do remove stems and stalks in the fall, bundle them up and keep them in an out-of-the-way place as overwintering habitat. Do the same with stems and stalks you remove in the spring, as bees might not yet have emerged following winter
Of course, this is just a sampling of the information the authors provide readers within their book.
• More information on the importance of native bees in my post here.
There are illustrations of example gardens – from those that can be set up on a small balcony, to gardens for the sun and shade. The book includes sources for native plants and seeds as well as resources for more information on native plants. There are tips and tricks, as well as proven practises to ensure success.
It’s clear that authors Johnson and Colla tackled this project out of love and the genuine hope that the book can make a difference.
In an interview with Gail Hope for Landscape Ontario, highly acclaimed garden author Lorraine Johnson explains her hope for the book.
“My hope for the book is that we help people understand some very complicated issues in a very straightforward, basic, and engaging way,” Johnson explains.
“I hope it also inspires people to action: planting a pollinator patch (even a tiny one), or adding a few native plants to a non-native garden, which is mainly what people have. If we inspire people to add a few native plants to their garden then they will see all of the butterflies, bees, and birds that the native plants support. However, individuals can do all this but if we are in a place that doesn’t value the natural greenspace and just paves it over, we’ll still be in trouble. We can create habitat until we are blue in the face but the losses are going to be greater than the gains without political and policy changes as well.”
Be sure to check out my posts on author Lorraine Johnson’s work with native plants here:
• Lorraine Johnson: Early pioneer for native plants
• Native gardening from meadows to woodlands
Lorraine Johnson: A longtime leader and advocate in native plant gardening
Lorraine’s passion for gardening and expertise in the field is evident in the numerous books she has written on the subject. Her books cover a wide range of topics, providing valuable insights and practical advice for gardeners of all levels of experience.

Lorraine Johnson is leading the way in educating gardeners about the importance of native plants.
• One of Lorraine’s notable works is “100 Easy-to-Grow Native Plants for Canadian Gardens.” This book highlights the beauty and benefits of using native plants in Canadian gardens. Lorraine explores the unique characteristics of each plant, including their adaptability to local climates and their ability to attract pollinators. This book serves as a comprehensive guide for gardeners looking to incorporate native plants into their landscapes.
•Another popular book by Lorraine is The New Ontario Naturalized Garden. In this book, she delves into the concept of naturalized gardening and its benefits for both the environment and gardeners. Lorraine provides practical tips on creating a naturalized garden, including plant selection, maintenance, and design principles. This book is a valuable resource for those interested in creating sustainable and wildlife-friendly gardens.
• Lorraine has also written City Farmer: Adventures in Urban Food Growing, which explores the growing trend of urban agriculture. In this book, she shares stories and experiences from urban farmers across Canada, showcasing the innovative ways they are growing food in cities. Lorraine’s book inspires readers to embrace urban farming and provides practical advice for starting their own urban food gardens.
Lorraine’s work is groundbreaking because it addresses emerging trends in gardening, such as urban agriculture. Her book, City Farmer: Adventures in Urban Food Growing, highlights the innovative ways in which urban farmers are growing food in cities. By showcasing these practices, Lorraine inspires readers to reimagine the possibilities of gardening in urban environments and encourages them to take part in the urban farming movement.

Sheila Colla has been researching native bee ecology since 2004.
SHEILA COLLA
Sheila Colla is an Assistant Professor in the Faculty of Environmental Studies at York University in Toronto.
She has been researching native bee ecology and decline since 2004. She works closely with environmental non-governmental organizations (ENGOs) and government agencies to implement the best available science in policy and land management.
She co-authored The Bumblebees of North America: An Identification Guide (Princeton University Press, 2014) and helps run the citizen science program BumbleBeeWatch.

Ann Sanderson’s exquisite art work is featured throughout the book.
ANN SANDERSON
Ann Sanderson has had a lifelong fascination with both science and the arts.
After completing an undergraduate degree in Zoology and Biology from the University of Toronto, she attended the Science Illustration program at the University of California in Santa Cruz.
Ann honed her skills as an illustrator while working in New York at Scientific American magazine and the American Museum of Natural History.
She is now a freelance illustrator in Toronto where she enjoys gardening and visually documenting the plants and wildlife of the city. Ann’s work can be found at annsciart.com.
Author Profile: Vic MacBournie is a former journalist and author/owner of the award-winning website Ferns & Feathers. He writes about his woodland wildlife garden that he has created over the past 25 years and enjoys sharing his garden photography with readers.

Pentax Q and Mount Shield Lens: A lomographers’ dream?
Combining the diminutive Pentax Q and the 07 Shield Mount Lens makes for an interesting lomography camera and lens combination.
This spring image shows many of the unique characteristics of the Pentax Q 07 Shield Lens that takes on the personality of both a Lensbaby and a lomography camera. Although the plastic lens renders the image mostly soft and out-of-focus, it is capable of obtaining extreme sharpness in central parts of the image.
Lens combines lomography and lensbaby effects
Is it possible that the Pentax Q is the ultimate lomography camera?
Purists would scoff at the idea that a digital camera – even one as quirky as the miniaturized Pentax Q – could ever be considered a leader in the world of lomography. But team it with the quirky 07 Mount Shield Lens or any number of vintage lenses, and lomographers might just be forced to take a little closer look.

Flowering Dogwood taken with Pentax Mount Shield Lens.
After all, lomography is all about using cheap plastic film cameras with low resolution plastic lenses together with even lower resolution and bizarre film stocks. It’s inspired by analog techniques of vintage lenses and embraces lens distortions, light leaks, and other quirks as part of the creative process. Lomography encourages playful and spontaneous shooting and values the aesthetic qualities of the photographs that result from these techniques.
All this in the pursuance of creating artistic images with equipment that makes the finished result extremely difficult to predict.
That doesn’t sound much like the traditional Q line of cameras and lenses.

This image taken with the Pentax Mount Shield Lens and some post processing has a lomography look to it that I think works nicely.
• If you are looking for a Pentax Q, the Mount Shield Lens or any other piece of hard-to-find photographic gear, be sure to check out KEH Photographic for an outstanding selection of used equipment at great prices.
The Pentax Q was first released back in June 2011 as a highly refined, extremely well-built miniaturized digital camera in an impressive magnesium body that could be paired with its own line of high-quality lenses. It is capable of capturing incredibly sharp images in RAW or jpeg. In fact, Pentax was so concerned about obtaining the highest quality resolution that it was one of the first camera makers to remove the anti-aliasing filter from the sensor to improve sharpness.
Doesn’t sound much like the cheap plastic Diana cameras from Hong Kong’s Great Wall Plastic Co. and Russia’s Holga cameras that led the charge and resurgence into lomography.
But stay with me and we’ll try to explain the link between the Pentax Q and lomography
In the meantime, if anyone doubts the re-emergence of shooting film and the use of very low-fi film cameras, just check out this lomography.com website. It’ll change your mind in a hurry. It may also introduce you to a new style of photography.
So, how does all this relate to the Pentax Q?

Pentax Q with 07 Mount Shield Lens attached. It’s not hard to see how tiny the combination is and how easy it would be to simply slip into your pocket and take anywhere and everywhere.
Pentax releases Mount Shield Lens
Back in 2013, just about the time lomography was experiencing another resurgence, Pentax released the 07 Mount Shield Lens for the Q series of cameras. This low-fi, pinhole-style body cap lens was an interesting departure from the line of high-quality lenses released for the Q and set the stage for Pentax Q users to begin turning their trusted miniature mirrorless cameras into digital lomography gems.

The Pentax 07 Mount Shield Lens captured these children playing in a fish pond. The overall softness of the image especially toward the edges of the scene helps to give the image a dreamy look.
One look at the Pentax Q Facebook group I belong to and it’s not hard to see that Q users, whether they know it or not, are using the camera to capture lomography-style images with vintage lenses, including the little plastic Mount Shield Lens.
Pentax’s Mount Shield lens (or 07 as Pentax labels it) is certainly a low-cost, low-fi plastic lens that has been described as either the “worst lens ever made or the best body cap lens ever made.” It has a fixed focal length that comes in at 11.5mm (63.5mm equivalent on the original Q slightly wider on newer Q versions). The aperture is fixed at f/9. There’s no need or way to adjust aperture, and the focus is fixed around 0.5m (20 inches), so no need to focus. Since the lens has a relatively small f/9 aperture, Pentax says this allows objects as close as 0.3m (almost 12 inches) to about 2m (more than 6 feet) to be in focus. (Your experience may differ depending on your lens.)
The shield lens may have been one of the first, but the world of mirrorless cameras opened up a long list of vintage lenses that work on the Pentax Q – many of them with dubious quality – but all of them with a quirkyness that perfectly fits the lomography style.
Okay, so what in the world is this “lomography” style all about? Although in its purist form, lomography involves using cheap plastic 120mm film cameras and lenses, there are many iterations that now include using proper – even modern – film cameras with specialized lenses that give odd or pleasingly soft bokeh among other characteristics. In fact, many of these highly specialized, beautifully made lenses are quite expensive( see the art lenses website). Other lomo shooters prefer to use traditional lenses with specialized lomography films which can be purchased at the lomography.com website.

Pentax Mount Shield lens can create some lovely flower images with a Lensbaby look.
We only need to look at the ten golden rules of lomography to begin seeing a connection with the Pentax Q.
Always carry your camera with you so as not to miss chances of capturing spontaneous images.
Shoot in whatever light is available to get more unpredictable and “artsy” images.
Make photography (lomography) a part of your every day life.
Try to capture spontaneous moments like that we see in street photography. Shoot from the hip and have fun.
Don’t be afraid to get up close to your subject.
Try not to overthink your shots – just shoot and check out the results later.
Always be ready to capture moments in time rather than technically perfect images.
Experiment and embrace the unknown without expectation
Take time to assess results at a later time.
Most importantly have fun and break the rules.
So how does the Q-series line up with these golden rules of lomography and make the Pentax Q a digital lomography camera extraordinaire.
The Pentax Q has always been thought of as a fun camera; one that is so small you can take it anywhere and everywhere with you, and one that encourages a creative approach with its myriad of built-in filters including a separate setting for bizarre blur effects. You can play with the colour settings or go bold contrast black and white at the twist of a button. It’s small sensor means noise is likely if the camera is pushed to extremes and, when paired with the Shield lens or vintage lenses, lomography-style photographs are at your fingertips.

This image shot with the Mount Shield lens on the Bold Monochrome setting of the Pentax Q shows the focus on the hands of the baby Buddha while the rest of the image goes soft toward the edges of the frame.
Like many of today’s specialized lomography film stocks, there are built-in filters to create mono-colour images.
But, most importantly, it’s the ability to mount exquisite 50-year-old cinematic lenses on the camera to capture that highly-sought after vintage look. How about mounting the miniature Pentax 110 lenses released back in 1978 on the Q to capture images with a vintage look.
For more on using Pentax 110 lenses on the Pentax Q check out my extensive post here.
With a few adapters, the list is almost endless.
And, what makes the Q system even more exciting, is that you are not having to pay for the added expense of buying and developing modern lomography film.
Speaking of lenses, if you want to see some exquisite lenses created for lomography, check out these at the Art Lens website.
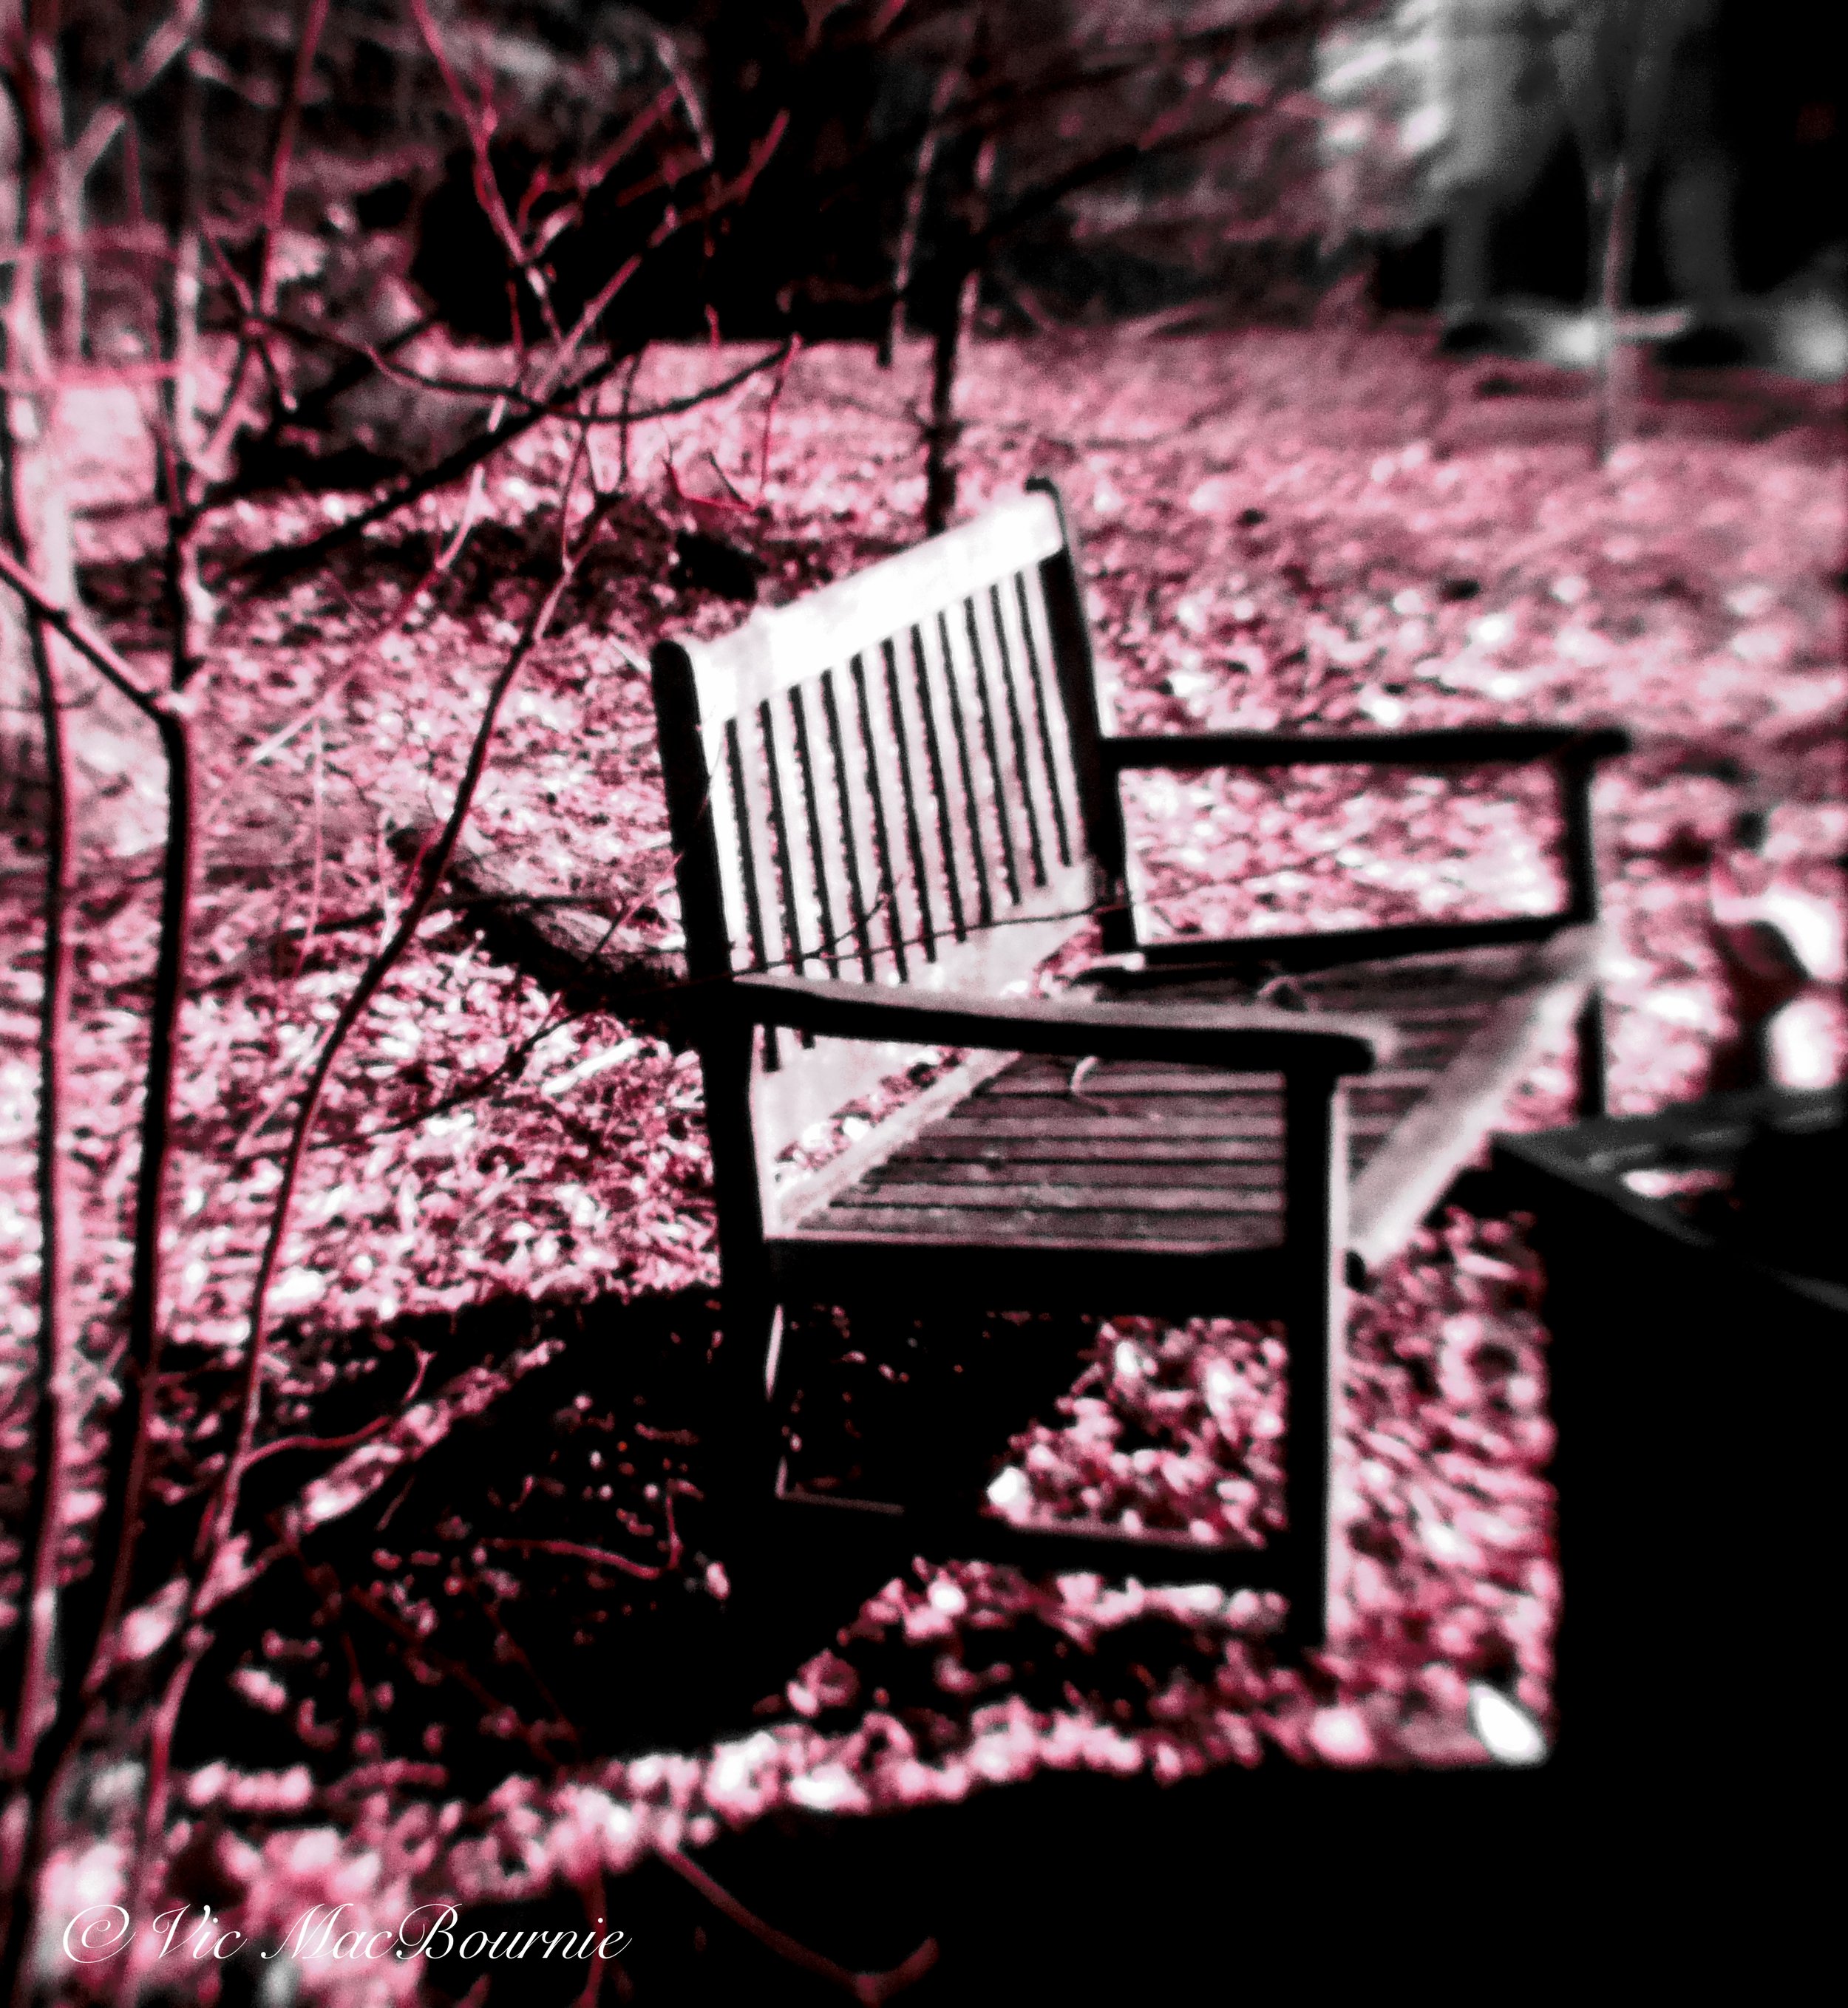
In this image, one of the many filters was used to create a lomography film effect with the Shield lens.
Shooting with the Shield lens
Everything that makes the Mount Shield lens a lomographers’ dream, also makes it appear difficult to use. Most of us are looking for sharp, technically correct images from edge to edge. That’s not what you are going to get with the shield lens.
Expect the unexpected. Odd, out-of-focus areas on your images, possible fringing, sharp central focus with softness spreading out to the edges… just to name a few. If you are using it for landscapes, chances are the entire image will be soft. Put something close to the lens in the focus zone and let the landscape drift out of focus for cool effects.
If you are taking photos in the garden, move in close to capture interesting effects similar to the style of images you may get with a Lensbaby.
Hello, World!
Combined with the many filters available in the camera and the separate blur control setting opens up a new world to photographers looking to experiment with their images.
And, after all, isn’t that what lomography is all about? Pop the shield mount on a Pentax Q and you’ve got a miniaturized camera that you can take anywhere and everywhere. There is no way to focus the lens, so shoot from the hip in whatever light you have. Experiment with filters – bold monochrome is a favourite. Try the extract colour filter which creates a B&W image that pulls out a single colour out of the image. The possibilities are endless.

This silhouette of a tree was photographed with the Pentax Q and Mount Shield Lens on the Bold monochrome setting.
Experience the joys of lomography
I know that a Pentax Q teamed with the Shield Lens or vintage lenses will never replace the joy purists have of shooting lomography film with a cheap plastic camera and lens. But the experience of shooting with an unpredictable lens in the pursuance of creative images is one that most photographers will surely enjoy and, more importantly, benefit from photographically as they push their creativity to new levels.
The fact that you can easily carry the combo around with you in a coat pocket makes it the ideal combination for photographers looking to capture their everyday surroundings.
Is it a lomographers’ dream camera? Probably not. But can it introduce digital shooters to a new creative process where pixel peeping is unheard of, mega sensors are of no importance and quirky is cool again.
Absolutely.
The Lomography Society International was founded in 1992 to promote the use and appreciation of analog photography. Today, the brand offers a wide range of cameras, films, and accessories and a community of enthusiasts who share their work and experiences online.
Author Profile: Vic MacBournie is a former journalist and author/owner of the award-winning website Ferns & Feathers. He writes about his woodland wildlife garden that he has created over the past 25 years and enjoys sharing his garden photography with readers.

Best flowering native ground covers for a woodland garden
Groundcovers are vital to any woodland and a key to creating a thriving garden with lots of interest.

Foamflower, with its white or pink spring flowers, is an idea woodland ground cover that spreads into impressive drifts.
Creating a thriving woodland garden requires incorporating native ground covers and, if they include a lovely flower, all the better. Three top choices for native ground covers in a woodland garden are Wild Ginger, Foamflower, and Allegheny Spurge.
Of the three, foamflower is by far the showiest providing delicate white or pink flowers in spring that look especially impressive growing in a large, natural-looking drift.
Wild Ginger, known for its heart-shaped leaves and unique maroon flowers, thrives in shaded areas, making it a perfect addition to the understory of a woodland garden. Its low-growing nature creates a lush carpet effect, adding texture and visual interest.
Foamflower is a versatile ground cover that can tolerate varying light conditions. Its attractive foliage and ability to spread make it an excellent choice for filling in gaps between larger plants in a woodland setting.
Be sure to check out a few of my other posts on groundcovers
• Best ground covers for a woodland garden
• Easiest ground covers to grow
Allegheny Spurge, also known as Pachysandra procumbens, is a hardy native ground cover (unlike the popular and more common Japanese Pachysandra) with attractive green and silver variegated leaves. It thrives in partial to full shade and produces small, white flowers in early spring, adding a pop of color to the garden.
These three native ground covers not only enhance the beauty of a woodland garden but also provide essential habitat for local wildlife, making them valuable additions to any naturalistic landscape.
Looking for more information on ground covers? The Complete Book of Ground Covers (Amazon link) is an excellent resource. It may also be available from your local bookstore.

Wild ginger boasts an unusual but certainly less impressive flower than the foamflower. It’s leaves are the hi-light of these native ground covers.
More ground covers to consider
If you are more open to other ground covers, there is a huge selection available for both sunny and shady locations
Ground covers play a crucial role in enhancing the beauty and functionality of our gardens. They provide a lush carpet of foliage and flowers that not only adds visual appeal but also helps to suppress weeds and retain soil moisture.
By covering the ground, these plants create a cohesive look in the garden, tying together different elements and creating a sense of unity.
Additionally, ground covers offer practical benefits such as erosion control on slopes, reducing the need for frequent watering, and acting as a natural mulch to protect plant roots. They can also attract beneficial insects and pollinators, contributing to a healthier ecosystem in your garden.
Choosing the right ground covers can transform a dull, bare patch of soil into a vibrant and dynamic space bursting with color and life. Whether you opt for low-growing varieties to fill in gaps between larger plants or use them to create a living pathway, ground covers are versatile and adaptable to various garden styles and conditions.
Incorporating these plants into your garden not only adds aesthetic value but also promotes sustainability and biodiversity.
Five of the best spring flowering ground covers
When it comes to spring flowering ground covers, there are several standout options that can bring a burst of color to your outdoor space.
One excellent choice is “Creeping Phlox,” a low-growing perennial that produces a carpet of delicate flowers in shades of pink, purple, white, or blue.
Another top contender is "Aubrieta," a hardy plant with cascading blooms in vibrant hues like purple, pink, and blue.
For a more unique touch, consider "Candytuft," a plant that forms dense mounds of white flowers, creating a stunning contrast against its dark green foliage.
“Moss Phlox” is another spring favorite, offering a carpet of colorful blooms that attract pollinators to your garden. Lastly, “Basket-of-Gold” is a bright and cheerful option with golden-yellow flowers that add a pop of color to any landscape.
These spring flowering ground covers not only enhance the beauty of your garden but also provide essential ground coverage and help maintain soil health. Consider incorporating these vibrant plants into your outdoor space for a stunning spring display.
Five of the best summer flowering ground covers
If you are looking for later, summer flowering ground covers, there are lots to choose from.
One exceptional choice is the “Blanket Flower,” known for its striking red and yellow daisy-like blooms that attract butterflies and bees.
Another standout option is the “Ice Plant,” a succulent ground cover with bright, daisy-like flowers in shades of pink, purple, orange, or yellow.
For a touch of elegance, consider planting “Lantana,” a versatile ground cover with clusters of flowers in hues of pink, orange, yellow, and purple that bloom throughout the summer.
“Verbena” is another top contender, producing clusters of small, fragrant flowers in various colors like purple, pink, red, and white, attracting pollinators to your garden.
Lastly, “Creeping Jenny” is a low-maintenance ground cover with cascading stems and small yellow flowers that add a pop of color to borders and containers.
These summer flowering ground covers not only beautify your outdoor space but also help suppress weeds and retain soil moisture, making them a practical and visually appealing choice for your garden.
Evergreens play a key role in the woodland garden creating vertical structure and a strong presence throughout the seasons.